Swift Regex Deep Dive
iOS MacOur introductory guide to Swift Regex. Learn regular expressions in Swift including RegexBuilder examples and strongly-typed captures.
Siri is Apple’s intelligent personal assistant. Siri allows you to use your voice to interact with your iOS, watchOS, tvOS, and macOS devices. As with many Apple technologies, Apple has made it easier for developers to integrate their apps with Siri through SiriKit. This series explores SiriKit and how you can use it to expose your app’s functionality through Siri. Part 1 provided the basics. In part 2 we explored Resolve, Confirm, and Handle. Finishing touches were discussed in part 3. Now we’ll look at how a custom UI can strengthen your app’s presence and brand in Siri.
Apple provides so much (Intents) framework, making it relatively easy for developers to expose their app’s functionality through Siri. While this customizes Siri’s behavior to your app, Siri’s UI remains functional but generic. To increase your app’s impact on the user, your app can opt to provide a custom UI for Siri. This optional custom UI can supplement Siri’s UI or completely replace it. You can decide what information to show the user – including showing information Siri may not normally show, like per-user information – and couple it with your app’s branding and familiar UI. Providing a custom UI can make your app’s Siri integration stand out, and it’s done by creating an Intents UI Extension.
Custom Siri UI is provided by creating an Intents UI Extension. The Intents UI Extension works in conjunction with your Intents Extension, providing a view controller which can display information about the interaction. The two extensions do not directly communicate; the UI Extension receives information by way of an INInteraction object, which will be explained below.
There are a couple of ways to get started:
If you already have an Intents Extension and wish to add a custom UI for it:
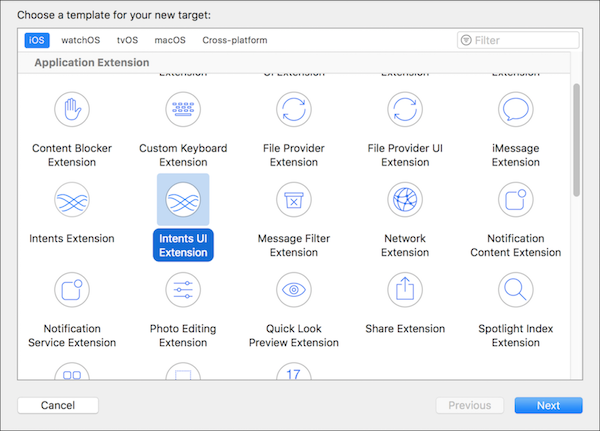
If you are creating a new Intents Extension and want custom UI to go with it:
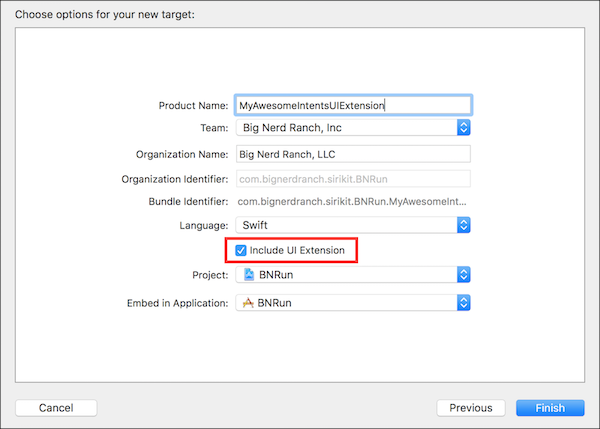
Then, just like in Part 1 with the Intents Extension:
Info.plistNSExtension item. If the Info.plist doesn’t contain one, add one of type dictionary.NSExtensionAttributes item. If there isn’t one, add one of type dictionary.IntentsSupported extension attribute (adding one of type array, if needed). Each entry should be a string of the class name of the Intent you support custom UI for, one entry for every supported Intent. For example, if you support a custom UI for your INSendMessageIntent, there should be an entry of “INSendMessageIntent”.While you are in the Info.plist file, note an Intents UI Extension has an NSExtensionMainStoryboard. The initial view controller within that storyboard is the principal class for the extension (if you wish to create your view controller programatically, remove the NSExtensionMainStoryboard entry and use NSExtensionPrincipalClass, setting its value to the name of your UIViewController subclass). Since the principal class is a UIViewController subclass, you have access to almost all UIKit and UIViewController functionality. I say “almost” because you can draw anything, have animations, embed child view controllers, but do not use controls nor gesture recognizers because the system prevents delivery of touch events to the custom view.
The UIViewController conforms to the INUIHostedViewControlling protocol, which defines the functions for providing the custom interface. There are two functions:
configure(with interaction:, context:, completion:)configureView(for parameters:, of interaction:, interactiveBehavior:, context:, completion:)When configureView() was introduced in iOS 11, configure() was not deprecated – both approaches remain valid but different ways to customize the Siri UI.
Introduced in iOS 10, configure() augments the default Siri interface. The principal UIViewController is instantiated, you configure() it, then it is installed into the UI alongside the default Siri interface. This leaves open the possibility for duplication of information, with both your and Siri’s UIs providing it. You can have your UIViewController conform to INUIHostedViewSiriProviding and suppress some bits of information, but what comes through and what get suppressed varies from Intent to Intent – yes, you will need to do some experimenting to see exactly how your Intent works out.
Using configure() is a reasonable approach. It’s straightforward, it’s simple, and if you only need to supplement what Siri provides (e.g. adding branding), it may be the perfect solution. Of course, if you need to support iOS 10, it’s your only solution. But if you’re supporting at least iOS 11, and if you need finer control over the UI customization, there is configureView()
configureView() offers customization of the entire UI, or just selected parts. configureView() has a parameter parameters: Set<INParameter>; these are the parameters of the interaction, such as the recipients and contents of a send message Intent or the description of a workout Intent. With access to individual parameters, you can choose on a per-parameter basis to show your own UI or Siri’s default, suppress showing a parameter, group the parameters in your own way, add non-parameter UI like a header, or even fully replace the Siri UI with your own customized layout.
When Siri displays your UI, it loads your UI extension and instantiates the view controller for each parameter (three parameters? three view controller instances), calling each view controller’s configureView(). The first time it is called with zero parameters, providing you with an opportunity to add non-parameterized UI (such as a branding banner) or to replace the entire default UI with your own custom UI. Subsequent calls to configureView() will be in a well-defined and documented order for each Intent parameter.
The increased support for customization is useful, but comes with greater cost. Implementing configureView() is slightly more complicated because there are more cases to contend with, especially if your UI extension supports multiple Intents. It’s important to know that every time configureView() is called, it is called on a new instance of your principal UIViewController! You do not have one view controller instantiated and you configure it for each parameter. For each parameter, a new UIViewController is instantiated, and is configured and installed for that and only that parameter. Thus, your UIViewController in your storyboard is not a monolithic view (like you may have with configure()). You must provide per-parameter views, or views per however you wish the parameters to be grouped and displayed. Furthermore, these extensions have tight memory constraints, so you must balance building your display against runtime realities. Watch “What’s New In SiriKit” from WWDC 2017 for additional explanation.
Again, configureView() is only available in iOS 11. If your UI Extension implements both configure() and configureView(), under iOS 11 only configureView() will be called.
Like with configure(), I strongly recommend you spend time with an empty implementation of configureView(), using the debugger to examine the parameters and their order for your Intent. Learning how the individual parts work will go a long way towards helping you architect the best custom solution for your app.
Let’s add some custom UI to BNRun. There are some nifty workout-oriented emoji, so we’ll use those to jazz things up. I’m going to add some developer-oriented information to the UI, since this is sample code and UI customization allows us to add information Siri doesn’t typically display. The full sample code can be found in the Github repository. You will want to refer to it for complete understanding, as the following snippets are abbreviated for clarity.
First, you should know about INInteraction.
An INInteraction object encapsulates information about the Siri interaction. While it can be used in a number of ways and places, it’s the primary way the UI Extension is informed about what’s going on and thus how to configure the UI. The properties you’ll most care about are:
intent: INIntent: the Intent of the interaction.intentResponse: INIntentResponse?: the Intent response, if appropriate.intentHandlingStatus: INIntentHandlingStatus: the state of execution, like .ready, .success, or .failureIt’s important to get your information from the INInteraction object and not by another means, to ensure proper reflection of the user’s interaction.
Let’s first look at configure(with interaction:, context:, completion:):
func configure(with interaction: INInteraction, context: INUIHostedViewContext,
    completion: @escaping (CGSize) -> Void) {

    var viewSize = CGSize.zero

    if let startWorkoutIntent = interaction.intent as? INStartWorkoutIntent {
        viewSize = configureUI(with: startWorkoutIntent, of: interaction)
    }
    else if let endWorkoutIntent = interaction.intent as? INEndWorkoutIntent {
        viewSize = configureUI(with: endWorkoutIntent, of: interaction)
    }

    completion(viewSize)
}
Since BNRun supports both Starting and Stopping a workout, we have to look at the interaction to determine the intent. Once we know, we can configure the UI. Our private configureUI() takes both the INIntent and the INInteraction so the UI extension can extract relevant information for display. IN BNRun, I’m able to construct a Workout object from an INStartWorkoutIntent and use that Workout’s data to fill in my UI. I also use the INInteraction to provide some additional information in my custom UI.
The last thing that must be done is call the completion, passing a desired size for the view. Note it’s a desired (requested) size, and while Siri will strive to honor it, it may not. Exactly what you provide is up to you. In BNRun, since everything is set up with Auto Layout, I pass view.systemLayoutSizeFitting(UILayoutFittingCompressedSize) for the desired size. Since UIViewController conforms to NSExtensionRequestHandling, you could look at your view controller’s extensionContext and return its hostedViewMinimumAllowedSize or hostedViewMaximumAllowedSize. Or you could calculate and return a specific size. Finally, if for some reason you are not supporting a custom UI for this Intent, return a size of CGSize.zero; this will tell Siri there is no custom UI and Siri will provide its default UI. I encourage you to experiment with different approaches to see what results they bring and how they can work for you.
Let’s see what it looks like:
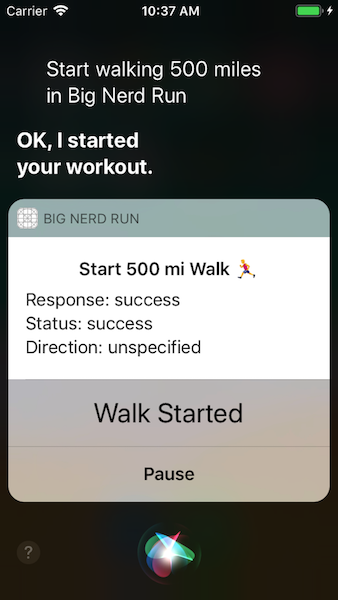
That’s nicer than the default UI alone, but note the duplication of information? It’s not horrible, but we can do better.
Here’s what configureView(for parameters:, of interaction:, interactiveBehavior:, context:, completion:) looks like:
@available(iOS 11.0, *)
func configureView(for parameters: Set<INParameter>, of interaction: INInteraction,
    interactiveBehavior: INUIInteractiveBehavior, context: INUIHostedViewContext,
    completion: @escaping (Bool, Set<INParameter>, CGSize) -> Void) {

    if parameters.count == 0 {
        _ = instantiateAndInstall(scene: "HeaderScene", ofType: HeaderViewController.self)
        let viewSize = view.systemLayoutSizeFitting(UILayoutFittingCompressedSize)
        completion(true, [], viewSize)
    }
    else {
        let startIntentDescriptionParameter = INParameter(for: INStartWorkoutIntent.self,
                                                keyPath: #keyPath(INStartWorkoutIntent.intentDescription))
        let endIntentDescriptionParameter = INParameter(for: INEndWorkoutIntent.self,
                                              keyPath: #keyPath(INEndWorkoutIntent.intentDescription))

        if parameters.contains(startIntentDescriptionParameter),
          let startWorkoutIntent = interaction.intent as? INStartWorkoutIntent {
            let viewSize = configureUI(with: startWorkoutIntent, of: interaction)
            completion(true, [startIntentDescriptionParameter], viewSize)
        }
        else if parameters.contains(endIntentDescriptionParameter),
          let endWorkoutIntent = interaction.intent as? INEndWorkoutIntent {
            let viewSize = configureUI(with: endWorkoutIntent, of: interaction)
            completion(true, [endIntentDescriptionParameter], viewSize)
        }
        else {
            completion(false, [], .zero)
        }
    }
}
As I mentioned above, configureView() is more complicated but more powerful than configure(). When no parameters are passed, that’s an opportunity to install a fun custom banner. When parameters are passed, we create our own INParameter objects, which are objects describing an Intent’s parameters. We match our parameters against the given parameters, and configure the UI accordingly. Finally, just like configure() the completion must be invoked, passing the desired size of that view (note: this particular parameter’s view – not the entire view), along with a “success” boolean (if this view was successfully configured or not) and the set of parameters this custom view is displaying. That last part allows for some interesting functionality because it enables you to group the display of multiple parameters into a single view. INSendMessageIntent has two parameters: recipients and contents. If you were processing the parameters for that Intent, you would first receive the recipients parameter and could create a custom view for just recipients. Then you would receive the contents parameter and could create a custom view for just the contents. But if you wanted to combine the display of recipients and contents into a single view, when processing the recipients parameter you could create your custom UI and configure it for both parameters, then in the completion pass an array of two INParameter objects: one for recipients and one for contents. Siri will see the contents parameter was handled and will not call configureView() for contents. This sort of parameter grouping provides you with a great deal of flexibility in how you customize your UI.
When it comes to extracting data, you have the INInteraction and can extract data by digging through its data structures. But you can also use your INParameters to extract information directly via INInteraction’s func parameterValue(for parameter: INParameter) -> Any?.
Let’s see what it looks like:
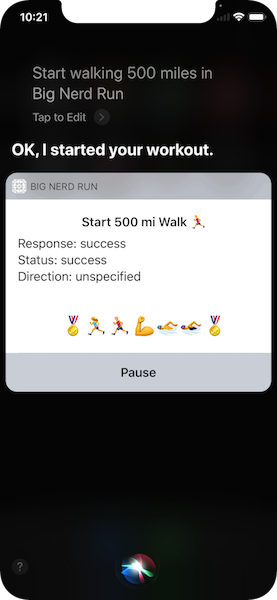
That’s much better. But, the emoji? That’s supposed to be a header view, so why is it a footer? Apple documents that the first call to configureView() has an empty set of parameters, and that what parameters are passed and the order of their passing will be known, stable, and documented. However, it appears there are exceptions. This is why I continue to stress the importance of starting your UI Extension development by running “empty” in the debugger (implement both configure functions, dump data, return .zero size) and spending time dumping parameters and examining exactly how your Intent behaves. The sample code has some functionality and suggestions to help with debugging and exploration.
A few links to useful resources, regarding custom Siri UI:
Siri is gaining a more prominant role in controlling Apple technology like AppleTV, CarPlay, HomePod, iPhones, and Apple Watches. Part 1, Part 2, and Part 3 of this series showed how to expose your iOS app’s functionality through Siri. Here we showed you how you can make your iOS app’s Siri experience stand out with custom UI. You now have the knowledge, so go forth and make awesome Siri experiences for your apps and your users.
And if you’re having trouble implementing SiriKit or other features into your iOS or watchOS app, Big Nerd Ranch is happy to help. Get in touch to see how our team can build a Siri-enabled app for you, or implement new features into an existing app.

Our introductory guide to Swift Regex. Learn regular expressions in Swift including RegexBuilder examples and strongly-typed captures.
The Combine framework in Swift is a powerful declarative API for the asynchronous processing of values over time. It takes full advantage of Swift...
SwiftUI has changed a great many things about how developers create applications for iOS, and not just in the way we lay out our...