


Intro to NSWindow
NSWindow is an essential component in the macOS developer's toolkit. In this first part in a series on NSWindow, you'll learn how to create,...
Color is a fundamental and important aspect of app development. It identifies brand, evokes emotion, and teaches us things like whether a button can be touched. In the last few years alone, Apple has introduced multiple technologies making it worth revisiting how we approach the use of color in our apps. These are features like the True Tone display and P3 display gamut shipping in most Apple products, and interface styles (Light and Dark), available in tvOS and coming soon to macOS Mojave.
The 2017 SDK releases (iOS 11, macOS 10.13, tvOS 11, and watchOS 4) and Xcode 9 introduced the concept of named colors. Named colors are added to an asset catalog, and can then be used directly in Storyboards and Nibs, or in code using a new suite of initializer APIs. Let’s see how named colors make our lives easier, and also take a look at the enhancements coming in the 2018 SDKs.
The sample project for this article has examples of usage across all platforms, and any following code and screenshots will indicate which platform they are for.
We’ll start off with an empty iOS app, and add additional targets for tvOS and macOS. The next step will be to create a new asset catalog shared across all targets. We’ll call it Colors.

With our colors asset catalog selected, select New Color Set from the Editor -> Add Assets menu item. You can change the name of this color over in the attributes inspector. Let’s name the first one Alizarin Crimson. I’ve chosen color names here familiar to a painter, but you can name a color whatever you want, perhaps to represent intention like “default button”. Since our colors will be shared across all platforms, and for consistency between them, it’s important to keep Universal checked under Devices, but you can always define colors per platform if your project needs call for it.
Now, select the image representation of our new color in the editor. The attributes inspector will update to include a new Color section. sRGB is selected for us by default, but you can also choose to use another gamut, or even choose a system color. The next item of interest is the input method. Do the designers on your project always provide colors in hex format? Well, you can change the input method to 8-bit Hexadecimal and input the value they sent you directly. Let’s do that here and enter #E32636.

Next up, let’s say we want a more vibrant color on a P3 display. Let’s add a new color, and name it Cadmium Yellow. Define it in 8-bit (0-255) as Red 237, Green 135, and Blue 45. Now change Gamut from Any to sRGB and Display P3. A new color has been added in the editor below the original, and both currently reflect the color values we set earlier. Now, click on the Display P3 color. Change Content to Display P3. You’ll notice the color is still the same, but the values we supplied before are different. Change them back to what we had (237, 135, 45), and if you’re working on a P3 display you’ll see a more vibrant color than before.

Following these same general steps, let’s create two more colors. For Phthalo Blue we’ll supply a High Contrast variant by checking the corresponding checkbox under Appearance. For Phthalo Green, we want to define a brighter color for Dark appearance. As was the case with cadmium yellow, these colors will change automatically given the right circumstances (e.g. switching between light and dark mode on Mojave).

Great, so now we have four colors defined. How do we use them in our app?
We’ll start with examples on iOS and tvOS using Interface Builder. We add a few views, embed them in a stack view, set up our constraints, and then it’s as simple as changing the background color for each view. The selection interface even includes a dedicated section for all of your named colors!

It’s worth noting iOS and tvOS don’t support anything other than the display gamut at this time, but it may change at a later point.
We could achieve the same results we had on iOS and tvOS using NSBox on macOS, but if we use NSView instead, we can’t change the background color in IB. So let’s walk through how we would accomplish it in code. Here are the three code snippets that will get us up and running on macOS.
First, we create an enum so we don’t have to worry about typing our color names as raw strings everywhere.
enum PaintColors: String {
    case alizarinCrimson = “Alizarin Crimson”
    case cadmiumYellow = “Cadmium Yellow”
    case phthaloBlue = “Phthalo Blue”
    case phthaloGreen = “Phthalo Green”
}
Next we have a simple NSView subclass, which will fill itself with the set color.
class BackgroundColorView: NSView {

    var backgroundColor: NSColor?

    override func draw(_ dirtyRect: NSRect) {
        backgroundColor?.set()
        dirtyRect.fill()
    }

}
Finally, an NSWindow subclass contains outlets to four instances of our BackgroundColorView class, and the backgroundColor property is set on each of them.
class ColorWindow: NSWindow {

    @IBOutlet var alizarinCrimsonView: BackgroundColorView!
    @IBOutlet var cadmiumYellowView: BackgroundColorView!
    @IBOutlet var phthaloBlueView: BackgroundColorView!
    @IBOutlet var phthaloGreenView: BackgroundColorView!

    override func awakeFromNib() {
        super.awakeFromNib()

        alizarinCrimsonView.backgroundColor = NSColor(named: PaintColors.alizarinCrimson.rawValue)
        cadmiumYellowView.backgroundColor = NSColor(named: PaintColors.cadmiumYellow.rawValue)
        phthaloBlueView.backgroundColor = NSColor(named: PaintColors.phthaloBlue.rawValue)
        phthaloGreenView.backgroundColor = NSColor(named: PaintColors.phthaloGreen.rawValue)
    }

}
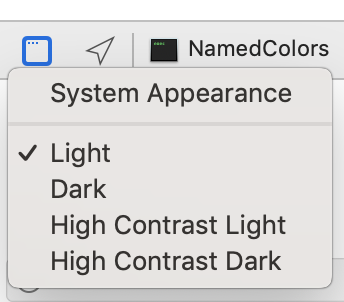
If you run this on a Mac running Xcode 10 and Mojave, you’ll have a new button in the debug area, which allows you to simulate different appearance combinations.
If you find yourself wanting to use named colors, but prefer not to use Interface Builder on iOS or tvOS, you should check out the following link:
init(named:) – UIColor | Apple Developer Documentation
There are a couple of gotchas worth mentioning when using named colors in your projects. First, how you define your colors matters. Using hexadecimal for sRGB and P3 will result in the same color, so you’ll want to use either the floating point or 8-bit (0-255) input methods.
Second, another option you have for adding colors via code is the use of color literals. You can do this either by showing the media library, then dragging and dropping the color into place in the editor, or by typing “Color Literal” and using autocomplete. This may seem like a great way to represent colors in code, but it’s important to understand this is not the same as using a named color. To see what I mean, open the file in an external editor. The Xcode editor builds the visual representation of the color for you, but the actual code is:
#colorLiteral(red: 0.8901960784, green: 0.1490196078, blue: 0.2117647059, alpha: 1)
If you decide to change the named color after the fact, or are trying to represent an appearance-dependent color in Mojave, you won’t get what you’re looking for.
The way we deal with colors on Apple platforms is evolving, which allows us to create more refined experiences. I encourage you to adopt the use of named colors in your apps!
NSWindow is an essential component in the macOS developer's toolkit. In this first part in a series on NSWindow, you'll learn how to create,...