Introduction to Svelte
Svelte is a great front-end Javascript framework that offers a unique approach to the complexity of front-end systems. It claims to differentiate itself from other popular frameworks, like React and Angular, by solving these problems rather than moving the complexity around. Some key advantages of Svelte are its impressive performance and speed—and its simple implementation that allows for slim files and less boilerplate. For example, with Svelte stores, you can implement full global state management in less than ten lines of code!
Unlike other frameworks, Svelte does not run in the browser, nor does it use the virtual DOM. Instead, it uses a compiler that runs at build time to compile components into standalone JavaScript modules. This approach leads to faster and more efficient applications, making Svelte an excellent choice for building high-performance web applications.
The best way to see all that Svelte offers is to build an app yourself!
Follow along with us to build a Todo app and witness Svelte in action as you implement some of its key features.
Getting Started
We assume the reader has Node.js (version 16 or above), a code editor, and a browser installed.
To initialize the todo app, run the following command in your terminal:
npm create vite@4 svelte-todo -- --template=svelte-ts
This command uses the build tool Vite to create and scaffold a Svelte project for you entitled svelte-todo.
This example also adds the option at the end of the command to include TypeScript in your application.
You may be prompted to install create-vite.
Enter y to continue.
To get your project running, follow the steps listed:
cd svelte-todonpm installnpm run dev -- --open
Congratulations! Your Svelte app is running in your browser at localhost:5173. Open the directory in your code editor. The Vite scaffolding adds a small demo app. To remove it, simply delete these files:
./src/assets./src/lib./app.css
Also, perform the following edits:
- Delete the entire contents of
./src/App.svelte. - Remove the line
import './app.css'frommain.ts.
Create a Component
Let’s create your first Svelte component.
- First, create a new folder inside the
srcdirectory calledcomponents. - Create a new file in the components folder called
TodoItem.svelte.
As the title implies, you are creating a to-do item. We know we will need a checkbox and a description of the item. Svelte components consist of three different parts: JavaScript, HTML, and CSS.
That’s it.
Start by adding the HTML.
<div>
   <input type='checkbox' />
   <span>{item}</span>
</div>
In the code above, you are using familiar HTML tags. There is one question, though: how do you get access to item? Add JavaScript to your component by using script tags. By convention, these typically reside at the beginning of the file.
<script lang="ts">
   export let item: string;
</script>
Variables that will be used by your HTML, like item, are declared inside your script tags. Then, you access them inside brackets like <span>{items}</span>.
In this case, there is an extra keyword: export. This means that the value of item comes from an external source and will be passed into the component as a property. The lang="ts" is optional and denotes that you are using TypeScript inside the tag. That is everything you need for your first component. To see your component in the browser, you need to use it in your application.
Open the file ./src/App.svelte and replace the previous contents of the file:
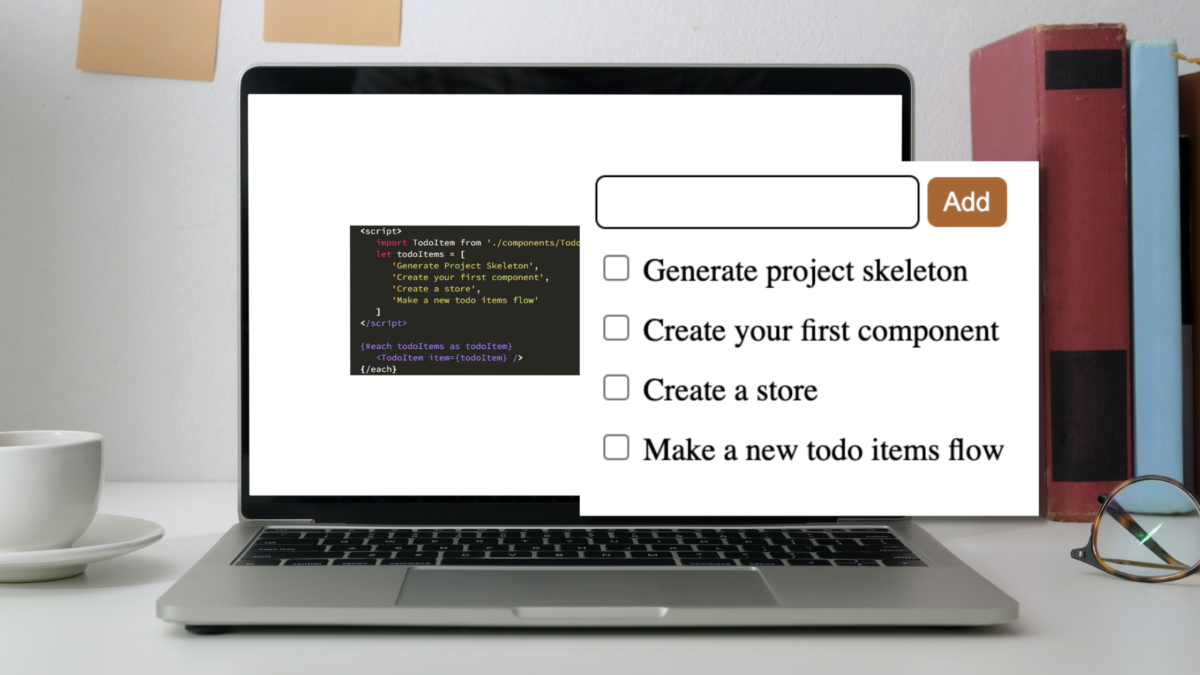
<script>
   import TodoItem from './components/TodoItem.svelte';
   let todoItems = [
      'Generate Project Skeleton',
      'Create your first component',
      'Create a store',
      'Make a new todo items flow'
   ]
</script>

{#each todoItems as todoItem}
   <TodoItem item={todoItem} />
{/each}
Let’s look at the JavaScript inside the script tags first. The TodoItem component that you created is being imported. Anytime a component is used in another component, it must be imported inside the script tag.
Next, you declare a new variable called todoItems. This is very similar to how the item variable was declared in the TodoItem component, with one big difference. There is no export keyword. This means that this variable is local to this component; the value is not coming from an external source. todoItems is an array that contains a list of items you will accomplish during this tutorial.
Now, take a look at the HTML. This looks different than the HTML you have already seen. That’s because it uses a logic block. In Svelte, you can add logic to HTML by wrapping it in curly braces. The character # lets you know that a logic block is beginning, and the character / signifies the block’s end.
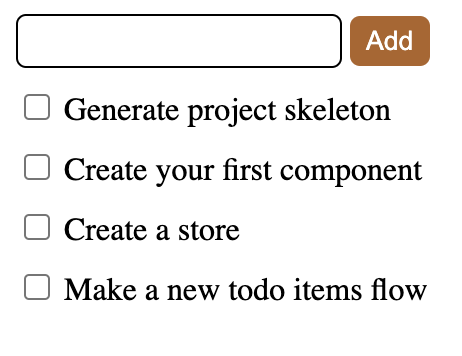
Because todoItems is an array, you can use an each block to iterate through the array and complete an action with each of the items in the array. In this case, you are looking at each item and returning a TodoItem component. Notice that the item is being assigned to the TodoItem component as an attribute-this is how TodoItem has access to the item variable. Check out your application in the browser. You should have a list of items to check off as complete!
Go ahead and check off Generate project skeleton and Create your first component—you’re halfway there!
Stores
Like other frameworks, including React, Svelte has tools for managing global and local state. Unlike the React Context API, the Svelte store does not rely on hierarchy. Components can consume state without being directly nested under provider components. The Svelte store also doesn’t even require that the calling code be Svelte. A store could be consumed through any plain JavaScript module.
Svelte provides three types of stores out-of-the-box writable, readable, and derived. It also provides the ability to create a custom store (you can read more about that at Svelte), but in this tutorial, we will just use a writable store.
Creating a store
Inside /src, create a new directory and file /stores/todo.ts. Inside the new todo.ts file, start by importing the writable store type from svelte/store:
import { writable } from 'svelte/store';
Since this is TypeScript, we must define a type for our store. We could just use a string[], but we want to be able to mark items as done. So, let’s create a type that allows us to define a to-do item and maintain its done status.
In this example, we’re going to export this type because we will need to import it later on in the tutorial, but you may not always need to do this.
export type TodoItemType = {
   item: string;
   done: boolean;
}
Now we can define our store with the default to-do items we used earlier.
export const todoItems = writable<TodoItemType[]>([
   { item: 'Generate project skeleton', done: true },
   { item: 'Create your first component', done: true },
   { item: 'Create a store', done: false },
   { item: 'Make a new todo items flow', done: false },
]);
Consuming the store
Navigate back to App.svelte. Since we’ll be pulling our todo items from a store, we will no longer need the local array todoItems. Let’s replace it with our new store.
<script lang='ts'>
   import TodoItem from './components/TodoItem.svelte';
   import { todoItems } from './stores/todo';
</script>
Now our page is broken because we need to update our loop to use the item key inside the todoItem object we have in our store. Do that now.
{#each todoItems as todoItem}
   <TodoItem item={todoItem.item} />
{/each}
Wait, our page still isn’t displaying our to-do items! That’s because the value of todoItems is a store. It’s not the value of our store. To get that value, we need to subscribe to the store. We can manage subscriptions manually with the subscribe and unsubscribe functions on the store, but this adds quite a bit of additional code.
Thankfully, Svelte offers an easy way to “auto-subscribe” to a store. Auto-subscribing is as simple as prefixing our usage of the store with a $.
{#each $todoItems as todoItem}
   <TodoItem item={todoItem.item} />
{/each}
Look how clean that is!
Writing to the store
Let’s make a new component called AddTodoItem.svelte in the /components directory. This component will handle adding new items to our list. Before we interact with the store, let’s first create our UI. We will want a text input to type out our new item and a button to add it to the store.
<input type='text'/>
<button>Add</button>
We need to maintain our input value locally. If you are familiar with React, you would typically do this by utilizing the useState hook and onChange or onBlur props, but in Svelte we use a concept called binding. We’ll start by defining the variable we want to bind the input value to in a script tag:
<script lang='ts'>
   let todoItem = '';
</script>
Next, we will use bind to bind the value of the text input to todoItem.
<input type='text' bind:value={todoItem} />
Now the value of the variable will be synced with the value of the input, and we’ll be able to use it inside our click handler. So, let’s create a new function and assign it to the on:click event handler for the button.
<script lang='ts'>
   let todoItem = '';
   const addTodoItem = () => {
      alert(todoItem);
   }
</script>

<input type='text' bind:value={todoItem} />
<button on:click={addTodoItem}>Add</button>
Before we can test this in the browser, we need to import and render this component in App.svelte.
<script lang='ts'>
   import TodoItem from './components/TodoItem.svelte';
   import AddTodoItem from './components/AddTodoItem.svelte';
   import { todoItems } from './stores/todo';
</script>

<AddTodoItem />

{#each $todoItems as todoItem}
   <TodoItem item={todoItem.item} />
{/each}
Check out your browser. Type a message in the text box and click “Add”. You should see a browser alert with the message you just typed.
Nice work!
To add a value to the store without overriding what is already there, we will use the update function that exists on the store object. This function takes a function as its only parameter. The parameter function will be passed the current value of the store. We can modify that value and return it to update the store.
Update the script tag in AddTodoItem.svelte:
<script lang='ts'>
  import { todoItems, type TodoItemType } from '../stores/todo';
  let todoItem = '';

  const addTodoItem = () => {
    todoItems.update((store: TodoItemType[]) => (
      [
        ...store,
        {
          item: todoItem,
          done: false
        }
      ]
    ));
  }
</script>
If you want to take it a step further, try updating TodoItem.svelte to toggle the “done” status in the store when a user checks the checkbox.
Styling
Styling in Svelte is scoped to the component the style is defined in. You can accomplish this functionality with other frameworks using things like CSS modules or styled-components, but with Svelte it is included out of the box. So, we don’t have to worry about clashing tag styles or accidentally re-using a class name. These styles also live inside the same file as the component code, typically at the end of the file.
Let’s start by adding some padding to the list of items. Add the following code to the end of TodoItem.svelte:
<style>
   div {
      padding-top: 10px;
   }
</style>
And some styles to AddTodoItem.svelte:
<style>
  button {
    padding: 5px 8px;
    background-color: #b16326;
    color: white;
    border-radius: 5px;
    border: none;
  }

  button:hover {
    background-color: #e38d39;
    cursor: pointer;
  }

  input {
    padding: 5px 8px;
    border-radius: 5px;
    border: 1px solid black;
  }
</style>
Notice our styles assigned to the input tag do not affect the input we have rendered inside TotoItem.svelte.
Conclusion
We’ve gone over the basic concepts of Svelte component structure, binding, stores, and styling. If you want to take things further, take a look at the official Svelte interactive tutorial for some more advanced topics, and be on the lookout for more Svelte blog posts!