The post Swift Regex Deep Dive appeared first on Big Nerd Ranch.
]]>An exciting and new Regex Builder in Swift Regex gives us a programmatic way of creating regular expressions. This innovative approach to creating often complex regular expressions is sure to be an instant winner with the regex neophyte and aficionado alike. We’ll be digging into Regex Builder to discover its wide-reaching capabilities.
Swift Regex brings first-class support for regular expressions to the Swift language, and it aims to mitigate or outright eliminate many of the downsides of regex. The Swift compiler natively supports regex syntax, which gives us compile time errors, syntax highlighting, and strongly typed captures. Regex syntax in Swift is compatible with Perl, Python, Ruby, Java, NSRegularExpression, and many others.
It should be noted that as of the writing of this article, Swift Regex is still in the open beta period. We’ll be using the Swift Regex found in Xcode 14 beta 6.
Creating a Swift Regular Expression
Swift Regex supports creating a regular expression in several different ways, each of which is useful for different scenarios. First, let’s take a look at creating a compile-time regular expression.
Compile Time Regex
let regex = /\d/
This regular expression will match a single digit. As is typical in regular expression syntax, the expression can be found between two forward slashes; “/<expression>/”. As you can see, this regular expression is a first-class type in Swift and can be assigned directly to a variable. As a Swift type, Xcode will also recognize this regex and provide both compile time checks and syntax highlighting.
Swift has added robust support for regex to a number of common APIs, and using this regular expression couldn’t be easier.
let user = "{name: Shane, id: 123, employee_id: 456}"
let regex = /name: \w+/

if let match = user.firstMatch(of: regex) {
    print(match.output)
}
Which gives us the output:
name: Shane
You may be tempted to use the regular expression [a-zA-Z]+ in order to match a word here. However, using \w+ allows the system to take into account the current locale.
Runtime Regex
Swift Regex also supports creating regular expressions at runtime. Runtime creation of a regular expression has many uses and can be useful for editors, command line tools, and search just to name a few. The expression syntax is the same as a compile time expression. However, they are created in a slightly different manner.
let regex = try Regex(".*\(searchTerm).*")
This regular expression is looking for a specific search term supplied at runtime. Here the regular expression is created by constructing the Regex type with a String representing the regular expression. The try keyword is used since a Regex can throw an error if the supplied regular expression is invalid.
We can again apply this regex using the firstMatch(of:) function as in our first example. Note that this time our regex captures the line that matches by using a regex capture, (, and ).
let users = """
[
{name: Shane, id: 123, employee_id: 456},
{name: Sally, id: 789, employee_id: 101},
{name: Sam, id: 453, employee_id: 999}
]
"""

let idToSearch = 789
let regex = try Regex("(.*id: \(idToSearch).*)")

if let match = users.firstMatch(of: regex) {
    print(match.output[1].substring ?? "not found")
}
Running the example gives us the following output:
{name: Sally, id: 789, employee_id: 101},We can gain access to any data captured by the regex via output on the returned Regex.Match structure. Here, output is an existential with the first item, at index 0, being the regex input data. Each capture defined in the regex is found at subsequent indexes.
Regex Builder
The innovative and new Regex Builder introduces a declarative approach to composing regular expressions. This incredible new way of creating regular expressions will open the regex door to anyone who finds them difficult to understand, maintain, or create. Regex builder is Swift’s solution to the drawbacks of the regular expression syntax. Regex builder is a DSL for creating regular expressions with type safety while still allowing for ease of use and expressivity. Simply import the new RegexBuilder module, and you’ll have everything you need to create and compose powerful regular expressions.
import RegexBuilder

let regex = Regex {
    One(.digit)
}
This regular expression will match a single digit and is functionally equivalent to our first compile time regex example, /\d/. Here the standard regex syntax is discarded in favor of a declarative approach. All regex operations, including captures, can be represented with RegexBuilder. In addition, when it makes sense, regex literals can be utilized right within the regex builder. This makes for a very expressive and powerful approach to creating regular expressions.
RegexBuilder Example
Let’s take a deeper look into RegexBuilder. In this example, we will use a regex builder to parse and extract information from a Unix top command.
top -l 1 -o mem -n 8 -stats pid,command,pstate,mem | sed 1,12d
For simplicity, we’ll take the output of running this command and assign it to a Swift variable.
// PID    COMMAND       STATE    MEMORY
let top = """
45360  lldb-rpc-server  sleeping 1719M
2098   Google Chrome    sleeping 1679M-
179    WindowServer     sleeping 1406M
106    BDLDaemon        running  1194M
45346  Xcode            running  878M
0      kernel_task      running  741M
2318   Dropbox          sleeping 4760K+
2028   BBEdit           sleeping 94M
"""
As you can see, the top command outputs structured data that is well suited for use with regular expressions. In our example, we will be extracting the name, status, and size of each item. When considering a Regex Builder it is useful to break a larger regex down into smaller component parts which are then concatenated by the builder. First, I’ll present the code, and then we’ll discuss how it works.
// 1
let separator = /\s{1,}/

// 2
let topMatcher = Regex {
    // 3
    OneOrMore(.digit)

    // 4
    separator

    // 5
    Capture(
        OneOrMore(.any, .reluctant)
    )
    separator

    // 6
    Capture(
        ChoiceOf {
            "running"
            "sleeping"
            "stuck"
            "idle"
            "stopped"
            "halted"
            "zombie"
            "unknown"
        }
    )
    separator

    // 7
    Capture {
        OneOrMore(.digit)

        // /M|K|B/
        ChoiceOf {
            "M"
            "K"
            "B"
        }

        Optionally(/\+|-/)
    }
}

// 8
let matches = top.matches(of: topMatcher)
for match in matches {
    // 9
    let (_, name, status, size) = match.output
    print("\(name) \t\t \(status) \t\t \(size)")
}
Running the example gives us the following output:
lldb-rpc-server  		 sleeping 		 1719M
Google Chrome    		 sleeping 		 1679M-
WindowServer     		 sleeping 		 1406M
BDLDaemon        		 running 		 1194M
Xcode            		 running 		 878M
kernel_task      		 running 		 741M
Dropbox          		 sleeping 		 4760K+
BBEdit           		 sleeping 		 94M
Here is a breakdown of what is happening with the code:
- From looking at the data, we can see that each column is separated by one or more spaces. Here we define a compile time regex and assign it to the
separatorvariable. We can then useseparatorwithin the regex builder in order to match column separators. - Define the regex builder as a trailing closure to
Regexand assign it totopMatcher. - A quantifier that matches one or more occurrences of the specified
CharacterClass.CharacterClassis a struct that conforms toRegexComponentand is similar in function to aCharacterSet. The.digitCharacterClass defines a numeric digit. - Matches the column separator.
- Captures one or more of any character. Regex captures are returned in the
Outputof the regex and are indexed based on their position within the regex. - A capture of one item from the enclosed list of items.
ChoiceOfis equivalent to a regex alternation (the|regex operator) and cannot have an empty block. You can think of this as matching a single value of anEnum. Use when there are a known list of values to be matched by the regular expression. - Captures one or more digits followed by one item from the known list of “M”, “K”, or “B” optionally followed by a “+” or “-“. Notice that the
Optionallycomponent can take a regex literal as its parameter. - Here we pass our regex as a parameter into the
matches(of:)function. We assign the returned value to a variable that will allow use to access the regex output and our captured data. - The
outputproperty of the regex returned data contains the entire input data followed by any captured data. Here we are unpacking the theoutputtuple by ignoring the first item (the input) and assigning each subsequent item to a variable for easy access.
As you can see from this example, the Swift regex builder is a powerful and expressive way to create regular expressions in Swift. This is just a sampling of its capability. So, next, let’s take a deeper look into the Swift regex builder and its strongly typed captures.
Strongly typed captures in Swift RegexBuilder
One of the more unique and compelling features of the Swift regex builder are strongly typed captures. Rather than simply returning a string match, Swift Regex can return a strong type representing the captured data.
In some cases, especially for performance reasons, we may want to exit early if a regex capture doesn’t meet some additional criteria. TryCapture allows us to do this. The TryCapture Regex Builder component will pass a captured value to a transform closure where we can perform additional validation or value transformation. When the transform closure returns a value, whether the original or a modified version, it is assumed valid, and the value is captured. However, when the transform closure returns nil, matching is signaled to have failed and will cause the regex engine to backtrack and try an alternative path. TryCaptures transform closure actively participates in the matching process. This is a powerful feature and allows for extremely flexible matching.
Let’s take a look at an example.
In this example, we will use a regex builder to parse and extract information from a Unix syslog command.
syslog -F '$((Time)(ISO8601)) | $((Level)(str)) | $(Sender)[$(PID)] | $Message'
We’ll take the output of running this command and assign it to a Swift variable.
// TIME                 LEVEL     PROCESS(PID)              MESSSAGE
let syslog = """
2022-06-09T14:11:52-05 | Notice | Installer Progress[1211] | Ordering windows out
2022-06-09T14:12:18-05 | Notice | Installer Progress[1211] | Unable to quit because there are connected processes
2022-06-09T14:12:30-05 | Critical | Installer Progress[1211] | Process 648 unexpectedly went away
2022-06-09T14:15:31-05 | Alert | syslogd[126] | ASL Sender Statistics
2022-06-09T14:16:43-05 | Error | MobileDeviceUpdater[3978] | tid:231b - Mux ID not found in mapping dictionary
"""
Next, we use Swift Regex to extract this data, including the timestamp, a strongly typed severity level, and filtering of processes with an id of less than 1000.
let separator = " | "

let regex = Regex {
    // 1
    Capture(.iso8601(assuming: .current, dateSeparator: .dash))
    // 2
    "-"
    OneOrMore(.digit)
    separator

    // 3
    TryCapture {
        ChoiceOf {
            "Debug"
            "Informational"
            "Notice"
            "Warning"
            "Error"
            "Critical"
            "Alert"
            "Emergency"
        }
    } transform: {
        // 4
        SeverityLevel(rawValue: String($0))
    }
    separator

    // 5
    OneOrMore(.any, .reluctant)
    "["
    Capture {
        OneOrMore(.digit)
    } transform: { substring -> Int? in
        // 6
        let pid = Int(String(substring))
        if let pid, pid >= 1000 {
            return pid
        }

        return nil
    }
    "]"
    separator

    OneOrMore(.any)
}

// 7
let matches = syslog.matches(of: regex)

print(type(of: matches[0].output))

for match in matches {
    let (_, date, status, pid) = match.output
    // 8
    if let pid {
        print("\(date) \(status) \(pid)")
    }
}

// 9
enum SeverityLevel: String {
    case debug = "Debug"
    case info = "Informational"
    case notice = "Notice"
    case warning = "Warning"
    case error = "Error"
    case critical = "Critical"
    case alert = "Alert"
    case emergency = "Emergency"
}
Running the example gives us the following output:
(Substring, Date, SeverityLevel, Optional<Int>)
2022-06-09 19:11:52 +0000 notice 1211
2022-06-09 19:12:18 +0000 notice 1211
2022-06-09 19:12:30 +0000 critical 1211
2022-06-09 19:16:43 +0000 error 3978
Here’s what is happening with the syslog example.
- Here, we are capturing an ISO 8601 formatted date. The
iso8601static function (new in iOS 16) is called on theDate.ISO8601FormatStyletype. This function constructs and returns a date formatter for use by the Swift RegexCapturein converting the captured string into aDate. ThisDateis then used in theCaptures output with no further string-to-date conversion necessary. - After the ISO 8601 formatted date, we have a UTC offset timezone component matched by the dash and one or more digits.
- Here
TryCaptureis being used to transform a captures type. It will convert the matched value into a non-optional type or fail the match. - The
transformclosure will be called upon matching the capture. It is passed the matched substring value that can then transform to the desired type. In this example, the transform is converting the matched substring into aSeverityLevelenum. The corresponding regex output for this capture becomes the closures return type. In the case of a transform onTryCapturethis type will be non-optional. For aCapturetransform, the type will be optional. - Swift Regex defines several repetitions, which are
OneOrMore,ZeroOrMore,Optionally, andRepeat. The.reluctantrepetition behavior will match as few occurrences as possible. The default repetition behavior for all repetitions is.eager. - A transforming capture will transform the matching substring of digits into an optional
Intvalue. If this value is 1000 or greater, then it is returned from the transform and becomes the captures output value. Otherwise, it returnsnilfor this captures output. - Assign the matches of the regex to the
matchesvariable. - If the
pidcapture is notnilthen print out the data. - Defines the
SeverityLevelenum type, which is used by the transforming capture defined in #3.
Conclusion
Swift Regex is a welcome and powerful addition to Swift. Regex Builder is a go-to solution for all but the simplest of regex needs, and mastering it will be time well spent. The declarative approach of Regex Builder coupled with compile time regex support giving us compile time errors, syntax highlighting, and strongly typed captures, makes for a potent combination. A lot of thought has gone into the design of Swift Regex, and it shows. Swift Regex will make a worthy addition to your development toolbox, and taking the time to learn it will pay dividends.
Resources
- Meet Swift Regex – WWDC 2022
- Swift Regex: Beyond the basics – WWDC 2022
- Swift Evolution Proposal 0351 – Regex builder DSL
- Swift Evolution Proposal 0354 – Regex Literals
- Swift Evolution Proposal 0355 – Regex Syntax and Run-time Construction
- Swift Evolution Proposal 0357 – Regex-powered string processing algorithms
- Swift Regex DSL Builder
The post Swift Regex Deep Dive appeared first on Big Nerd Ranch.
]]>The post Custom Operators in Swift Combine appeared first on Big Nerd Ranch.
]]>Despite the usefulness of Combine’s built-in operators, there are times when they fall short. This is when constructing your own custom operators adds needed flexibility to perform often complex tasks in a concise and performant manner of your choosing.
Combine Lifecycle
In order to create our own operators, it is necessary to understand the basic lifecycle and structure of a Combine pipeline. In Combine, there are three main abstractions: Publishers, Subscribers, and Operators.
Publishers are value types, or Structs, that describe how values and errors are produced. They allow the registration of subscribers who will receive values over time. In addition to receiving values, a Subscriber can potentially receive a completion, as a success or error, from a Publisher. Subscribers can mutate state, and as such, they are typically implemented as a reference type or Class.
Subscribers are created and then attached to a Publisher by subscribing to it. The Publisher will then send a subscription back to the Subscriber. This subscription is used by the Subscriber to request values from the Publisher. Finally, the Publisher can start sending the requested values back to the Subscriber as requested. Depending on the Publisher type, it can send values that it has indefinitely, or it can complete with a success or failure. This is the basic structure and lifecycle used in Combine.
Operators sit in between Publishers and Subscribers where they transform values received from a Publisher, called the upstream, and send them on to Subscribers, the downstream. In fact, operators act as both a Publisher and as a Subscriber.
Creating a Custom Operator
Let’s cover two different strategies for creating a custom Combine operator. In the first approach, we’ll use the composition of an existing chain of operators to create a reusable component. The second strategy is more involved but provides the ultimate in flexibility.
Composing a Combine Operator
In our first example, we’ll be creating a histogram from a random array of integer values. A histogram tells us the frequency at which each value in the sample data set appears. For example, if our sample data set has two occurrences of the number one, then our histogram will show a count of two as the number of occurrences of the number one.
// random sample of Int
let sample = [1, 3, 2, 1, 4, 2, 3, 2]

// Histogram
//     key: a unique Int from the sample
//     value: the count of this unique Int in the sample
let histogram = [1: 2, 2: 3, 3: 2, 4: 1]
We can use Combine to calculate the histogram from a sample of random Int.
// random sample of Int

// 1
let sample = [1, 3, 2, 1, 4, 2, 3, 2]

// 2
sample.publisher
      // 3
      .reduce([Int:Int](), { accum, value in
        var next = accum

        if let current = next[value] {
            next[value] = current + 1
        } else {
            next[value] = 1
        }

        return next
    })
    // 4
    .map({ dictionary in
        dictionary.map { $0 }
    })
    // 5
    .map({ item in
        item.sorted { element1, element2 in
            element1.key < element2.key
        }
    })
    .sink { printHistogram(histogram: $0) }
    .store(in: &cancellables)
Which gives us the following output.
histogram standard operators:
1: 2
2: 3
3: 2
4: 1
Here is a breakdown of what is happening with the code:
- Define our sample data set
- Get a
Publisherof our sample data - Bin each unique value in the data set and increase a counter for each occurrence.
- Convert our
Dictionaryof binned values into anArrayof key/value tuples. eg[(key: Int, value: Int)] - Sort the array in ascending order by
key
As you can see, we have created a series of chained Combine operators that calculates a histogram for a published data set of Int. But what if we use this sequence of code in more than one location? It would be really nice if we could use a single operator to perform this entire operator chain. This reuse not only makes our code more concise and easier to understand but easier to debug and maintain as well. So let’s do just that by composing a new operator based on what we’ve already done.
// 1
extension Publisher where Output == Int, Failure == Never {
    // 2
    func histogramComposed() -> AnyPublisher<[(key:Int, value:Int)], Never>{
        // 3
        self.reduce([Int:Int](), { accum, value in
            var next = accum

            if let current = next[value] {
                next[value] = current + 1
            } else {
                next[value] = 1
            }

            return next
        })
        .map({ dictionary in
            dictionary.map { $0 }
        })
        .map({ item in
            item.sorted { element1, element2 in
                element1.key < element2.key
            }
        })
        // 4
        .eraseToAnyPublisher()
    }
}
What is this code doing:
- Create an extension on
Publisherand constrain its output to typeInt - Define a new function on
Publisherthat returns anAnyPublisherof our histogram output - Perform the histogram chain of operators as in the previous example but this time on
self. We useselfhere since we are executing on the currentPublisherinstance - Type erase our publisher to be an
AnyPublisher
Now let’s use our new Combine operator.
// 1
let sample = [1, 3, 2, 1, 4, 2, 3, 2]

// 2
sample.publisher
    .histogramComposed()
    .sink { printHistogram(histogram: $0) }
    .store(in: &cancellables)
Which gives us the following output.
histogram composed:
1: 2
2: 3
3: 2
4: 1
Using the new composed histogram operator:
- Define our sample data set
- Directly use our new composed Combine histogram operator
From the example usage of our new histogram operator, you can see that the code at the point of usage is quite simple and reusable. This is a fantastic technique for creating a toolbox of reusable Combine operators.
The Complete Combine Operator
Creating a Combine operator through composition, as we have seen, is a great way to refactor existing code for reuse. However, composition does have its limitations, and that is where creating a native Combine operator becomes important.
A natively implemented Combine operator utilizes the Combine Publisher, Subscriber, and Subscription interfaces and relationships in order to provide its functionality. A native Combine operator acts as both a Subscriber of upstream data and a Publisher to downstream subscribers.
For this example, we’ll create a modulus operator implemented natively in Combine. The modulus is a mathematical operator which gives the remainder of a division as an absolute value and is represented by the percent sign, %. So, for example, 10 % 3 = 1, or 10 modulo 3 is 1 (10 ➗ 3 = 3 Remainder 1).
Let’s look at the complete code for this native Combine operator, how to use it, and then discuss how it works.
// 1
struct ModulusOperator<Upstream: Publisher>: Publisher where Upstream.Output: SignedInteger {
    typealias Output = Upstream.Output // 2
    typealias Failure = Upstream.Failure

    let modulo: Upstream.Output
    let upstream: Upstream

    // 3
    func receive<S>(subscriber: S) where S : Subscriber, Self.Failure == S.Failure, Self.Output == S.Input {
        let bridge = ModulusOperatorBridge(modulo: modulo, downstream: subscriber)
        upstream.subscribe(bridge)
    }
}

extension ModulusOperator {
    // 4
    struct ModulusOperatorBridge<S>: Subscriber where S: Subscriber, S.Input == Output, S.Failure == Failure {
        typealias Input = S.Input
        typealias Failure = S.Failure

        // 5
        let modulo: S.Input

        // 6
        let downstream: S

        //7
        let combineIdentifier = CombineIdentifier()

        // 8
        func receive(subscription: Subscription) {
            downstream.receive(subscription: subscription)
        }

        // 9
        func receive(_ input: S.Input) -> Subscribers.Demand {
            downstream.receive(abs(input % modulo))
        }

        func receive(completion: Subscribers.Completion<S.Failure>) {
            downstream.receive(completion: completion)
        }
    }

// Note: `where Output == Int` here limits the `modulus` operator to
// only being available on publishers of Ints.
extension Publisher where Output == Int {
    // 10
    func modulus(_ modulo: Int) -> ModulusOperator<Self> {
        return ModulusOperator(modulo: modulo, upstream: self)
    }
}
As you can see, the modulus is always positive, and when evenly divisible it is equal to 0.
How does the code work?
Now we can discuss how the native Combine operator code works.
- We define our new Combine operator as a
Publisherwith a constraint on some upstreamPublishers output of typeSignedInteger. Remember, our operator will be acting as both aPublisherand aSubscriber. Thus our input, the upstream, must beSignedIntegers. - Our
ModulusOperatoroutput, acting as aPublisher, will be the same as our input (i.e.SignedIntegers). - Required function implementation for
Publisher. Creates aSubscriptionwhich acts as a bridge between the operators upstreamPublisherand the downstreamSubscriber. - The
ModulusOperatorBridgecan act as both aSubscriptionand aSubscriber. However, simple operators like this one can be aSubscriberwithout the need of being aSubscription. This is due to the upstream handling lifecycle necessities likeDemand. The upstream behavior is acceptable for our operator, so there is no need to implementSubscription. TheModulusOperatorBridgealso performs the primary tasks of the modulus operator. - Input parameter to the operator for the modulus that will be calculated.
- References to the downstream
Subscriberand the upstreamPublisher. CombineIdentifierforCustomCombineIdentifierConvertibleconformance when aSubscriptionorSubjectis implemented as a structure.- Required function implementations for
Subscriber. Links the upstreamSubscriptionto the bridge as a downstreamSubscriptionin addition to lifecycle. - Receives input as a
Subscriber, performs the modulus operation on this input, and then passes it along to the downstreamSubscriber. The new demand for data, if any, from the downstream is relayed to the upstream. - Finally, an extension on
Publishermakes our custom Combine operator available for use. The extension is limited to those upstreamPublisherswhose output is of typeInt.
Putting this new modulus operator into action on a Publisher of Int would look like:
[-10, -9, -8, -7, -6, -5, -4, -3, -2, -1, 0, 1, 2, 3, 4, 5, 6, 7, 8, 9, 10].publisher
    .modulus(3)
    .sink { modulus in
        print("modulus: \(modulus)")
    }
    .store(in: &cancellables)
modulus: 1
modulus: 0
modulus: 2
modulus: 1
modulus: 0
modulus: 2
modulus: 1
modulus: 0
modulus: 2
modulus: 1
modulus: 0
modulus: 1
modulus: 2
modulus: 0
modulus: 1
modulus: 2
modulus: 0
modulus: 1
modulus: 2
modulus: 0
modulus: 1
As you can see, the modulus operator will act upon a Publisher of Int. In this example, we’re taking the modulus of 3 for each Int value in turn.
Conclusion
Combine is a powerful declarative framework for the asynchronous processing of values over time. Its utility can be extended and customized even further through the creation of custom operators which act as processors in a pipeline of data. These operators can be created through composition, allowing for excellent reuse of common pipelines. They can also be created through direct implementation of the Combine Publisher, Subscriber, and Subscription protocols, which allows for the ultimate in flexibility and control over the flow of data.
Whenever you find yourself working with Combine, keep these techniques in mind and look for opportunities to create custom operators when relevant. A little time and effort creating a custom Combine operator can save you hours of work down the road.
The post Custom Operators in Swift Combine appeared first on Big Nerd Ranch.
]]>The post Getting started with computer vision using CoreML and CreateML appeared first on Big Nerd Ranch.
]]>What is computer vision?
Computer vision in its simplest terms is the ability to give a machine an image and the machine to give back meaningful information about the contents of the image. There are two ways computer vision is mostly used today. The first is image classification. This is where a machine can identify what an image is as a whole, but has no concept of what part of the image contains the detected items. The other type is object detection. While similar to image classification object detection is able to find individual items in an image and report their locations within the image. This can be further built upon to perform object tracking and is widely used in fields like self-driving cars and Snap filters.
Collecting training data.
The first step in any machine learning field is training a model to teach the computer what it should look for. For the purposes of experimenting with your first ML project, Google Images combined with a bulk image downloader like Fatkun Batch Image Downloader can be a great resource.
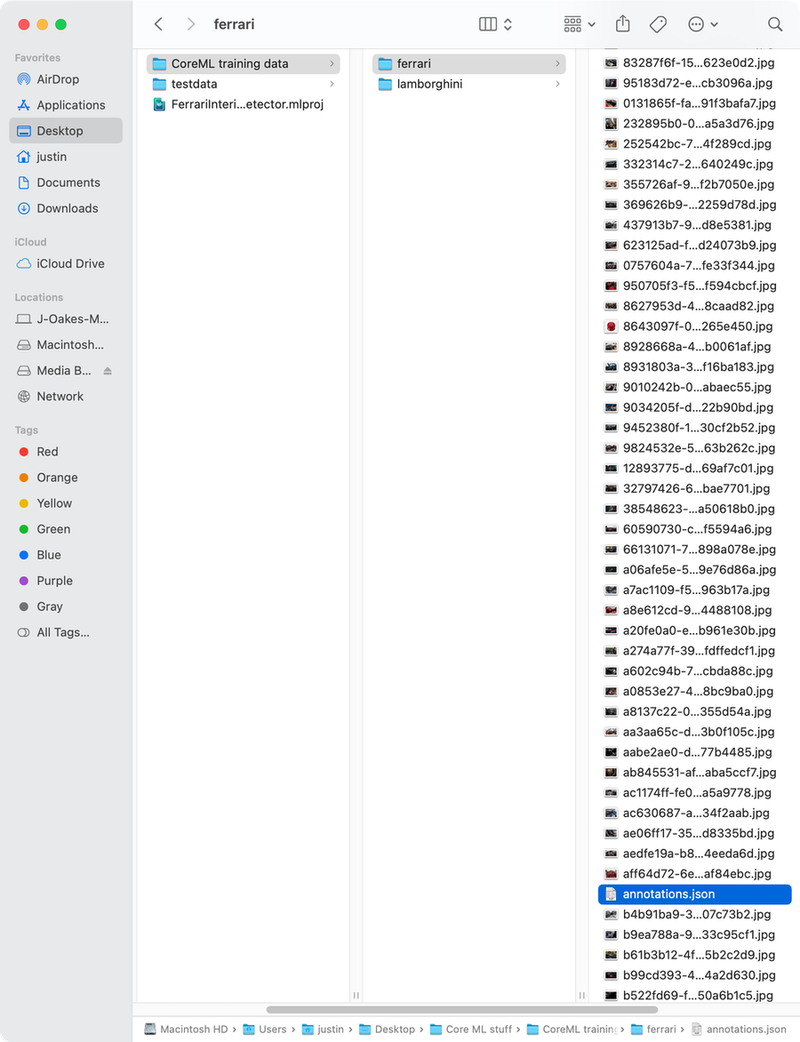
You will need at minimum 50 images for each kind of item you would like to identify, but your results will be better with more. A test data set while not strictly required will also go a long way towards helping validate your model works as it should. Make sure you have your training data organized in folders like in the screenshot below. You will need at least 2 different categories of images for image classification.
If you’re creating an object detection model you will need to include an annotations.json file in each directory that has training or testing images. This file lists the different objects that can be found in each image as well as their location in the image. Creating this file is something you can do by hand, but given your data set requires at least 50 images this can be extremely time-consuming. While it is frustrating that Apple leaves us to come up with our own way to do all this data entry, This HackerNoon article How to Label Data — Create ML for Object Detection, walks you through generating an annotations file using IBM Cloud. This does a lot to make the process less painful. Once you have your data set up you can move on to training your model.
Training your model.
With your data collected and organized all you need to do to create a working .mlmodel file is
- Open CreateML and create a new project of type Image Classifier or Object Detection.
- Drag and drop the directories that contain your training data onto the CreateML window and make sure it looks like the screenshot below.
- Click train.
This phase may take several hours to complete. As training continues you should see a graph on the screen trend towards 0. This indicates that the computer is getting better at recognizing the images provided.

When the training completes you will have access to the Preview and Output tabs of CreateML. The Preview tab will allow you to manually drag and drop photos for you to validate your newly created model. While doing this isn’t strictly necessary it is a good way to quickly test your model before moving on. If making use of this tab for additional testing you should make sure you are feeding it new images that are not included in either the training or test data sets.
When you are comfortable that the model is good enough to move to the next stage of your project you will use the Output tab to export your work to a .mlmodel file.
Using your model.
Now that you have a model it is time to explore how to actually process images and get data back about them. Luckily the Vision framework has all the functionality you will need to execute queries against the model. The images you use can come directly from the camera using an AVCaptureSession or come from anywhere else in the form of a CGImage. At this point processing, an image will be pretty straightforward. Let’s take a look at the code below
// 1. Converting CMSampleBuffer from a capture session preview into a CVPixelBuffer
       guard let pixelBuffer: CVPixelBuffer = CMSampleBufferGetImageBuffer(sampleBuffer) else { return }

       // 2. Where we bring in the model that powers all the heavy lifting in CoreML
       // All of the code to initialize the model should be automatically generated when you import the mlmodel file into the project.
       guard let model = try? VNCoreMLModel(for: FerrariObjectDetector(configuration: MLModelConfiguration()).model) else { return }
       let request = VNCoreMLRequest(model: model, completionHandler: requestCompletionHandler)

       // 3. Where the magic happens. Passes the buffer we want Vision to analyze and the request we want to Vision to perform on it.
       try? VNImageRequestHandler(cvPixelBuffer: pixelBuffer, options: [:])
           .perform([request])
This is all you need to have Vision return objects recognized in an image. One interesting thing to note is VNImageRequestHandler can handle multiple requests on the same image at a time. The completion handler in this case is defined outside of this block of code to make reading it easier. Let’s look at it now to get an idea of what we can do with this framework and what some of the sticking points might be.
A VNRequestCompletionHandler is really just a closure that takes VNRequest and an optional error as perimeters and returns void. (VNRequest, Error?) -> Void. The completion handler in the example looks like this.
{ completedRequest, error in
                guard error == nil,
        // 1. Keep an eye on what type you expect your results to cast to
                      let results = completedRequest.results as? [VNRecognizedObjectObservation] else { return }
                // 2. You may want to do more filtering here.
                // ie check for overlap, or changes in objects since the last frame.
                if !results.isEmpty {
                    // Remember we are running on the video queue
                    // switch back to main for updating UI
                    DispatchQueue.main.async {
                        self.handleResults(for: results)
                    }
                } else {
                    DispatchQueue.main.async {
                        self.clearResults()
                    }
                }
            }
An easy gotcha is that the results you get back will depend on the type of model you send to your VNCoreMLRequest. Make sure if using an image classification model to cast to a [VNClassificationObservation]. In this case we’re using [VNRecognizedObjectObservation] because we’re using an object detection model. Once you do have your collection of recognized objects there are 2 properties that you will mostly be concerned with. The first will be .labels and in the case of object detection .boundingBox. The labels array contains each item the machine thinks a detected item might be. These labels are ranked by its confidence in that classification. In most cases you will want the first item in the array. You can get the actual title string and confidence using the identifier and confidence properties on the label.
The bounding box is returned as a CGRect. It is important to note that Vision uses a different coordinate system that UIView/CGLayer and will need to be converted from a bottom left to top right system to correctly make an overlay for the object. While that falls outside of the scope of this blog post getting these coordinates to true up should be easy enough with a little effort.
Recap
In this post, you learned what computer vision is, where to get training data, and how to train a model with that data using CreateML. You then learned how to use the exported model. With this in mind, you should have everything you need to start experimenting with your first computer vision project on Apple devices. For more information feel free to check out Apple’s own documentation Recognizing Objects in Live Capture and an example project Understanding a Dice Roll with Vision and Object Detection. Now go out there and get started!
The post Getting started with computer vision using CoreML and CreateML appeared first on Big Nerd Ranch.
]]>The post Learning how to think in pipelines with Combine appeared first on Big Nerd Ranch.
]]>How would you solve this problem?
You’re implementing a complex data loading system.
- You have data sources A, B, and C to read from
- Each needs to be connected/initialized before reading any data from it
- To initialize B and C, you must read a configuration object from A
- All the data sources are synced from a cloud service automatically when initialized, which could take a variable amount of time for each
- An auth token is required to open the data sources, which must be fetched from a web service
With each of these requirements, the complexity grows. In a real project, these requirements may have been added over months and multiple shipping versions of the app. Without the full context from the start, accounting for the final complexity becomes very difficult.
An experienced reader may have already recognized these as asynchronous problems. Knowing that the complexity compounds further. We have to manage callbacks and dispatch queues to avoid blocking the main thread, tricky but nothing too painful. You may even reach for operation queues which would also help with the dependency management for this data.
You can download the full Swift Playground and follow along. There are multiple pages, each corresponding to one of the steps below, and a Common.swift file that contains some of the convenience functions and type definitions used in these examples.
Simplicity is Key, Right?
In a naive, single-threaded case (or our glorious async/await future, but that’s another blog post), your code may look something like this:
// From page "01 - Sequential BG Queue"
func getAllDataSources(userName: String) -> MyDataSourceFacade {
    let token = getTokenFromServer()

    let A = getDataSourceA(token)

    let userData = A.getData(for: userName)

    let B = getDataSourceB(userData, token)
    let C = getDataSourceC(userData, token)

    return MyDataSourceFacade(userData, A, B, C)
}
You may notice one big thing that’s missing from this example: error handling. So it would be a bit more complex in reality but roughly the same structure.
To get this off the main thread, we’d need something like the following:
// From page "01 - Sequential BG Queue"
DispatchQueue.global(qos: .userInitiated).async {
    let facade = getAllDataSources(userName: "Jim")

    DispatchQueue.main.async {
        print("done!")
        // do something with facade
    }
}
It’s a familiar pattern, but it’s very brittle and is prone to simple errors when adding functionality. It’s also very static. What if someone refactors the code and forgets to dispatch the code off and on the main thread properly? What if the auth token expires and we need to start the process over?
A First Try with Combine
Thankfully these things are much easier in a pipeline-oriented paradigm like Combine. A very natural way to update this for Combine is to replace the variables with Subjects or @Published properties then fuse them all together like this:
class FacadeProvider {

    @Published private var token: String
    @Published private var A: MyDataSource
    @Published private var B: MyDataSource
    @Published private var C: MyDataSource
    @Published private var userData: MyUserData

    private var cancellables: [AnyCancellable] = []

    func getAllDataSources(userName: String) -> AnyPublisher<MyDataSourceFacade, Never> {

        cancellables = []

        getTokenPublisher()
            .logError()
            .subscribe(on: backgroundQueue)
            .assign(to: .token, on: self)
            .store(in: &cancellables)

        $token
            .tryMap { getDataSourceA($0) }
            .logError()
            .subscribe(on: backgroundQueue)
            .assign(to: .A, on: self)
            .store(in: &cancellables)

        $A
            .tryMap { $0.getData(for: userName) }
            .logError()
            .subscribe(on: backgroundQueue)
            .assign(to: .userData, on: self)
            .store(in: &cancellables)

        let userAndTokenPub = $userData.combineLatest($token)

        userAndTokenPub
            .tryMap { getDataSourceB($0.0, $0.1) }
            .logError()
            .subscribe(on: backgroundQueue)
            .assign(to: .B, on: self)
            .store(in: &cancellables)

        userAndTokenPub
            .tryMap { getDataSourceC($0.0, $0.1) }
            .logError()
            .subscribe(on: backgroundQueue)
            .assign(to: .C, on: self)
            .store(in: &cancellables)

        return $userData.combineLatest($A, $B, $C)
            .map { (userData, A, B, C) -> MyDataSourceFacade? in
                return MyDataSourceFacade(userData, A, B, C)
            }
            .subscribe(on: backgroundQueue)
            .receive(on: DispatchQueue.main)
            .eraseToAnyPublisher()
    }
}
This is a pretty direct translation from our naive example, and it’s easy to figure out what’s happening. I purposely chose this because it’s what those new to Combine will likely think to do when hearing about @Published, myself included. It’s a bit more verbose, but we constructed valid pipelines, logged errors (albeit with a helper function) and guaranteed the threading behavior we wanted.
Better? Or Worse…
However, I’ve glossed over a pretty big problem with this implementation: it doesn’t actually work. We’ve defined our properties as non-optional, so when we create this type, each property must contain a value. However, we don’t have initial values for these complex data types.
So let’s change this to actually work, using optional properties where needed:
// From page "02 - Combine First Try"
class FacadeProvider {

    @Published private var token: String?
    @Published private var A: MyDataSource?
    @Published private var B: MyDataSource?
    @Published private var C: MyDataSource?
    @Published private var userData: MyUserData?

    private var cancellables: [AnyCancellable] = []

    func getAllDataSources(userName: String) -> AnyPublisher<MyDataSourceFacade, Never> {

        cancellables = []

        getTokenPublisher()
            .logError()
            .subscribe(on: backgroundQueue)
            .assign(to: .token, on: self)
            .store(in: &cancellables)

        $token
            .ignoreNil()
            .tryMap { getDataSourceA($0) }
            .logError()
            .subscribe(on: backgroundQueue)
            .assign(to: .A, on: self)
            .store(in: &cancellables)

        $A
            .ignoreNil()
            .tryMap { $0.getData(for: userName) }
            .logError()
            .subscribe(on: backgroundQueue)
            .assign(to: .userData, on: self)
            .store(in: &cancellables)

        let userAndTokenPub = $userData.ignoreNil().combineLatest($token.ignoreNil())

        userAndTokenPub
            .tryMap { getDataSourceB($0.0, $0.1) }
            .logError()
            .subscribe(on: backgroundQueue)
            .assign(to: .B, on: self)
            .store(in: &cancellables)

        userAndTokenPub
            .tryMap { getDataSourceC($0.0, $0.1) }
            .logError()
            .subscribe(on: backgroundQueue)
            .assign(to: .C, on: self)
            .store(in: &cancellables)

        return $userData.combineLatest($A, $B, $C)
            .compactMap { (userData, A, B, C) -> MyDataSourceFacade? in
                guard let userData = userData,
                      let A = A,
                      let B = B,
                      let C = C else {
                    return nil
                }

                return MyDataSourceFacade(userData, A, B, C)
            }
            .subscribe(on: backgroundQueue)
            .receive(on: DispatchQueue.main)
            .eraseToAnyPublisher()
    }
}
This is starting to get messy. Not to mention that our error handling could use some improvement. In this implementation, the caller of this function will never receive an Error, because the Publisher they’re returned is only connected to the @Published properties (whose Failure types are Never). This is a problem because if any setup goes awry and the process needs to start over, the caller will just wait quietly for a value/error that will never come. That’s obviously not ideal.
Wield the Pipeline(s)
The problem here is with how we’ve decided to model the problem with Combine. We did something that seemed natural to a developer who has worked almost exclusively with procedural code, which I’d bet is most of us in the iOS/Mac developer community. But that’s not what Combine is made for. We need to model this as a reactive stream: multiple signals that come together to give a complex output value.
Here’s a more “Combine-flavored” solution:
// From page "03 - Combine Flavored"
func getAllDataSources(userName: String) -> AnyPublisher<MyDataSourceFacade, Error> {

    let tokenPub = getTokenPublisher()

    let APub = tokenPub
        .tryMap { getDataSourceA($0) }

    let userDataPub = APub
        .tryMap { $0.getData(for: userName) }

    let userAndTokenPub = userDataPub.combineLatest(tokenPub)

    let BPub = userAndTokenPub
        .tryMap { getDataSourceB($0.0, $0.1) }

    let CPub = userAndTokenPub
        .tryMap { getDataSourceC($0.0, $0.1) }

    return userDataPub.combineLatest(APub, BPub, CPub)
        .compactMap { (userData, A, B, C) -> MyDataSourceFacade? in
            print("Returning facade")
            return MyDataSourceFacade(userData, A, B, C)
        }
        .subscribe(on: backgroundQueue)
        .receive(on: DispatchQueue.main)
        .eraseToAnyPublisher()
}
This is so much better! No more managing subscriptions with AnyCancellable! No more assigning to properties! We’re returning errors properly to the caller! But there is one wrinkle in this code that can trip you up. When we run this, we notice in our server logs that we’re contacting the auth server six times for the token every time we create a facade. Huh, that’s weird… Let’s take a look at why this is happening.
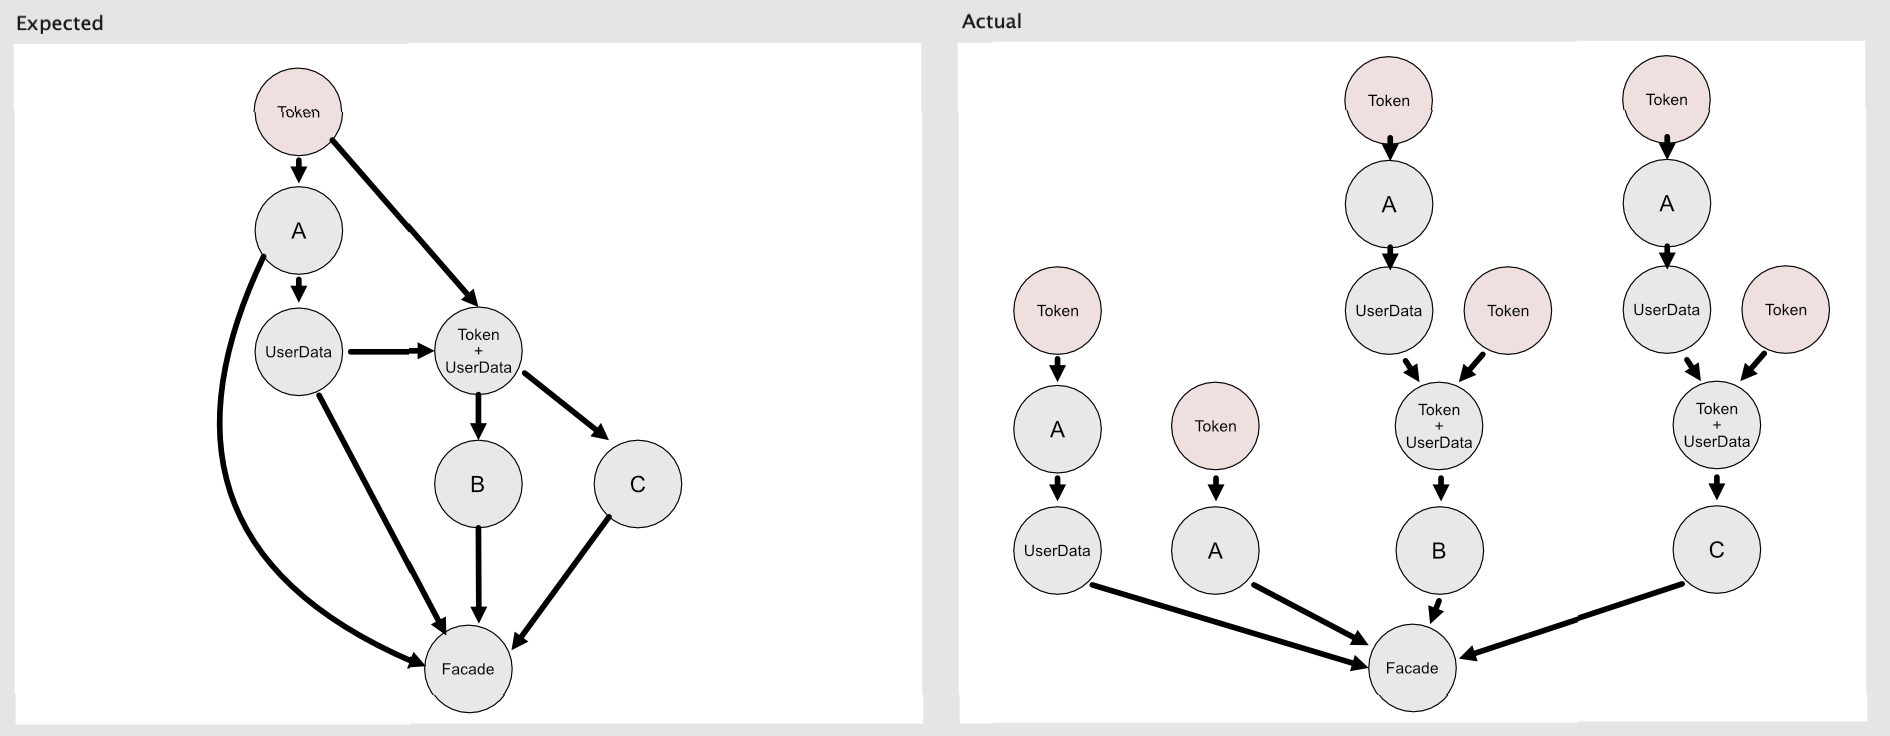
Above is a diagram of what we expected our above code to do, and what actually happened. On the left, we see the simple data flow we intended to define in the previous code sample, where each value is only created once. On the right, we see the actual outcome, where every intermediate value is being duplicated for every receiver. This is because the publishers we defined are only “recipes” for creating Subscriptions.
Subscriptions are the actual data-flow connections that are created when a subscriber connects to the pipeline. The subscription process happens in reverse, against the flow of data. By default, publishers don’t know about their existing subscriptions, they must create a new subscription to their upstream source each time they receive a downstream connection. That’s what you want in most cases, where stateless, value-type semantics offer safety and convenience, but in our case we only need these intermediate publishers to load their data a single time.
Spread the Word with Reference-type Publishers
Luckily Combine has a solution for this: class-type publishers like Share, Multicast, and Autoconnect. Share is the simplest to use since (per Apple’s documentation) it’s “effectively a combination of Multicast and PassthroughSubject, with an implicit .autoconnect().” We’ll update our re-used publishers to use .share() so they can publish to multiple downstreams.
// From page "04 - Shared Publishers
func getAllDataSources(userName: String) -> AnyPublisher<MyDataSourceFacade, Error> {

    let tokenPub = getTokenPublisher()
        .share()

    let APub = tokenPub
        .tryMap { getDataSourceA($0) }
        .share()

    let userDataPub = APub
        .tryMap { $0.getData(for: userName) }
        .share()

    let userAndTokenPub = userDataPub.combineLatest(tokenPub)
        .share()

    let BPub = userAndTokenPub
        .tryMap { getDataSourceB($0.0, $0.1) }

    let CPub = userAndTokenPub
        .tryMap { getDataSourceC($0.0, $0.1) }

    return userDataPub.combineLatest(APub, BPub, CPub)
        .compactMap { (userData, A, B, C) -> MyDataSourceFacade? in
            print("Returning facade on (Thread.current.description)")
            return MyDataSourceFacade(userData, A, B, C)
        }
        .subscribe(on: backgroundQueue)
        .receive(on: DispatchQueue.main)
        .eraseToAnyPublisher()
}
And that’s it! For real this time. Sorry for the deception, but I wanted to present this in a realistic, iterative-problem-solving way, so you could directly see what sort of issues you may run into when using Combine in the real world.
In fact, this blog post is almost exactly the path I took in a recent project (minus a lot of frustration and soul-searching along the way). But once I had a breakthrough on how to use Combine “The Right Way,” I was honestly giddy. And I never use that word (it sounds gross to me). So I felt the need to share and hopefully help anyone else out there struggling to take their first steps into the reactive world.
The post Learning how to think in pipelines with Combine appeared first on Big Nerd Ranch.
]]>The post Now Available: Swift Programming: The Big Nerd Ranch Guide, Third Edition appeared first on Big Nerd Ranch.
]]>It has been our greatest passion to help developers learn and stay up to date with Swift programming and iOS development through our books and bootcamps. To share our love of Swift and all of the changes it has seen, we are proud and excited to announce the 3rd edition of Swift Programming: The Big Nerd Ranch Guide!
 So, What’s New?
While “Updated for Xcode 12 and Swift 5.3” is absolutely true, it doesn’t tell the whole story of this 460-page tome.
We have made a number of other improvements that we think you will love.
Tools for Standing Alone
After you learn Swift, a great next step is to learn about iOS programming and development (I can recommend a great book on the subject).
No matter what your next step is, you have already learned useful skills by the end of this book. With that in mind, we wrote a brand new chapter about writing command line utilities using Swift’s Argument Parser library.
In addition to giving you the tools to build CLI utility apps for your Mac, the new chapter also introduces some important discussion around the filesystem, project organization, and the modularity of Swift, including how to import external libraries using the Swift Package Manager from within Xcode.
Tools for the Future
Developers wanting to eventually learn SwiftUI will be happy to know that we have included coverage of opaque types and property wrappers in this edition, two language features that enable SwiftUI’s elegant syntax.
We have worked hard to expand our discussion around advanced concepts such as memory management and troubleshooting reference cycles, the polymorphism enabled by Swift’s type system, working with closures, generics, and the important differences between value and reference types in your programs.
Lastly, we have included a discussion of the newer language features which have shifted how we think about our programs, such as the generic Result type.
For Dessert: A Taste of SwiftUI
Speaking of SwiftUI, you didn’t think we would leave that out, did you?
The last chapter of the book is a Big Nerd Ranch take on an introduction to building iOS and macOS apps with the SwiftUI framework.
This new chapter, which replaces the old “First Cocoa App” and “First iOS App” chapters with a single multi-platform iOS/macOS app in SwiftUI, takes care to introduce and explain some of the fundamental building blocks of SwiftUI apps. We also take this opportunity to extend our discussion of the filesystem and saving user data.
We think you’ll like where it takes you.
What’s Next?
We will continue to provide world-class training on how to develop apps for iOS, and we are building a SwiftUI Essentials course which we hope to offer in 2021. We look forward to continuing to engage with you and teach you as Apple’s platforms evolve.
But you can rest assured that as we learn more, we will share our passion and love for the latest Swift developments with you.
Keep your eye on this blog and our social media for more. Happy coding!
The post Now Available: Swift Programming: The Big Nerd Ranch Guide, Third Edition appeared first on Big Nerd Ranch.
]]>The post Exploring Kotlin/Native – Part 2 – Interoperability appeared first on Big Nerd Ranch.
]]>In this post, we’ll explore how well the Kotlin/Native compiler handles both pre-built and non-pre-built libraries.
Pre-built Libraries
The Kotlin/Native distribution includes “Platform Libraries”, which are a set of prebuilt libraries specific to each target.
A few of the prebuilt libraries that come “out-of-the-box” when you download Kotlin/Native are:
- POSIX (available for all platforms except WebAssembly)
- OpenGL
- Zlib
- Gzip
- Metal
- Foundation … along with many other libraries and Apple frameworks.
Source: Kotlin/Native Interoperability
How it Works
According to kotlinlang.org:
“The Kotlin/Native compiler automatically detects which of the platform libraries have been accessed and automatically links the needed libraries. … [Platform] libs in the distribution are merely just wrappers and bindings to the native libraries. That means the native libraries themselves (
.so,.a,.dylib,.dll, etc.) should be installed on the machine.”
This means that you can write a Kotlin program that uses any of the supported platform libraries. Since the platform libraries are wrappers and bindings to the native libraries, any accesses to the platform libraries will be routed to where the actual implementation of the native library is located on the machine. In this way, the program is able to access the operating system services of the platform that it targets.
No additional action needs to be taken in order to utilize the platform libraries. Platform libraries seem easy and straightforward to use, so let’s try it out.
Test Driving a Platform Library
There are several platform libraries to choose from. OpenGL appeared to be the most interesting to me, so we’ll experiment with it. (Note: Apple deprecated OpenGL in 2018 in favor of Metal, but we are using OpenGL 3.3, the version upon which all future versions of OpenGL are based; macOS supports up to OpenGL 4.1.)
First, we need to build a window and an OpenGL context. Some background information about OpenGL is strongly recommended for this tutorial, but not strictly required. Chapter 2 of LearnOpenGL is a great source of background information and serves as inspiration for this tutorial.
We could manually program our window and context, or we can use a pre-existing library that contains functions that can create a window and an OpenGL context for us. Some commonly used libraries which handle these tasks are GLUT, SDL, SFML and GLFW. I noticed that GLUT is included in the macOS platform libraries. For Linux, the equivalent library will need to be installed on the machine. Regardless of the platform, the libraries need to exist directly on the machine. The actual implementation of the libraries is not included in the platform libraries, as the platform libraries are merely wrappers/bindings to actual libraries. OpenGL and GLUT come with the OS and Xcode installations.
JetBrains provides a neat, simple demonstration of this out-of-the-box capability, which can be found here.

Figure 1. Running JetBrains’s OpenGL sample.
Non-pre-built Libraries
What if I want to use a library that is not pre-included in the platform libraries? What if I wanted to use GLFW instead of GLUT so that I can follow along in the OpenGL tutorial?
We will need to create Kotlin bindings from the C library. This example is a good reference. We’ll use the cinterop tool. “It takes a C library and generates the corresponding Kotlin bindings for it, which then allows us to use the library as if it were Kotlin code.”
First, download the GLFW source files. You can download the source package or clone the git repo. Note: We’ll be using a macOS. The steps in this tutorial may not translate directly to Windows or Linux operating systems.
If you want to produce a library compatible with all three platforms, you have to create bindings that will act as an interface to the real library (written in C/C++). There’s some good documentation about how to produce the .klib file to build our program with.
- C Interop: Official documentation on how to use Kotlin/Native’s
cinteroptool to generate everything your Kotlin program needs to interact with an external library. - Kotlin/Native Libraries: Basic instructions on how to produce a library with the Kotlin/Native compiler and how to link the library to your Kotlin program; also contains documentation about helpful klib utilities included in Kotlin/Native.
We’ll use these resources to produce our own .klib file.
The first step before we start building the library is to create a Kotlin program that will use GLFW. I created a file named test.kt. In test.kt, import the OpenGL platform libraries.
import kotlinx.cinterop.*
import platform.OpenGL.*
import platform.OpenGLCommon.*
Below these import statements, import the GLFW libraries and instantiate a window.
...
import glfw.*
fun main() {
    var glfwInitialized = glfwInit()
    if (glfwInitialized == 0) {
        println("Failed to initialize GLFW")
        return
    }
    var window = glfwCreateWindow(640, 480, "OpenGL on Kotlin! Wow!", null, null);
    if (window == null)
    {
        println("Failed to create GLFW window")
        glfwTerminate()
        return
    }
    println("hello world! glfw initialized? = $glfwInitialized, window pointer = $window")
    glfwMakeContextCurrent(window)
    while(glfwWindowShouldClose(window) == 0)
    {
        glClear(GL_COLOR_BUFFER_BIT)
        glfwSwapBuffers(window);
        glfwPollEvents();
    }
    glfwTerminate()
    return
}
This program uses the function glfwInit(), among others, whose actual implementation is contained inside the GLFW C library. We used this program to test that the Kotlin program can properly access the GLFW library.
Next, you need to define the .def file. It is important that you get this part right. If you do not have the proper contents included in your custom .def file, the cinterop tool may not be able to generate the necessary files properly. You will know if you did something wrong if you are trying to use a function or property belonging to the C library in your Kotlin program and you receive compile-time errors stating that the function or property is not recognized. A good way to check if the wrapper/bindings are being generated correctly is by using the klib contents <library-name> command (explained in more detail later). If you are inducing C interoperability on a library, you must ensure that you include all of the necessary header files and include the proper compiler and linker options. To know if you are doing this right may require some background knowledge about how to build and link the particular C library you are using. For the sake of this demonstration, however, the contents of the .def file will be provided to you.
Create a glfw.def file. The contents should look like this:
headers = /usr/local/include/GLFW/glfw3.h /usr/local/include/GLFW/glfw3native.h
compiler-options = -framework OpenGl
package = glfw
linkerOpts.osx = -L/opt/local/lib -L/usr/local/lib -lglfw
linkerOpts.linux = -L/usr/lib64 -L/usr/lib/x86_64-linux-gnu -lglfw
linkerOpts.mingw = -lglfw
Note: According to the documentation on Creating Bindings for a New Library, if you wish to insert compiler options that are specific to a particular platform, you can set fields such as compilerOpts.osx and compilerOpts.linux equal to the options you would like to specify.
To avoid lengthy terminal commands, we are going to add the Kotlin/Native distribution to the system PATH. (If you already added Kotlin/Native to the PATH, you can skip this part.) When adding the distribution to the PATH, you are telling the terminal to look in this location (along with the other locations specified in your PATH) when using terminal commands (such as cinterop and kotlinc-native). The terminal needs to know where to find the scripts behind the commands in order to run them. If you do not add the distribution location path to your PATH, the terminal will not recognize your cinterop and kotlinc-native commands when you try to use them (unless you type the entire file path specifying the location of the respective scripts). First, identify the location of your Kotlin/Native distribution that you downloaded. I downloaded my instance of the Kotlin/Native distribution from the releases page (scroll all the way down and you can see links to download Kotlin/Native for Windows, Linux, and macOS).
Copy the file path to wherever you downloaded and unzipped your Kotlin/Native distribution. You can add the distribution location to the PATH temporarily or permanently.
The Temporary Way
Enter the following command into your terminal, substituting <path-to-your-kotlin-native-distribution> with the file path leading to your Kotlin/Native distribution located on your local machine. Don’t forget to append /bin.
export PATH=$PATH:<path-to-your-kotlin-native-distribution>/bin
To verify that your path was added to PATH, you can run:
echo $PATH
and check that your distribution location was added to the PATH variable. File paths are separated by the : delimiter.
The Permanent Way
Run:
open ~/.bash_profile
or, if the file does not exist:
touch ~/.bash_profile
open ~/.bash_profile
Append the following text to the subsequent file that opens, substituting <path-to-your-kotlin-native-distribution> with the file path leading to your Kotlin/Native distribution located on your local machine:
PATH=$PATH:<path-to-your-kotlin-native-distribution>/bin
Save the file. Close the terminal and open a new session for the changes to take effect. Verify that your path was added to PATH by running:
echo $PATH
Now you should be able to use the cinterop and kotlinc-native commands without issue.
Set Up C Interoperability and Link the Library
Run the cinterop command:
$ cinterop -def glfw.def -compiler-option -I/usr/local/include -o glfw3
You can verify if the bindings were generated correctly by running:
$ klib contents glfw3
You should see a bunch of code containing type aliases, constants, function headers, etc. output to the terminal. The code excerpt below displays snippets of glfw3.klib‘s contents. Notice that the code is in Kotlin. This output indicates that the Kotlin bindings were generated. These bindings correspond to the properties and functions present in the C library. If you run the klib contents command but nothing outputs, it likely means that something went wrong. You should check that the right header files and options were declared in the .def file in the appropriate fields. Refer to the library’s documentation for guidance on properly building and linking the library.
package glfw {
@CStruct(spelling = "struct { unsigned char p0[15]; float p1[6]; }") class GLFWgamepadstate constructor(rawPtr: NativePtr /* = NativePtr */) : CStructVar {
    val axes: CArrayPointer<FloatVar /* = FloatVarOf<Float> */> /* = CPointer<FloatVarOf<Float>> */
    val buttons: CArrayPointer<UByteVar /* = UByteVarOf<UByte> */> /* = CPointer<UByteVarOf<UByte>> */
    companion object : CStructVar.Type
}
...

typealias GLFWcharfun = CPointer<CFunction<(CPointer<GLFWwindow>?, UInt) -> Unit>>
typealias GLFWcharfunVar = CPointerVarOf<GLFWcharfun>
typealias GLFWcharmodsfun = CPointer<CFunction<(CPointer<GLFWwindow>?, UInt, Int) -> Unit>>
typealias GLFWcharmodsfunVar = CPointerVarOf<GLFWcharmodsfun>
typealias GLFWcursorenterfun = CPointer<CFunction<(CPointer<GLFWwindow>?, Int) -> Unit>>
...

package glfw {
const val GLFW_ACCUM_ALPHA_BITS: Int = 135178
const val GLFW_ACCUM_BLUE_BITS: Int = 135177
const val GLFW_ACCUM_GREEN_BITS: Int = 135176
...

package glfw {
const val GLFW_KEY_EQUAL: Int = 61
const val GLFW_KEY_ESCAPE: Int = 256
const val GLFW_KEY_F: Int = 70
const val GLFW_KEY_F1: Int = 290
...

package glfw {
const val GLFW_OPENGL_API: Int = 196609
const val GLFW_OPENGL_COMPAT_PROFILE: Int = 204802
const val GLFW_OPENGL_CORE_PROFILE: Int = 204801
const val GLFW_OPENGL_DEBUG_CONTEXT: Int = 139271
...

@CCall(id = "knifunptr_glfw77_glfwCreateCursor") external fun glfwCreateCursor(image: CValuesRef<GLFWimage>?, xhot: Int, yhot: Int): CPointer<GLFWcursor>?
@CCall(id = "knifunptr_glfw78_glfwCreateStandardCursor") external fun glfwCreateStandardCursor(shape: Int): CPointer<GLFWcursor>?
@CCall(id = "knifunptr_glfw25_glfwCreateWindow") external fun glfwCreateWindow(width: Int, height: Int, @CCall.CString title: String?, monitor: CValuesRef<GLFWmonitor>?, share: CValuesRef<GLFWwindow>?): CPointer<GLFWwindow>?
@CCall(id = "knifunptr_glfw22_glfwDefaultWindowHints") external fun glfwDefaultWindowHints()
@CCall(id = "knifunptr_glfw79_glfwDestroyCursor") external fun glfwDestroyCursor(cursor: CValuesRef<GLFWcursor>?)
@CCall(id = "knifunptr_glfw26_glfwDestroyWindow") external fun glfwDestroyWindow(window: CValuesRef<GLFWwindow>?)
...
Once the glfw3.klib file is generated, install the library by running:
$ klib install glfw3.klib
Note: The klib install command will install the associated library files to the default repository. The headers will be installed to /usr/local/include/GLFW and the library files will be installed to /usr/local/lib for macOS. For Linux, the corresponding install locations are /opt/local/include/GLFW and /opt/local/lib.
Compile the program, linking our program to the GLFW library.
$ kotlinc-native test.kt -l glfw3
(This outputs an executable file named program.kexe by default. To specify a name, append -o program-name to the command, substituting “program-name” with your desired program name.)
To run the program, type ./program.kexe into the command line and hit enter.
You should see something like hello world! glfw initialized? = 1, window pointer = CPointer(raw=0x7f858c40c8a0) in the terminal. So glfwInit() returned 1 (i.e. true) and the window, which is accessed via pointer, was created. You should also see an empty black window pop up, like so:  Now you have a place to put your 3D OpenGL objects.
You have successfully created a Kotlin program that is capable of using the OpenGL and GLFW C libraries! Thanks to Kotlin/Native, you can take advantage of the functionality provided by platform libraries and external C libraries using the Kotlin programming language.
The post Exploring Kotlin/Native – Part 2 – Interoperability appeared first on Big Nerd Ranch.
]]>The post Using Apple’s Compression Framework on iOS & macOS appeared first on Big Nerd Ranch.
]]>In the early days of Apple, disk space was a precious and limited resource. With today’s modern iOS and macOS devices, disk space is relatively abundant, but developers still need to be careful about how they manage their application data. iPhone and iPad users can quickly find their relatively large solid-state drives filling up with media or apps.
If you’re developing an app for iOS or macOS you may find yourself storing a variety of custom data on the user’s device including: application support files, temporary data, cached images, etc. In some cases it may make sense for you to compress this data yourself to reduce the required storage space. Although many compression algorithms can be complex to implement from scratch, thankfully Apple has made it easy with their Compression framework.
Apple’s Compression Framework
Available in iOS 9.0+ and macOS 10.11+, Compression simplifies the process of leveraging a number of common compression algorithms such as ZLIB, LZMA, LZFSE, and LZ4.
How Compression Works
There are a wide variety of compression algorithms available. In general, they reduce the size of data by identifying repetition and creating a new intermediary data representation which eliminates this ‘waste of space.’ There are two broad categories of algorithms: lossy and lossless—the key difference being that lossy algorithms actually result in a loss of the input data, meaning the exact input data can’t necessarily be restored in full after decompression. JPEG compression is a classic example of a lossy algorithm, and if you’ve ever seen an internet image that was full of artifacts, you’ve witnessed the result of this data loss.
For most computing applications, lossless algorithms are necessary to ensure data integrity, so that is what we’ll be using here. (All of the compression algorithms offered by Apple’s Compression framework are lossless.)
Choosing an Algorithm
In this post we’ll be using ZLIB (which internally is built around DEFLATE), as it is a commonly-used algorithm for general data compression and has widespread cross-platform support. If you’re not as concerned with platform compatibility you may consider a different algorithm. Apple provides brief descriptions of the available algorithms and when to use them in the Compression.Algorithm enumeration docs.
Compressing Data with Swift
Now let’s take a closer look at how you can easily and quickly reduce the size of stored data. Let’s imagine we’re working on an iOS or macOS app that needs to save a large JSON payload to disk. And although we’re focusing on local storage here, compression is also an important consideration for network requests and bandwidth usage. JSON typically contains a considerable amount of repetition, so we can expect significant size savings by compressing the data before we save it to disk.
Step 1: Get the JSON Data
To start, we’ll get an actual Data object from our JSON string. Note: the JSON itself is omitted below, but you can use any example JSON string to quickly test this code out. We’ll also grab the input data size while we’re at it, as we’ll want to reference it later.
let jsonString: String = …
guard let inputData = jsonString.data(using: .utf8) else { /* Handle error */ }
let inputDataSize = inputData.count
Step 2: Create our Destination Buffer
Now we create a buffer used to store the compressed data. We allocate it with a reasonable starting size based on the inputData. We’re using Swift’s UnsafeMutablePointer here to effectively give us a raw block of memory, which is represented as a series of UInt8s.
Because allocate<T>(capacity: N) allocates as many bytes as needed for N instances of type <T>, we want to make sure to accommodate the size of that data type by checking the MemoryLayout for UInt8. However, in practice, it’s extremely unlikely that a UInt8 would ever require anything besides a single byte (which means the size and stride would be 1), so this is mostly in place as a safeguard.
let byteSize = MemoryLayout<UInt8>.stride
let bufferSize = inputDataSize / byteSize
let destinationBuffer = UnsafeMutablePointer<UInt8>.allocate(capacity: bufferSize)
Step 3: Create our Source Buffer
We’ll also create a source buffer which contains our inputData. There are various ways to do this in Swift (and also avoiding copying the data), though for our purposes the approach below provides simple and readable code:
var sourceBuffer = Array<UInt8>(repeating: 0, count: bufferSize)
inputData.copyBytes(to: &sourceBuffer, count: inputDataSize)
Step 4: Apply Compression
Now the fun part: compressing the data. Apple has made this as simple as possible: we just pass our buffers into the compression_encode_buffer() function along with the sizes and the algorithm we’d like to use (in this case COMPRESSION_ZLIB).
let compressedSize = compression_encode_buffer(destinationBuffer,
                                                inputDataSize,
                                                &sourceBuffer,
                                                inputDataSize,
                                                nil,
                                                COMPRESSION_ZLIB)
For fun, you might try comparing the values now of inputDataSize vs compressedSize. It’s not uncommon for ZLIB to achieve JSON compression rates of 70% or higher.
Step 5: Get the Compressed Data
The result of the function call will be the size of the data once it’s compressed. The actual compressed data is now in our destinationBuffer. We can check for a return size of 0 to determine if any errors occurred, otherwise we can now make use of the buffer data. One way to do this is to take ownership of the memory using NSData.bytesNoCopy() as shown below and toll-free bridge it to Data.
guard compressedSize != 0 else { … }
let encodedData: Data = NSData(bytesNoCopy: destinationBuffer, length: compressedSize) as Data
It’s worth noting that using this approach causes our Data to take ownership of the allocated bytes of the buffer, and puts that memory under the standard Swift memory management rules we’re familiar with for Foundation objects. This means that you do not need to (and should not) manually deallocate the buffer memory at this stage.
Decompressing the Data
Our compressed data wouldn’t be very valuable if we couldn’t later restore it to its original form. Thankfully it’s quite simple—and is essentially just the above steps in reverse. The one difference is that we need to know the decompressed (original) size of the data so that we can allocate sufficient space. To perform the decompression we simply pass in the compressed data in a buffer, along with the original data size:
let decodedSize = compression_decode_buffer(destinationBuffer,
                                            inputDataSize,
                                            &sourceBuffer,
                                            compressedSize,
                                            nil,
                                            COMPRESSION_ZLIB)
Summary
Compression can be a valuable tool in your developer tool chest to ensure that your iOS and macOS applications are good citizens and are not wasting disk space or network bandwidth. Apple’s Compression framework makes it easier than ever to use common compression algorithms in your apps.
The post Using Apple’s Compression Framework on iOS & macOS appeared first on Big Nerd Ranch.
]]>The post Exploring Kotlin/Native – Part 1 appeared first on Big Nerd Ranch.
]]>After all, Java’s phenomenal widespread popularity (and profitability) in the enterprise world was fueled by its ability to run on any machine, eliminating the need to replicate software tailored to different hardware platforms. The creators of Java, Sun Microsystems, had a memorable and catchy slogan: “Write once, run anywhere.” This implied that Java could be written by anyone and run on any device — so long as that device was equipped with a Java Virtual Machine (JVM).
This caveat can prove to be a costly obstacle because, for some devices, the need to have a JVM pre-installed is impractical or impossible. Embedded devices with limited memory may not have the capacity to house a JVM. Some operating systems, such as iOS, simply do not allow it.
The Kotlin compiler has a method to compile the language to native binaries of several popular operating systems, eliminating the need for a special virtual machine to be installed on the device. For a handful of supported operating systems, the Kotlin compiler can remove the need to download and install a virtual machine in order to run your Kotlin program. In theory, this means that you can write a Kotlin program and compile it to produce eight different executable files that can run natively on each of their respective platforms, right?
In this blog series, we will explore Kotlin/Native in-depth: What it is, what it can do, and what it can’t.
Expectation:
 Through my research, I found that some Kotlin/Native target platforms must be built on the appropriate host machine. Windows targets, for example, must be built on a Windows host. So you cannot create native binaries for all eight platforms using only one host machine.
 Figure 1. Informational message received when building a Kotlin/Native project in IntelliJ IDEA. The Windows Kotlin/Native target cannot be built on a host running MacOS.
Since I am operating on a MacBook, let’s instead explore creating native binaries that can be compiled from MacOS, i.e. Mac, Linux, and iosARM native binaries.
Test Driving Kotlin/Native
The Kotlin/Native compiler is already included in the Kotlin/Native distribution in the form of a command line tool. Using the command line is straight-forward when compiling for a target platform that is the same as the host machine, but we are trying to take one Kotlin source file and compile it down to eight native binary files that can run on the eight supported hardware platforms. Additionally, compiling one Kotlin source code file as opposed to compiling an entire project with multiple Kotlin source code files is unlikely in the real world. In the scenario where multiple source files and libraries need to be compiled, it is easier to use an IDE and Gradle build system. IntelliJ is a great choice because it allows you to compile multiple source files in a project at once, and can allow you to target multiple platforms for the compilation of those source files simultaneously by using Gradle. Because it is overall more practical to use the Kotlin/Native compiler via IntelliJ, we will also be using IntelliJ to accomplish our objective.
I followed the instructions on Creating a new Kotlin/Native project in IntelliJ IDEA, but added support for the other platforms in the Gradle file in the Kotlin block:
plugins {
   id 'org.jetbrains.kotlin.multiplatform' version '1.3.61'
}
repositories {
   mavenCentral()
}
kotlin {
   // For ARM, should be changed to iosArm32 or iosArm64
   // For Linux, should be changed to e.g. linuxX64
   // For MacOS, should be changed to e.g. macosX64
   // For Windows, should be changed to e.g. mingwX64
   macosX64("macos") {
       binaries {
           executable {
               // Change to specify fully qualified
               // name of your application's entry point:
              entryPoint = 'sample.main'
               // Specify command-line arguments, if necessary:
               runTask?.args('')
           }
       }
   }
   linuxX64("linux") {
       binaries {
           executable {
               entryPoint = 'sample.main'
               runTask?.args('')
           }
       }
   }
   mingwX64("windows") {
       binaries {
           executable {
               entryPoint = 'sample.main'
               runTask?.args('')
           }
       }
   }
   iosArm64("ARM") {
       binaries {
           executable {
               entryPoint = 'sample.main'
               runTask?.args('')
           }
       }
   }
   sourceSets {
       // Note: To enable common source sets please
       // comment out 'kotlin.import.noCommonSourceSets' property
       // in gradle.properties file and re-import your project in IDE.
       macosMain {
       }
       macosTest {
       }
   }
}
// Use the following Gradle tasks to run your application:
// :runReleaseExecutableMacos - without debug symbols
// :runDebugExecutableMacos - with debug symbols
I tried to build but was hit with this error:
Execution failed for task ':compileKotlinMacos'.
> Process 'command '/Applications/IntelliJ IDEA CE.app/Contents/jbr/Contents/Home/bin/java''
> finished with non-zero exit value 2
If you see this error message, you may be missing Xcode Command Line Tools. Here’s how you can set them:
Open Xcode. In the top menu bar, navigate to Xcode > Preferences. In the window that opens, select the Locations tab in the top menu bar.
 In the dropdown menu next to “Command Line Tools,” select the latest version available. This should fix the issue.
 Now it is time to build. Hit the green, hammer-shaped build button towards the top right of the IDE window.
 ![]()
The program should compile without issue. You may notice that nothing seemed to happen. No new folders were generated for our platforms. What gives?
Once you build the program, the IDE compiles the source code and produces an executable file. You can find this executable file in the project’s build files.

Figure 2. The executable file is placed in the ./build/bin/macos/releaseExecutable directory of your project files.
Assuming you are currently in your project root file, you can go to ./build/bin/macos and you’ll be able to find your runnable executable file in releaseExecutable. You can even run it directly in the terminal.
Alternatively, you can run the program in the IDE. To run the program in the IDE, double click the runReleaseExecutableMacos task in the Gradle tasks menu. To get to the Gradle task menu, click the Gradle side tab located on the right side of the IDE window. Open your project’s drop-down and then open Tasks > run and you should find the run task for the MacOS executable.
 As you can see in the Run view, the executable ran successfully!
 Creating Multiple Native Binaries from a Common Source
Next, we will create a common source module. Comment out the kotlin.import.noCommonSourceSets=true line in the gradle.properties file.
 Next, in the project view located in the left hand drawer menu, create a new Directory.
 Once you click Directory, a pop-out options menu should appear. Select commonMain/kotlin and commonTest/kotlin and hit enter. To select multiple items, hold down the control key on Windows or command key on Mac while selecting the items with your mouse.
 You should see some new folders appear: commonMain and commonTest.
 These folders are for our common source code. We will place our Kotlin program in the commonMain/kotlin directory and compile it down to native binaries that target the Mac, Linux, and iOS (ARM) platforms.
After making a common Kotlin source file, like so:
 I made a few changes to the build.gradle file:
kotlin {
   // For ARM, should be changed to iosArm32 or iosArm64
   // For Linux, should be changed to e.g. linuxX64
   // For MacOS, should be changed to e.g. macosX64
   // For Windows, should be changed to e.g. mingwX64
   macosX64("macos") {
       binaries {
           executable {
               // Change to specify fully qualified
               // name of your application's entry point:
              entryPoint = 'main'
               // Specify command-line arguments, if necessary:
               runTask?.args('')
           }
       }
   }
   linuxX64("linux") {
       binaries {
           executable {
               entryPoint = 'main'
               runTask?.args('')
           }
       }
   }
   mingwX64("windows") {
       binaries {
           executable {
               entryPoint = 'main'
               runTask?.args('')
           }
       }
   }
   iosArm64("ARM") {
       binaries {
           executable {
               entryPoint = 'main'
               runTask?.args('')
           }
       }
   }
   sourceSets {
       // Note: To enable common source sets please
       // comment out 'kotlin.import.noCommonSourceSets' property
       // in gradle.properties file and re-import your project in IDE.
       commonMain {
           dependencies {
               implementation(kotlin("stdlib-common"))
           }
       }
       commonTest {
           dependencies {
               implementation(kotlin("test-common"))
               implementation(kotlin("test-annotations-common"))
           }
       }
   }
}
I rebuilt the project and verified that native binaries were produced for each of the three target platforms I specified in the build.gradle file, except for Windows. Since I am using a Mac to compile the source code, the compiler just ignores the Windows instructions in build.gradle.
Voila! Executables were created for all three platforms.

Reality:
In reality and for more complex projects, multi-platforming will likely require platform-specific code to be implemented, especially for Android and iOS. So the multi-platforming structure probably looks closer to this (ignoring host machine requirements):
 Next time, we can try to build a program using different libraries to see how Kotlin/Native will hold up under the added complexity.
Conclusion
Kotlin/Native allows you to compile a single Kotlin program to eight different types of native binaries. Each binary file produced is intended to run on a specific target platform. The only caveat is that some targets require a specific type of host in order to compile the native binary. So if you wanted to compile eight different native binaries, one for each of the supported eight platforms, you would have to make sure you compile each one on the specific hardware platform it requires. Fortunately, having access to Windows and Mac systems will allow you to cover the most commonly used supported platforms. Alternatively, you could try compiling on a virtual machine or using an automated build service such as CircleCI. Apart from the emerging multiplatform capabilities, you will have the option to create Kotlin programs for a variety of platforms with direct access to native libraries and frameworks.
The post Exploring Kotlin/Native – Part 1 appeared first on Big Nerd Ranch.
]]>The post Building Quality iOS Apps, Quickly appeared first on Big Nerd Ranch.
]]>Fortunately, it’s not impossible. Here are three best practices that we use (and recommend others use, too!) to deliver iOS, iPadOS, tvOS, and macOS apps to market.
Unit Testing
There’s just no way around it – the only way to know that an app does what it’s supposed to do is to test it. However, having a large group of manual QA testers can be a costly approach to ensuring quality. A more cost-effective way to engineer a quality app for an Apple platform is to write the code that tests the app itself.
But not all apps are equally testable. In order for a test to have the maximum impact on app quality and speed of delivery, apps need to be built from the ground up with testability in mind. When building an app to be testable, we recommend that apps:
- Are built modularly, with single-responsibility components that can keep unit tests focused
- Use dependency injection to unit test each component in isolation
- Have unit tests written as features are built, so new functionality is proven to work before a user even sees it
This unit testing discipline not only improves the overall quality of the app, but it helps in the speed of delivery. A well executed test plan means less time spent investigating bugs and more time spent building features.
Logging
Nevertheless, bugs still happen. A good unit testing discipline only prevents defects you can anticipate. How can you minimize engineering time spent investigating user-reported bugs so they can spend more time building features?
Our recommended approach to solve this problem is a thorough logging discipline. We recommend that all apps use CocoaLumberjack to:
- Log any user interaction
- Log any significant errors or unusual state
- Share the logs directly from device with a UIActivityViewController
This can substantially reduce the time it takes to find and fix an issue. Rather than asking a user to self-report everything they did to end up in a weird state, they can just send an email to the developers with a log that looks like this:
[Authentication] User cdownie@bignerdranch.com logged in.
[Settings] Settings icon tapped.
[Settings] Edit Address tapped.
[Settings] Save Address tapped.
[Settings] Error: Updating the user address failed with error: { status: 403, error: "Zip code did not match provided city & state" }
Continuous Integration
While these (and other) code quality tasks are important, they can also quickly become a project maintenance burden. If you’re manually running unit tests, ensuring code consistency with a linter, or submitting periodic builds to TestFlight, that’s time that could otherwise be spent building features and delivering value to your users. Additionally, these manual chores are all too easy to accidentally skip when pressed for time.
So, automate it! The fastest chore is the one you don’t have to do. We recommend configuring a continuous integration server like CircleCI to run these tasks for you. Specifically, we recommend:
- Running code-quality tasks on both
masterand feature branches - Parallelizing long-running tasks to improve the speed of the continuous integration system
- Generating a new, versioned build of your app for every commit to
master - Uploading these new builds to TestFlight automatically with fastlane
That last point is particularly important. With frequently updated builds sent out regularly to early beta testers, you can get early feedback on your app’s progress. Crucially, this can tell you what features to focus further development on. All without impacting the engineering team’s speed of delivery.
Deliver Quality, Quickly
With these techniques in hand, your engineering team should now be able to:
- Deliver high-quality features with unit tests
- Debug issues quickly with concise user-generated logs
- Iterate quickly on early user feedback with continuous integration
Best of all, you can do all of this while keeping the engineering team focused on delivering new features.
If this all seems overwhelming, not to worry. At Big Nerd Ranch, we have decades of experience applying these best practices and more to build apps quickly, confidently, and with quality. We would be more than happy to make your idea for an iOS, iPadOS, tvOS, or macOS app a reality. Feel free to schedule a call with us today.
The post Building Quality iOS Apps, Quickly appeared first on Big Nerd Ranch.
]]>The post Kotlin Multiplatform in 2020 appeared first on Big Nerd Ranch.
]]>Some notable themes emerged this year including several upcoming performance improvements, language stabilizations, and feature improvements to coroutines, Kotlin’s approach to concurrency. The star of the show however was clearly Kotlin Multiplatform, with 7 sessions dedicated to the subject including 2 sessions from engineers at Square and Careem, sharing their own experiences with it.
Kotlin Multiplatform is moving from an early stage, engineering focused, experiment into a solid contender in the multiplatform solution space.
What is Kotlin Multiplatform?
Kotin Multiplatform is a mechanism for sharing code across multiple platforms. This means you can share common data, state, and business logic across Windows, Linux, MacOS, Web, iOS and Android, as well as any Java Virtual Machine (JVM) based platform not covered by the aforementioned operating systems.
This is not a new concept. In the mobile application space today there are other popular solutions to sharing code between mobile platforms, such as Flutter and React Native, and many others that have come before them; Cordova, PhoneGap, Kony, Titanium, to name a few. Even outside of mobile, this has been attempted before. If you consider the idea of languages like C# compiling to intermediate language for the Common Language Runtime (CLR) and Java compiling to bytecode for the Java Virtual Machine (JVM), these languages and their platforms were designed with portability and sharing in mind.
Kotlin Multiplatform has the same goal as its predecessors but accomplishes it in a different way. Whereas Java, C#, React Native and many others compile or target an intermediary language that requires a bridging adapter or virtual machine layer to interpret at runtime, Kotlin Multiplatform code compiles to the same native output as the rest of the code running on the platform. In this way, it transcends platforms that were previously not reachable for a single language. To put it in practical terms, Java needs a JVM, C# needs a CLR, React Native needs a JavaScript bridge to interpret the logic and invoke the appropriate native UI framework code, Kotlin Multiplatform does not. It compiles down to JVM bytecode, JavaScript, or native machine code as needed, based on the platform target.
The Case for Kotlin Multiplatform
The pitch for Kotlin Multiplatform is put simply by Kotlin’s lead design engineer, Andrew Breslav, “Code Sharing, Skill Sharing, plus 100% access to the native platforms”. The idea is that sharing code across all of the platforms your application(s) support, using a common programming language, leads to fewer bugs, shortens development times, and carries lower maintenance costs since your team is maintaining a smaller code base.
Having a common language also means that developer skillsets are heavily transferable between teams.
Answers to Commonly Expressed Concerns
Many of the concerns common to multiplatform solutions, such as the fear of adopting (and then supporting) a new language, experiencing degraded runtime performance, or losing the native look-and-feel of your applications, fall by the wayside.
Team Support
Kotlin is already used by over 53% of professional Android developers today and that growth is accelerating. It’s being used in server-side development too at large tech companies like Intuit, Expedia, and Pivotal.
Kotlin is also easy to learn, with a language syntax that is remarkably similar to other popular languages like Swift, Scala, Groovy, and Java. You may find that your team already has the right skill sets.
Performance
Since Kotlin Multiplatform code compiles to the exact same format as the target platform, it is just as performant as its native counterparts. Your users (and engineers) won’t be able to tell the difference.
Native UI/UX
Kotlin Multiplatform encourages sharing only where it makes sense. As an example, you may wish to share your core business logic and state, but allow each platform to decide exactly how to consume and present that data. This gives your customers a fully native experience while reaping the benefits of code sharing.
Considerations & Risks
The biggest risk to Kotlin Multiplatform is timing and consequently the sparseness of third-party library support. Some basic libraries like HTTP client libraries and data serialization libraries exist and there is a promise for more to come in 2020, with the release of Kotlin 1.4, including a DateTime library. But, for the moment it’s likely that you will need to implement some things yourself.
In addition, Kotlin multiplatform is designed to share code, but not be a drop in replacement for all of the APIs of each platform you target. So, it should be noted that you will need at least some knowledge of each platform you support. This is different than a multiplatform solution like Flutter where Flutter comes with its own UI componentry and is very much a drop in replacement for the native UI stack.
The Future
In 2020, expect Kotlin Multiplatform adoption to accelerate. While it has not quite reached 1.0 stable, major tech companies are already starting to use it.
At Big Nerd Ranch, we see a lot of potential in it and are excited to see where it goes!
The post Kotlin Multiplatform in 2020 appeared first on Big Nerd Ranch.
]]>