The post tvOS Games, Part 4: Bullets and Explosions appeared first on Big Nerd Ranch.
]]>In the previous installments of this series, I explore game controllers, create a SpriteKit-driven game, and animate the sprites. Now we get to the important part: shooting. In this installment, I’ll walk through creating the bullet and detecting when it hits something.
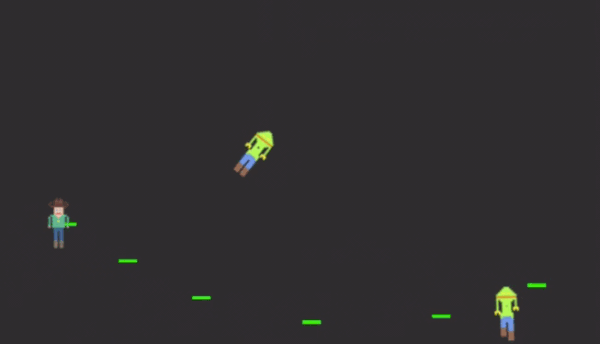
In the original game, moving the left joystick moved the player around the screen, and moving the right joystick would shoot bullets. A talented Robotron player would usually have his (or her) right joystick at a 90º angle to his left joystick, orbiting an ever tightening-group of bad guys:

The player gets to shoot every fifth step with no pauses and no reloading. On the enemy side, there’re some interesting play dynamics:
- Foot Soldiers (red andyellow) shoot fairly infrequently, perhaps 5% or less.
- Hulks (big green chest) are indestructible, wander like civilians, and stomp civilians. (They get a nice skull-n-crossbones avatar for a moment, too!) The player’s bullets will cause the hulk to skip a walking turn.
- Spheroids move to the corners and launch little Enforcers.
- Enforcers shoot slightly more intelligently, sometimes leading the player for the hit.
- Brains (not shown) wander and touch civilians, who become Progs (also not shown.)
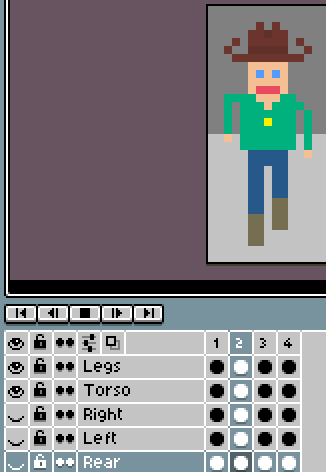
I made FootSoldier a subclass of Enemy, and as of now, that’s the only type of bad guy implemented. Perfectly happy to consider all pull requests!
When the characters fire, they create a laser bullet centered on them, and send it hurtling in the direction chosen. The bullet is a 5×30 sprite, rotated to the appropriate angle.
class Bullet : GameNode {
    static var bullets : [Bullet] = []
    static func aimedAt(_ vector: CGVector, by shooter: GameNode) -> Bullet {
        let size = CGSize(width: 5, height: 30)

        // Put a bullet on the screen
        let bullet = Bullet(texture: nil, color: UIColor.red, size: size)
        bullet.position = shooter.position
        bullet.rotateTo(vector)
        bullets.append(bullet)
        shooter.universe.addChild(bullet)

        // and shoot it!
        let bulletAction = SKAction.sequence([
            SKAction.playSoundFileNamed("laser.wav", waitForCompletion: false),
            SKAction.move(by: vector.bulletVector, duration: 2.5),
            SKAction.removeFromParent()
            ])
        bullet.run(bulletAction, completion: {
            if let idx = bullets.index(of: bullet) {
                bullets.remove(at: idx)
            }
        })
        return bullet
    }

    /* 180º = π radians; 90º = π/2 radians; 45º = π/4 radians */
    /* also for these bullets 270º looks identical to 90º     */

    func rotateTo(_ vector: CGVector) {
        var angle = 0.0
        let sv = vector.simplifiedVector

        if sv.dy == sv.dx && sv.dx != 0 {
            angle -= .pi / 4
        } else if sv.dy == -1*sv.dx && sv.dx != 0 {
            angle += .pi / 4
        }
        if sv.dx != 0 && sv.dy == 0 {
            angle += .pi / 2
        }
        zRotation = CGFloat(angle)
    }
}
Once I’ve placed the object on the screen, I move it for 2.5 seconds in the direction of the bulletVector, which is (2000 * x, 2000 * y). When it gets to the end, I remove it. Here’s the Enemy’s shoot() function:
func shoot() -> Bullet? {
    guard !dead else {
        return nil
    }
    if( (arc4random() % 20) == 0 ) { // 5% chance
        let shotVector = universe.directionToNearestPlayer(from: self)
        let shot = Bullet.aimedAt(shotVector, by: self)
        return shot
    }
    return nil
}
Easy peasy. Looks like a bullet, acts like a bullet, except for the killing part.
Physics
SpriteKit has a physics engine that will handle both contacts and collisions. What’s the distinction, you ask? Contacts notify us of intersection, while collisions actually affect each other’s trajectory. To demonstrate, here I set the collision mask for the bullet, and then set its mass property to 10,000. As they say, hijinks ensue!
Needless to say, this wasn’t the effect I was looking for. I don’t want my bullets to bounce off my targets… I want them to blow up. So the code will be doing a contact test.
In any event, both methods work off of a bitmask system based on a UInt32. Rather than use a nice Swift-y OptionSet, I stuck with the old fashioned method. I described my few different object types:
enum CollisionType : UInt32 {
    case Player = 0x01
    case Enemy = 0x02
    case Civilian = 0x04
    case Bullet = 0x08
    case Wall = 0x10
}
Going back to the bullet code, just before the shot fires, I add an SKPhysicsBody to the new bullet.
// give it properties for letting us know when it hits
let body = SKPhysicsBody(rectangleOf: size)
body.categoryBitMask = CollisionType.Bullet.rawValue
body.collisionBitMask = 0x0
if let _ = shooter as? Player {
    body.contactTestBitMask = CollisionType.Enemy.rawValue | CollisionType.Civilian.rawValue
} else {
    body.contactTestBitMask = CollisionType.Player.rawValue | CollisionType.Civilian.rawValue
}
bullet.physicsBody = body
Of course I then modified our Player, Civilian and Enemy classes to set their physics body appropriately as well. The next step is to implement a delegate method to get notified of the contact.
extension GameUniverse : SKPhysicsContactDelegate {
    func didBegin(_ contact: SKPhysicsContact) {
        var hit : Hittable?
        var bullet : Bullet?

        if let shot = contact.bodyA.node as? Bullet {
            hit = contact.bodyB.node as? Hittable
            bullet = shot
        } else if let shot = contact.bodyB.node as? Bullet {
            bullet = shot
            hit = contact.bodyA.node as? Hittable
        } else if let p1 = contact.bodyA.node as? Player,
            let p2 = contact.bodyB.node as? Enemy {
            gameEndedByTouchingPlayer(p1, enemy: p2)
        } else if let p1 = contact.bodyB.node as? Player,
            let p2 = contact.bodyA.node as? Enemy {
            gameEndedByTouchingPlayer(p1, enemy: p2)
        }
If the collision was the player bumping into an enemy, there’s a method for that. Otherwise the hit variable will contain the hittable that got shot, and the bullet variable contains the bullet that got ‘im.
If it’s an enemy who got shot, I blow him up and remove him from the array of enemies. (I considered calling it the “enemies list” but that was too… political.) If that was the last enemy, you cleared the level. If it was the player, end the level. And if it was a civilian, blow ‘em up. If it’s the last friendly, do something. (I stubbed out gameEndedByNoMoreFriendlies() because I think maybe we should give a “clear the room” award in such a case!)
        if let target = hit, let bullet = bullet {
            bullet.removeFromParent()
            if let enemy = target as? Enemy {
                score += enemy.pointValue
                blowUp(enemy)
                enemy.dead = true
                if let enemyIdx = enemies.index(of: enemy) {
                    enemies.remove(at: enemyIdx)
                }
                if allDead() {
                    showLabel("LEVEL COMPLETE") {
                        self.stateMachine?.win()
                    }
                }
                enemy.removeFromParent()
            } else if let civ = target as? Civilian {
                blowUp(civ)
                civ.removeFromParent()
                if let friendlyIndex = friendlies.index(of: civ) {
                    friendlies.remove(at: friendlyIndex)
                }
                if friendlies.count == 0 {
                    gameEndedByNoMoreFriendlies()
                }
            } else if let player = target as? Player {
                guard stateMachine?.currentState != stateMachine?.lost else {
                    return
                }
                gameEndedByShootingPlayer(player, bullet: bullet)
            } else {
                print("Something funky")
            }
        }
    }

    func allDead() -> Bool {
        if enemies.count == 0 {
            return true
        }
        for enemy in enemies {
            if (!enemy.dead) {
                return false
            }
        }
        return true
    }
}
And now our enemies are dying, though somewhat anticlimactically. We’ll get to that in a second…
Walls and Bouncing
Before I move on, I’ll remove that godawful wall logic from the Movable.move() method and make that a genuine contact test as well. One of the yak-shave areas I didn’t cover is the game generation section, but I added the appropriate methods there. I want big red walls! Back in my GameUniverse class, I added an internal Wall class and then methods to populate them.
class Wall : SKSpriteNode {}

func addBorder() {
    let mySize = self.frame.size
    addWall(CGRect(x:0, y:0, width: screenBorderWidth, height: mySize.height))
    addWall(CGRect(x:mySize.width-screenBorderWidth, y:0, width: screenBorderWidth, height: mySize.height))

    addWall(CGRect(x:0, y:0, width: mySize.width, height: screenBorderWidth))
    addWall(CGRect(x:0, y:mySize.height-screenBorderWidth, width: mySize.width, height: screenBorderWidth))
}

func addWall(_ rect: CGRect) {
    let wallNode = Wall(color: UIColor.red, size: rect.size)
    let bod = SKPhysicsBody(rectangleOf: rect.size)
    bod.affectedByGravity = false
    bod.pinned = true
    bod.friction = 100000
    bod.linearDamping = 1000
    bod.angularDamping = 1000
    bod.contactTestBitMask = CollisionType.Player.rawValue | CollisionType.Civilian.rawValue
    bod.categoryBitMask = CollisionType.Wall.rawValue
    bod.collisionBitMask = 0x00
    wallNode.physicsBody = bod
    let center = CGPoint(x: rect.midX, y: rect.midY)
    wallNode.position = center
    addChild(wallNode)
}
Back in our didBegin(contact:) method:
if let wall = contact.bodyA.node as? Wall,
    let walker = contact.bodyB.node as? Movable {
    walker.revert(wall)
} else if let wall = contact.bodyB.node as? Wall,
    let walker = contact.bodyA.node as? Movable  {
    walker.revert(wall)
} ...
The revert() method in Movable just takes the previousPosition and assigns it to position. We’ll want that, but we also need to change our walker’s direction to walk away from the wall.
Originally, I just took the reverse() of the current direction and applied that. And, often, that was perfect. But occasionally the walkers would continue heading right off the screen, and sometimes they’d appear to walk while embedded in the walls. It wasn’t until much later that I realized I’d gotten myself into a race condition: I updated position, and THEN decremented the step counter which might effect a direction change. On cases where the collision with a wall coincided with a new random direction, it was going to go wonky.
I next tried to figure out which quadrant of the screen you were in, and choose the correct direction for that. But that math got unwieldy quickly when the screen’s aspect ratio came in. In the end, the old-fashioned way worked best: Ask the collided-with wall which direction the player should choose.
class Wall : SKSpriteNode {
    enum WallType {
        case north, south, east, west
    }
    var type : WallType = .north

    var safeDirection : Movable.WalkDirection {
        switch(type) {
        case .north : return .south
        case .south : return .north
        case .east : return .west
        case .west : return .east
        }
    }
}
And back in the Civilian class:
override func revert(_ obstacle: SKSpriteNode) {
    super.revert(obstacle)
    if let wall = obstacle as? Wall {
        direction = wall.safeDirection
    } else {
        direction = direction.reverse()
    }
    stepCount = 50
    walk()
}
OKAY! Let’s take stock. There’s animated sprites running around shooting each other. Our civilians are correctly bumping into walls and heading back in. It’s starting to feel like a real game!
Now I want to add an explosion effect to each hit. An alien shooter game is no fun without good explosions, of course.
SKEmitterNode Explosions
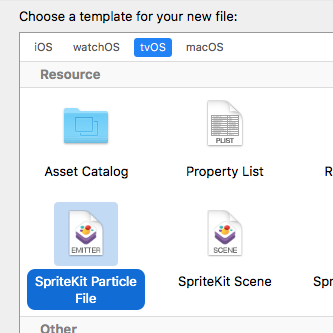
Xcode has a pretty nice editor for particle emitters in SpriteKit. To get into it, create a new SpriteKit particle file:
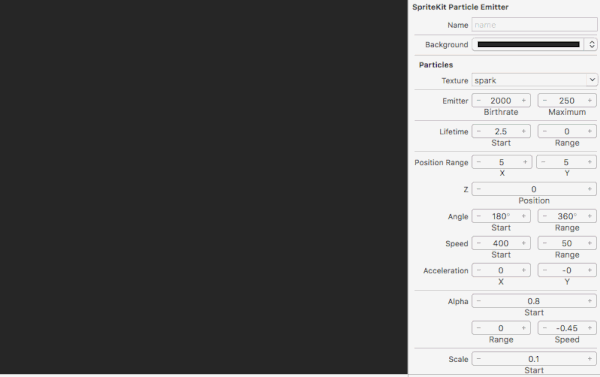
Xcode then asks for a template, and I chose Spark. From there, I found myself in an editor that shows the emitter running. After fiddling with the settings I came up with something that made me happy. I set the birthrate high, and the number of particles low, to give it a halo effect.
Using this emitter in your code is pretty simple. Create an emitter node and put it where you need it. Usually, it will copy the position of some parent node. For this explosion, I will want to remove it just before it restarts, to be sure it doesn’t show the explosion twice.
func explode(at point: CGPoint, for duration: TimeInterval, color: UIColor = UIColor.boomColor, completion block: @escaping () -> Swift.Void) {
    if let explosion = SKEmitterNode(fileNamed: "Explosion") {
        explosion.particlePosition = point
        explosion.particleColorSequence = SKKeyframeSequence(keyframeValues: [color], times: [1])
        explosion.particleLifetime = CGFloat(duration)
        self.addChild(explosion)
        // Don't forget to remove the emitter node after the explosion
        run(SKAction.wait(forDuration: duration), completion: {
            explosion.removeFromParent()
            block()
        })
    }
}
Now, I want each of the explosions to be slightly different in color and duration. Bad guys explode quickly; civilians explode more slowly (and in red because I’m morbid like that.) The player explodes much more slowly. Here’s that logic:
func blowUp(_ target: Hittable) {
    if let player = target as? Player {
        stopGame()
        player.alpha = 0
        explode(at: player.position, for: 2.5, color: UIColor.white) {
            player.alpha = 1
        }
        run(SKAction.playSoundFileNamed("player-boom.wav", waitForCompletion: false))
    } else if let enemy = target as? Enemy {
        run(SKAction.playSoundFileNamed("enemy-boom.wav", waitForCompletion: false))
        explode(at: enemy.position, for: 0.25) {
        }
    } else if let civ = target as? Civilian {
        run(SKAction.playSoundFileNamed("civ-boom.wav", waitForCompletion: false))
        explode(at: civ.position, for: 0.5, color: UIColor.red) {
        }
    }
}
AHA! I snuck sounds in there! As you can see, there’s almost nothing to it. Drag your sound file into your project, and make sure it’s checked for your app target. Then, if your object is any sort of SKNode or SKScene subclass, it’s just one line of code:
run(SKAction.playSoundFileNamed("player-boom.wav", waitForCompletion: false))
SpriteKit caches the file so that subsequent playback events have no delay.
Next Up
At this point, we have a real game! Our characters are running around. We can kill good guys and bad guys and we can lose our life. The next step is to develop the disconnected levels into a single game with increasing difficulty. Stay tuned!
The post tvOS Games, Part 4: Bullets and Explosions appeared first on Big Nerd Ranch.
]]>The post tvOS Games, Part 3: Animations appeared first on Big Nerd Ranch.
]]>In this series’ previous posts, I discussed how to use the game controllers and then built the skeleton of a Robotron:2084 game. In this third post, I will cover how to turn our boring boxes into fun animated sprites. The full source is available on Github for your use.
Building Sprites
It’s fairly easy to search for Robotron sprites and early on I began doing this. It didn’t take long before I wanted to customize things and realized that my existing tools were not up to the task. After some searching around, I found an amazing tool called Aseprite that has a wonderfully retro interface of its own. Just get a load of that!
It took me about half a day to learn the interface and draw myself a little cowboy sprite walking:
When saving the animation in PNG format, Aseprite helpfully numbered all the files dude-01.png, dude-02.png and so forth. It was a fun break from coding, so I designed a whole slew of sprites:


I imported all these images into my asset catalog and got to work.
Making Movables Look Like They Move
I opened up my Movable class and added some logic to rotate through whatever textures were supplied.
var spriteStep = Int(arc4random_uniform(4))
var spriteTextures : [SKTexture] = []

func nextSprite() {
    guard spriteTextures.count >= 2 else {
        return
    }

    texture = spriteTextures[spriteStep]
    if let sz = texture?.size() {
        self.size = CGSize(width: sz.width*3, height: sz.height*3)
    }

    spriteStep = (spriteStep + 1) % spriteTextures.count
}
And up in my move() method, when I update the position, I’ll swap the sprite.
lastWalkVector = vec
position = pos
nextSprite()
I knew that I was going to want to select a set of textures based on the direction the character was facing, so I’d have a dictionary where the key was the direction, and the value was an array of textures. The right and left sprite sets have four distinct steps, but the back and front sprite sets only have three, repeating the middle one. By using string interpolation and well-chosen arrays, it made generating the sets straightforward.
static let textures : [String : [SKTexture]] = {
    var ret : [String : [SKTexture]] = [:]
    for set in ["back", "front"] {
        var arr : [SKTexture] = []
        for frame in [ 1, 2, 3, 2 ] {
            arr.append(SKTexture(imageNamed: "dude-(set)-(frame)"))
        }
        ret[set] = arr
    }
    for set in ["right", "left"] {
        var arr : [SKTexture] = []
        for frame in [ 1, 2, 3, 4 ] {
            arr.append(SKTexture(imageNamed: "dude-(set)-(frame)"))
        }
        ret[set] = arr
    }
    return ret
}()

func didChangeDirection(_ direction: Movable.WalkDirection) {
    let set = direction.spriteSet()
    spriteTextures = Player.textures[set]!
}
What’s that spriteSet() call on WalkDirection?
func spriteSet() -> String {
    switch self {
    case .north: return "back"
    case .south: return "front"
    case .east: return "right"
    case .west: return "left"
    }
}
And voila! Our player has an animated sprite.
![]()
The enemy can follow simpler sprite logic, since there’s no “left”, “right”, or “back” variations – just the one face. However, the civilian is more complex since there are three types.
enum CivilianType : String {
    case lady = "lady"
    case man = "man"
    case boy = "boy"

    var pointValue : Int {
        switch(self) {
        case .lady: return 300
        case .man: return 200
        case .boy: return 100
        }
    }
    static var allTypes : [CivilianType] = [.lady, .man, .boy]
    static var allTypeNames : [String] = {
        return allTypes.map() { return $0.rawValue }
    }()
}
Our civilian class then gets a type attribute:
var type : CivilianType = {
    switch (arc4random_uniform(3)) {
    case 0:  return .lady
    case 1:  return .man
    default: return .boy
    }
}()
Simple enough, eh? Now, just as the Player had dude-(direction)-(step) logic to find the textures, now we’ll want (type)-(direction)-(step) for each type of civilian.
lazy var textureBanks : [String : [SKTexture]] = {
    return textureDictionary[self.type.rawValue]!
}()

override func didChangeDirection(_ direction: Movable.WalkDirection) {
    let set = direction.spriteSet()
    let textureBank : Array<SKTexture> = textureBanks[set]!
    self.spriteTextures = textureBank
}

static let textureDictionary : [String:[String:[SKTexture]]] = {
    var dict : [String:[String:[SKTexture]]] = [:]

    for type in allTypeNames {
        var ret : [String : [SKTexture]] = [:]
        for set in ["back", "front"] {
            var arr : [SKTexture] = []
            for frame in [ 1, 2, 3, 2 ] {
                arr.append(SKTexture(imageNamed: "(type)-(set)-(frame)"))
            }
            ret[set] = arr
        }
        for set in ["right", "left"] {
            var arr : [SKTexture] = []

            let list = [1,2,3,4]
            for frame in list {
                arr.append(SKTexture(imageNamed: "(type)-(set)-(frame)"))
            }
            ret[set] = arr
        }
        dict[type] = ret
    }

    return dict
}()
And all our sprites are animated now.
![]()
Next Up: Shooting!
So at this point I have a level with my characters running around and looking great. This is really fun, but it’s time to get to the “shoot” part of “shoot-em-up game.” Check out the next installment for details on how to do it!
The post tvOS Games, Part 3: Animations appeared first on Big Nerd Ranch.
]]>The post tvOS Games, Part 2: SpriteKit Goes Retro appeared first on Big Nerd Ranch.
]]>I have an old arcade game in a cocktail table format. It’s Robotron:2084, the 1981 hit from Williams. You may remember the ridiculously difficult and fast gameplay:
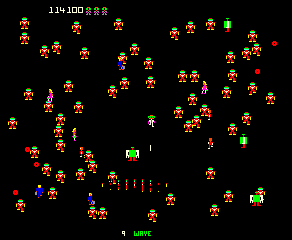
A bona fide classic of the arcade era, this Eugene Jarvis-designed game has all of his hallmarks: fast, addictive gameplay, skyrocketing difficulty, and my favorite, conflicting goals. In his first hit Defender, one had to shoot the aliens while rescuing humans. In this game, the player (white with a red head) must shoot all the evil robots (red humanoids, large green boxy robots, and the pulsing circles in the corners that launch little homing bots) while not shooting any of the good guys (a man, woman, child or the other player.)
Fresh off my successful previous project and my experiments with controllers, I decided to make a weekend sprint of it. I gave myself this basic game plan:
- Get a square on the screen that moves with the controller.
- Get another square on the screen that always “pursues” the first.
- Get another square on the screen that wanders.
- Turn the squares into animated sprites.
- Make the player and pursuer squares able to shoot. Bullets kill any square.
- Make an explosion when there’s a hit.
- Put a border on the screen.
- Add a “three lives and game over” feature.
- Add scoring.
- Add a high score leaderboard.
A Quick Recap: Controllers
In my previous post, I described spending some time learning how game controllers work. For this project, I would need a dedicated controller manager that can vend the correct controller for the player at any time. In fact, I might as well set up the logic to vend two controllers, and then, I should try to keep the second player in mind throughout development.
I created a Control protocol to hide the distinction between the different gamepads, instead offering game-appropriate data:
protocol Control {
    var moveVector : CGVector { get }
    var shootVector : CGVector { get }
    var buttonAPressed : Bool { get }
    var trigger : Bool { get }

    // the underlying controller
    var controller : GCController { get }

    // lower number is higher priority, for choosing controller v. remote
    var priority : Int { get }
}
Instead of the valueChangedBlock(), I am going to just read the inputs in the game loop.
Before We Begin: Vector Math
In SpriteKit, the (0,0) pixel is the lower leftmost one. To move our character towards the upper right, we might send it a stream of move(CGVector(x: 1.920, y: 1.080)) commands. This will send the sprite in a nice line directly from one corner to the other. However, if you recall, the sprites in this game did not move smoothly. They either went horizontal, vertical, or on a diagonal. For that purpose, I’ll want to take any vector and turn it into one where the X value is either -1, 0, or 1, and the Y value is either -1, 0, or 1.
To determine this, I considered that you could divide the circle into sixteen wedges… or,
using absolute values, only four:
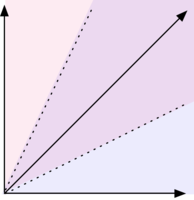
The pink portion is vertical, so I want the X component to be zero and the Y component to be the sign of the original Y. Likewise, the blue portion should have a Y component of zero and a signed X. The purple section is going to be signed for both X and Y.
extension CGVector {
    // returns a vector where dx = [-1, 0, 1] and dy = [-1, 0, 1]
    var simplifiedVector : CGVector {
        func sign(_ val: CGFloat) -> CGFloat {
            switch (val) {
            case let(val) where 0 > val : return -1
            case let(val) where 0 < val : return 1
            default: return 0
            }
        }

        var ret = CGVector(dx: 0, dy: 0)
        let isHoriz = (fabs(dx) > fabs(dy*2))
        if(!isHoriz) {
            ret.dy = sign(dy)
        }
        let isVert = (fabs(dy) > fabs(dx*2))
        if(!isVert) {
            ret.dx = sign(dx)
        }
        return ret
    }
}
TIL, in Swift you can put a function inside a function. :mindblown:
Step 1: The Player
Last year when SpriteKit came to the Apple Watch, I threw together a quick Flappy Bird clone to get used to the framework. It’s tremendously easy to build 2D scenes with it, so it was an obvious choice for this project. You may want to spin through the previous post to become familiar with the framework. In short, there is a SKScene which holds many SKNode instances of different types. Typically we will use a SKSpriteNode, as it can be drawn as a box of a given color or as an image from an asset bundle. In this game, the other sort of node we will use is an SKEmitterNode, for explosions.
class GameUniverse : SKScene {
    static var shared = GameUniverse(size: CGSize(width: 1920, height: 1080))

    var playerOne = Player()

    func setupUniverse() {
        addPlayer()
    }

    func addPlayer() {
        let p1 = playerOne
        p1.name = "Player One"
        p1.position = self.frame.center
        addChild(p1)
        friendlies.append(p1)
    }

}
For all of the sprites that would be moving around the screen, I declared an abstract “movable” class with a move(vec: CGVector) method, and a walk() method that subclasses could override for their own peculiar walking needs. For the player and friendlies, it will call walk() thirty times a second. For the robots, it will call walk() on some of them each turn.
class Movable : GameNode {
    var lastWalkVector : CGVector = .zero=
    var nodeSpeed : CGFloat = 1.0

    func walk() { } // subclasses override

    func move(_ direction : CGVector) -> Bool {
        var vec = direction
        vec.dx *= (nodeSpeed * speedModifier)
        vec.dy *= (nodeSpeed * speedModifier)

        var pos = position
        pos.x = pos.x + vec.dx
        pos.y = pos.y + vec.dy

        position = pos
        return true
    }
}
I then stubbed out some types I knew I’d need, and went right to the player sprite:
// For later when the shooting starts
class Hittable : Movable { }

class Player : Hittable {
    enum PlayerNumber {
        case one
        case two
    }
    var playerNumber : PlayerNumber = .one

    var controller : Control? {
        switch(playerNumber) {
        case .one: return ControllerManager.shared.playerOneController
        case .two: return ControllerManager.shared.playerTwoController
        }
    }

    override func walk() {
        guard let ctrl = controller else {
            return
        }

        let vec = ctrl.moveVector
        if vec != .zero {
            let lastVec = player.lastWalkVector.simplifiedVector
            _ = move(vec)
        }
    }
}
So at this point, if the player has a controller, and we call walk(), it will move the sprite around the screen. I spent some time shaving the initialization yak, and then set up the game loop as described earlier. (If you want to look at the game loop, it’s highlighted here.)
And just like that, I am driving a white box around the screen!

Now it’s time to add the bad guys.
Step 2: The Pursuer
In order for the enemies to find the player they wish to kill, I need to add a little helper code to the GameUniverse that returns a simplified vector to the player. The enemies use that as their direction to walk and shoot. This gives the player a place to hide, along the dotted lines shown above. You will see the best players maximizing the number of dotted lines that converge on their location while minimizing the number of solid ones, thus reducing your chances of being hit.
func directionToNearestPlayer(from node: GameNode) -> CGVector {
    let c1 = node.position
    let player = universe.nearestPlayer(to: node)
    let c2 = player.position

    let diff = CGVector(dx: c2.x - c1.x, dy: c2.y - c1.y)
    let ret = diff.simplifiedVector
    return ret
}

override func walk() {
    let vec = directionToNearestPlayer(from: self)
    let lastVec = lastWalkVector.simplifiedVector
    _ = move(vec)
}
Step 3: The Wanderer
The wandering pattern for a civilian is pretty simple. Randomly choose a new direction and walk twenty or so steps, then randomly choose again. The direction chosen is always a cardinal one, no “northeast” wanderers. (Not shown here are utility functions like random() and reverse().)
enum WalkDirection : String {
    case north = "north"
    case south = "south"
    case east = "east"
    case west = "west"
}
In the Civilian class I stubbed out earlier, I added the walk logic.
class Civilian {
    var direction = WalkDirection.random()
    var stepCount = 0
    var stepDelay = 3 // step every Nth frame
    var stepDelayCount = 0

    override func walk() {
        stepDelayCount += 1
        if stepDelayCount > stepDelay {
            stepDelayCount = 0

            // move the sprite
            move(direction.vector()

            if(stepCount <= 0) {
                newDirection()
            }
            stepCount = stepCount - 1
        }
    }

    func newDirection() {
        stepCount = 10 + Int(arc4random()%20)
        direction = Movable.WalkDirection.random()
    }
}
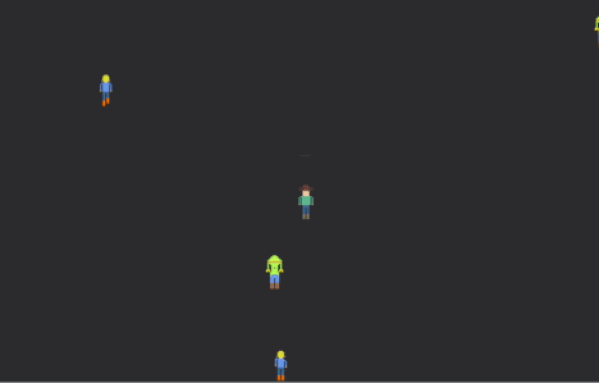
At this point, I have a player that runs, pursuers that pursue, and civilians that wander.
They wander off the screen, true, but I’ll address that later.
To Be Continued…
I’m a long way from done, but SpriteKit has made it pretty simple to quickly get my items moving all over the screen. In our next post, I’ll show how to create simple animated characters for the sprites, shuffle through their textures and make the game look a whole lot better.
The post tvOS Games, Part 2: SpriteKit Goes Retro appeared first on Big Nerd Ranch.
]]>The post tvOS Games, Part 1: Using the Game Controller Framework appeared first on Big Nerd Ranch.
]]>
My colleagues and I just shipped a tvOS project for a client in December. Toward the end, it was a high-powered rush to knock out some troublesome bugs so that we could ship on time. When we finally shipped, I had a lot of momentum. I had been thinking about the interaction model of tvOS and the applicability of game controllers, and so I decided to invest some time in learning about them.
Apple handles this through the Game Controller Framework on tvOS and iOS. Apple’s Game Controller Programming Guide is a good place to start. It’s written for iOS originally, as they talk about supporting those device-wrapping controllers; but like so many things in tvOS, it’s close enough to iOS that the pattern is still applicable.
In brief, there are static methods for starting and stopping controller discovery. Via notification, that process vends instances of GCController as needed. Any given GCController might have a GCMicroGamepad or a GCExtendedGamepad. Each gamepad has an assortment of GCControllerButtonInput and GCControllerDirectionPad properties.
I built the Controlla app (repo here) to detect and list all the controllers and show you all their inputs. It’s a simple app: there is only a centered vertical stack view, which will hold a horizontal panel for each control. The horizontal panels are built from simple building blocks.
Detecting Controllers
To get started, I needed to discover the available controllers. This is done through the time-honored process of subscribing to a few notifications and then kicking off the discovery thread. When the discovery thread has a controller for us, we’re going to get a call to our observer. I stubbed in add and remove methods, and after we have controller panels, we’ll manage the panel stack there.
func startWatchingForControllers() {
     // Subscribe for the notes
    let ctr = NotificationCenter.default
    ctr.addObserver(forName: .GCControllerDidConnect, object: nil, queue: .main) { note in
        if let ctrl = note.object as? GCController {
            self.add(ctrl)
        }
    }
    ctr.addObserver(forName: .GCControllerDidDisconnect, object: nil, queue: .main) { note in
        if let ctrl = note.object as? GCController {
            self.remove(ctrl)
        }
    }
    // and kick off discovery
    GCController.startWirelessControllerDiscovery(completionHandler: {})
}

func stopWatchingForControllers() {
    // Same as the first, 'cept in reverse!
    GCController.stopWirelessControllerDiscovery()

    let ctr = NotificationCenter.default
    ctr.removeObserver(self, name: .GCControllerDidConnect, object: nil)
    ctr.removeObserver(self, name: .GCControllerDidDisconnect, object: nil)
}

func add(_ controller: GCController) {
    let name = String(describing:controller.vendorName)
    if let gamepad = controller.extendedGamepad {
        print("connect extended (name)")
    } else if let gamepad = controller.microGamepad {
        print("connect micro (name)")
    } else {
        print("Huh? (name)")
    }
}

func remove(_ controller: GCController) {

}
What to do with my new-found controller(s)? Well, as you may have surmised from the code above, they’re going to be one of two types.
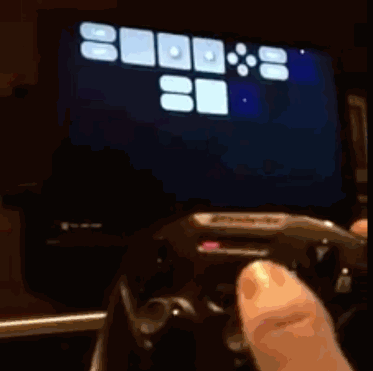
The Micro Gamepad
If you wish to support the use of the Siri Remote as a gameplay controller, you’re going to interact with its GCMicroGamepad.
It has an XY input (the touch-sensitive top area) and two buttons: A (Play/Pause) and X (pressing the top area.) It also offers up a GCMotion, which aligns closely with Core Motion’s CMMotion classes.
The Extended Gamepad
The GCExtendedGamepad documentation lists the set of inputs available:
- Two shoulder buttons.
- Two triggers.
- Four face buttons arranged in a diamond pattern. (“ABXY”)
- One directional pad.
- Two thumbsticks.
Also, there is an array of LEDs. This isn’t an input but an output; the controller has a playerIndex property which takes an enum. You should honor the spirit of this and set the value appropriately for your game and your use.
Reading Inputs
Here are all the ways it is possible to observe the values of the direction pad.
guard let gamepad = gamepad as? GCMicroGamepad else { return }

// method one
gamepad.valueChangedHandler = { (gamepad, element) in
    if let dpad = element as? GCControllerDirectionPad {
        print("CTRL : ( dpad )")
    } else {
        print("OTHR : ( element )")
    }
}

// method two
gamepad.dpad.valueChangedHandler = { (dpad, xValue, yValue) in
    print("DPAD : ( dpad )")
}

// method three
gamepad.dpad.xAxis.valueChangedHandler = { (axis, value) in
    print("AXIS: ( axis ) -> ( value ) ")
}

// A bonus: grab the play/pause event
if let ctrl = gamepad.controller {
    ctrl.controllerPausedHandler = { controller in
        // play/pause here
        print("PLAY: ( controller ) ")
    }
}
A diagonal swipe produces…
AXIS: Axis -> 0.0435127
DPAD : DirectionPad (x: 0.044, y: -0.025)
DPAD : DirectionPad (x: 0.044, y: -0.025)
CTRL : DirectionPad (x: 0.044, y: -0.025)
AXIS: Axis -> 0.0873253
DPAD : DirectionPad (x: 0.087, y: -0.068)
DPAD : DirectionPad (x: 0.087, y: -0.068)
CTRL : DirectionPad (x: 0.087, y: -0.068)
AXIS: Axis -> 0.0913773
DPAD : DirectionPad (x: 0.091, y: -0.086)
DPAD : DirectionPad (x: 0.091, y: -0.086)
CTRL : DirectionPad (x: 0.091, y: -0.086)
… and so on.
Notice that the handlers are called outward: First the axis’s handler, then the pad’s handler, then the controller’s handler. Also notice that the axis has a bad description implementation.
There is a fourth method for getting the controller’s values, which you might use if your game has an internal time loop separate from the display loop. It looks like this:
let shot = gamepad.saveSnapshot()
This returns a GCMicroGamepadSnapshot, which offers all the values of the GCMicroGamepad for a moment in time that you can process at your leisure.
Displaying the Controller
I pulled out my notebook and sketched a few horizontal designs for the micro and extended gamepads. This is what I came up with, recreated in Omnigraffle:
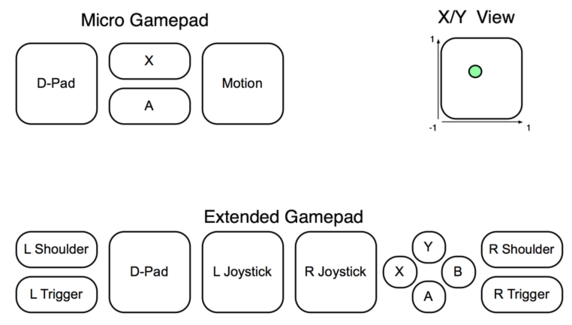
The directional pad view needed to display values between (-1.0, 1.0) as shown in the diagram above. I handled this by adding a circular CALayer to a square view, with some logic to translate the pad values to coordinates for the circle’s center. That’s implemented in XYPositionView, which is subclassed as DirectionPadView and MotionView. The latter class also changes the circle’s radius to indicate the Z dimension, and the effect is quite striking:

I saw that I was going to need a view to display the on-off state of a controller button. I began with a UIButton subclass for my ButtonIndicatorView. Simply by modifying the enabled flag, I thought I could display on and off states. This didn’t work well at all! The focus engine thought I was trying to navigate a sea of buttons. What a holy interaction mess that was! The left stick and D-pad would move focus from button to button. The additional highlight and sizing provided by the focus engine made the display ugly, and worse, confusing. The focus engine—in a game, I’d almost always want to handle that interaction myself.
Disabling Focus
GameControllerKit includes an GCEventViewController, which is a simple view controller subclass that adds a controllerUserInteractionEnabled toggle. When it is set to false, none of the standard actions (eg. direction commands, Menu, and Select) are honored. Since Menu is what exits the app, I’d have to deal with that eventually, but not just yet. I wanna see those controls!
I swapped UILabel for UIButton. After, all, they’re only for display, and don’t need to be interactive. The label dims the background color when the button is active. Then, I created a container view for the ABXY buttons. It creates the buttons, colors their labels, attaches them to the controller, and sets their constraints.
Rather than code-dump these classes here, you can go see them in the Github repository.
Escape!
Remember how Menu no longer worked? I handled it here:
override func pressesBegan(_ presses: Set<UIPress>, with event: UIPressesEvent?) {
    var menuPressed = false
    if presses.contains(where: { press in press.type == .menu }) {
        menuPressed = true
    }
    if (menuPressed) {
        self.controllerUserInteractionEnabled = true
        let alert = UIAlertController(title: "Quit?", message: "You sure you're out?", preferredStyle: .alert)
        alert.addAction(UIAlertAction(title: "Yep, I'm out", style: .default) { _ in
            super.pressesBegan(presses, with: event)
        })
        alert.addAction(UIAlertAction(title: "Nevermind", style: .default) { _ in
            self.controllerUserInteractionEnabled = false
        })
        self.present(alert, animated: true, completion: nil)
    }
}
Knowledge is Power
Okay, now I’ve got a nice handle on how controllers work. In my next installment, we’ll build a game inspired by the classic Robotron: 2084 game in SpriteKit. We’ll use what we learned here, add what we learned putting SpriteKit on the watch. Then we’ll add in some state machines using GameplayKit, and finally a leaderboard using GameKit.
The post tvOS Games, Part 1: Using the Game Controller Framework appeared first on Big Nerd Ranch.
]]>The post Monetizing Your Apps with Apple’s In-App Purchases appeared first on Big Nerd Ranch.
]]>Raise your hand if you wanna get paid.

It’s hard monetizing your apps, and as much as Apple has done to make in-app
purchasing (aka IAP) easy, it’s still not easy. The code is the easy part. There are a
bunch of things to get straight before we even get to the code. Today we’re
going to walk through the process from start to finish.
It’s All Business
If you’re the product owner or project manager, the first half of this article is for you.
Keeping an eye on the lead time for launch means leaving adequate time for implementing and
testing (ESPECIALLY testing!) these features. When the app is complete except for IAP,
it’s especially painful because it’s done except for that all important “get the money”
part.
Ground Rules
Getting to the IAP testing stage with a test app is kind of a pain. It’s much
easier to go through it “for real”. I would suggest that you do this work on an app you intend to monetize.
Also, you must make sure all the financial stuff is straight. Apple needs to
know they have a way to send you money. They need to believe you have the legit
right to sell what you’re selling (ie. you can’t call yourself Disney without
proving that you really represent Disney.) And they need to know that stuff
before they’ll even show you the products in the sandbox environment.
Understanding the Terms
App Identifier or App ID: When Apple asks for these things, they
mean the numeric Apple ID for your app, not the reverse-DNS bundle ID we
use in the app. The Apple ID will be shown on the iTunes Connect
App Information screen, under General Information, after we’ve
created a record for your app.
Product ID is an string identifier you attach to your IAP record. If your
game sells a power-up for a buck, you’ll assign some unique ID to that
power-up such as, say, powerUp.diamond_shields. In some organizations,
the product ID is provided by the accounting department so they can
tie purchases back to their system.
According to Apple,
you can use letters, numbers, periods and underscores.
Review is a many-faceted thing that, for the most part, we don’t deal with
until we’re almost ready for release. There are three pieces of review: External
TestFlight review, App Store Review, and In App Purchase Review.
The Sandbox is the test Apple purchase environment. When using a build that
is sandboxed, all of the IAP screens will indicate that they are using the
sandbox. Do not try to use real iTunes users in the sandbox, and don’t ever ever
use a sandbox iTunes user for any kind of real login, such as the App Store or Apple ID management. Doing so renders the sandbox user permanently unusable. It’s too easy to slip up and make this mistake, so you should really be careful with your sandbox IDs.
TestFlight is Apple’s test deployment system. You use it to upload and
distribute builds. You can use HockeyApp or other deployment services as well,
but for ease of discussion, we’ll be using TestFlight.
Let’s Do It!
You’ll need to flip the “In App Purchases” switch in Xcode, which will poke the
relevant bits in the provisioning portal. (If you’re using source control, and
you should be, this makes for a nice atomic commit. So do it.)

Then, log in to iTunes Connect. Go right into
the Agreements, Tax and Banking module and make sure everything is set up,
including the banking details. Seriously, cross every T and dot every I.

When you are all done, you must wait for Apple’s approval. They work fairly
quickly when compared to app review, as it’s straightforward accounting and
legal stuff. And remember, before you grouse about it, this is how Apple gets
you paid. Agree with glee!
From time to time Apple updates their license agreements and you must log into iTunes Connect
to re-agree to them. You should be logging in to view your reports, anyway, so periodically
swing by the finance module and make sure we’re all still good with Apple.
While you’re waiting, go into the My Apps section and set that up.
It’s in there that you will create your products for sale.

In order to get your app into the store, you need to create a record for it.
This is pretty straightforward; select the Xcode managed app ID and take it
from there. You don’t need to worry about all the descriptions and images just yet.
Once you’ve created your app record, switch to the “Features” tab. It starts on
the In-App Purchases feature, so all you have to do is poke the ‘+’ to create a new product.

You’ll then be presented with a set of choices as to what sort of thing you’re selling:
- Consumables are items such as a magic potion or an extra 10,000 coins for a player to spend in your game. They can be bought many times.
- Non-Consumables are items that you purchase and don’t use up. This might be for a feature unlock.
- Non-Renewing Subscriptions are a one-time purchase that has an expiration date that you can programmatically extract.
- Auto-Renewing Subscriptions charge repeatedly until cancelled. This is where you might offer a monthly subscription to your content.
Choose your item type and click Create, and then you’re on to the details.
The Reference Name is just for your reports and Product ID is the value
we’ll be searching for in the app. As mentioned above, you might
use a value that maps back to your accounting system.
Warning: When you click Save here, you are creating a record that cannot
be deleted. You can amend it, but not remove it. I give you this warning only
because in learning about this, I cluttered up one of my apps and now will feel the shame forever.

Off to Xcode
import UIKit
import StoreKit
import Freddy

class IAPProcessor: NSObject {
    static let shared = IAPProcessor()

    // Shared Secret for validation. This value comes from one of two
    // places in iTunes Connect:
    //
    // A) On your "My Apps", next to the plus, is an ellipsis (…).
    //    In that menu, select 'In-App Purchase Shared Secret'.
    // B) On the In-App Purchases feature panel where you created your
    //    IAP record, on the right side of the list, is 'View Shared Secret'.

    public var sharedSecret = "**yours here**"
    public var productIdentifier : String = "**yours here**" {
        didSet {
            searchForProduct()
        }
    }

    // We store the callback for the delegate calls
    var completionBlock: ((Bool, String?, Error?) -> Void)?

    let paymentQueue = SKPaymentQueue.default()
    var product : SKProduct?

    var runningRequest : SKProductsRequest?

    public var availableForPurchase : Bool {
        return !products.isEmpty
    }

    public func startListening() {
        paymentQueue.add(self)
        searchForProduct()
    }
}
Also, go over to the App Delegate and add this line to the bottom of ...didFinishLaunching...:
IAPProcessor.shared.startListening()
The payment queue is the primary interface into
StoreKit. You send in your purchases, and then at some later point, you get
notified of transaction updates. The payment queue’s add() method is
overloaded such that it can take an SKPaymentTransactionObserver or an
SKPayment representing your purchase request.
We create this object and call startListening() on it. This attempts to add
our IAPProcessor to the payment queue.
Since we’re neither a payment or a transaction observer, Xcode will now
begin complaining. We’ll become an observer down below. First…
Finding Products to Purchase
Before we offer our diamond shield up for purchase, we should probably make
sure that it’s available for sale. We do that for searching by product
identifier. The search is encapsulated in a SKProductsRequest that is
meant to search for an entire array of product identifiers at one time. There
are code examples available that handle multiple, but for simplicity, we’re
asking for one, and expecting one reply.
extension IAPProcessor : SKProductsRequestDelegate, SKRequestDelegate {
    func searchForProduct() {
        let productIdentifiers = Set([productIdentifier])
        let productsRequest = SKProductsRequest(productIdentifiers: productIdentifiers)
        productsRequest.delegate = self;
        productsRequest.start()
        runningRequest = productsRequest
    }

    func request(_ request: SKRequest, didFailWithError error: Error) {
        NSLog("Request fail (error)")
        runningRequest = nil
    }

    func productsRequest(_ request: SKProductsRequest, didReceive response: SKProductsResponse) {
        let productsFromResponse = response.products
        NSLog("Search for Products received response, (productsFromResponse.count) objects")

        if let product = productsFromResponse.first {
            self.product = product
        }
        runningRequest = nil
    }
}
In this block of code, we encapsulate the search logic. Since we are only
searching for one productIdentifier, we know we’ll get back one record or none
at all. The SKProductRequest constructor takes a Set containing only our
identifier, and start() kicks off the product search as a background job.
Also, we must retain the request, or it is deallocated before it begins.
So once we have our SKProduct object, we can ask the user to buy one! If he
does, here’s how we request the purchase, as well as restore them:
    public func purchase(completion: @escaping (Bool, String?, Error?) -> Void) {
        if let product = product {
            if SKPaymentQueue.canMakePayments() {
                completionBlock = completion
                let payment = SKPayment(product: product)
                paymentQueue.add(payment);
            } else {
                completion(false, "User cannot make payments", nil)
            }
        } else {
            completion(false, "Product not found.", nil)
        }
    }

    public func restorePurchases(completion: @escaping (Bool, String?, Error?) -> Void) {
        self.completionBlock = completion
        paymentQueue.restoreCompletedTransactions()
    }
The canMakePayments() method reports on whether the device has been restricted
from In-App Purchases. This is done in Settings > General > Restrictions. In
your UI, you should disable your purchase controls and provide alternate
messaging if this returns false.
When we add our payment to the payment queue, our app will be overlaid by system
dialogs completing the in-app purchase. The user may cancel the transaction or
complete it; we’ll find out later, in the SKPaymentTransactionObserver
delegate calls. Let’s implement those now:
extension IAPProcessor : SKPaymentTransactionObserver {
    func paymentQueue(_ queue: SKPaymentQueue, updatedTransactions transactions: [SKPaymentTransaction]) {
        NSLog("Received (transactions.count) updated transactions")
        var shouldProcessReceipt = false
        for trans in transactions where trans.payment.productIdentifier == self.productIdentifier {
            switch trans.transactionState {
            case .purchased, .restored:
                shouldProcessReceipt = true
                paymentQueue.finishTransaction(trans)
            case .failed:
                NSLog("Transaction failed!")
                if let block = completionBlock {
                    block(false, "The purchase failed.", trans.error)
                }
                paymentQueue.finishTransaction(trans)
            default:
                NSLog("Not sure what to do with that")
            }
        }
        if(shouldProcessReceipt) {
            processReceipt()
        }
    }
At this point, Apple has completed the purchase transaction and written the
receipt data to the location in Bundle.main.appStoreReceiptURL. For consumable
and non-consumable item purchases, you can implement a processReceipt() that
looks like this:
    func processReceipt() {
        completionBlock?(true, productIdentifier, nil)
    }
Your code might put an annotation in your database, or in the UserDefaults, or
some other place. That’s it; we’re done with code. Jump down to the testing
section.
If you’re doing subscriptions, there is just a bit more to be done…
Validating Receipts with Apple
There are a number of reasons to validate the receipt with Apple, but chief
among them is to find out the expiration date of the product your user just
purchased. Many different configurations are possible. Not only may they be
recurring, but there are also several options for free trial periods.
For many services – say, your fitness program or other content-driven app – it
may make more sense to validate those receipts on the server. But if you have no
backend, or your backend is just storing your content, then you’re going to have
to validate the receipt yourself.
extension IAPProcessor {
    func processReceipt() {
        if let receiptURL = Bundle.main.appStoreReceiptURL,
            FileManager.default.fileExists(atPath: receiptURL.path) {

            expirationDateFromProd(completion: { (date, sandbox, error) in
                if let error = error {
                    self.completionBlock?(false, "The purchase failed.", error)
                } else if let date = date, Date().compare(date) == .orderedAscending {
                    self.completionBlock?(true, self.productIdentifier, nil)
                }
            })
        } else {
            let request = SKReceiptRefreshRequest(receiptProperties: nil)
            request.delegate = self
            request.start()
        }
    }
}
Apple doesn’t tell you, the app developer, whether a given purchase is a sandbox
one or not. According to their Receipt Validation Programming Guide, you can find out if a purchase is a sandbox one by making a request to their production receipt validator; if it fails with a status code of 21007, it’s a sandbox purchase.
Therefore we need to set up our code to check production, and on failure, to
then check the sandbox.
Thankfully, the only difference is the URL, so it’s simple enough to reuse the
parsing code between them. We are using Freddy for our JSON parser, but it works just fine with
JSONSerialization.
My apologies, but it’s a bit of a code-dump. It’s pretty routine stuff.
enum RequestURL: String {
    case production = "https://buy.itunes.apple.com/verifyReceipt"
    case sandbox = "https://sandbox.itunes.apple.com/verifyReceipt"
}

extension IAPProcessor {
    func expirationDateFromProd(completion: @escaping (Date?, Bool, Error?) -> Void) {
        if let requestURL = URL(string: RequestURL.production.rawValue) {
            expirationDate(requestURL) { (expiration, status, error) in
                if status = 21007 {
                    self.expirationDateFromSandbox(completion: completion)
                } else {
                    completion(expiration, false, error)
                }
            })
        }
    }

    func expirationDateFromSandbox(completion: @escaping (Date?, Bool, Error?) -> Void) {
        if let requestURL = URL(string: RequestURL.sandbox.rawValue) {
            expirationDate(requestURL) { (expiration, status, error) in
                completion(expiration, true, error)
            }
        }
    }

    func expirationDate(_ requestURL: URL, completion: @escaping (Date?, Int?, Error?) -> Void) {
        guard let receiptURL = Bundle.main.appStoreReceiptURL, FileManager.default.fileExists(atPath: receiptURL.path) else {
            NSLog("No receipt available to submit")
            completion(nil, nil, nil)
            return;
        }

        do {
            let request = try receiptValidationRequest(for: requestURL)

            URLSession.shared.dataTask(with: request) { (data, response, error) in
                var code : Int = -1
                var date : Date?

                if let error = error {
                    if let httpR = response as? HTTPURLResponse {
                        code = httpR.statusCode
                    }
                } else if let data = data {
                    (code, date) = self.extractValues(from: data)
                } else {
                    NSLog("No response!")
                }
                completion(date, code, error)
            }.resume()
        } catch let error {
            completion(nil, -1, error)
        }
    }

    func receiptValidationRequest(for requestURL: URL) throws -> URLRequest {
        let receiptURL = Bundle.main.appStoreReceiptURL!
        let receiptData : Data = try Data(contentsOf:receiptURL)
        let payload = ["receipt-data": receiptData.base64EncodedString().toJSON(),
                       "password" : sharedSecret.toJSON()]
        let serializedPayload = try JSON.dictionary(payload).serialize()

        var request = URLRequest(url: requestURL)
        request.httpMethod = "POST"
        request.httpBody = serializedPayload

        return request
    }

    func extractValues(from data: Data) -> (Int, Date?) {
        var date : Date?
        var statusCode : Int = -1

        do {
            let jsonData = try JSON(data: data)
            statusCode = try jsonData.getInt(at: "status")

            let receiptInfo = try jsonData.getArray(at: "latest_receipt_info")
            if let lastReceipt = receiptInfo.last {
                let formatter = DateFormatter()
                formatter.dateFormat = "yyyy-MM-dd HH:mm:ss VV"
                date = formatter.date(from: try lastReceipt.getString(at: "expires_date"))
            }
        } catch {
        }

        return (statusCode, date)
    }
}
Automatically Recurring Payments
This one is pretty easy. Remember how we set up the listener in the App
Delegate? That was because if a payment occurred while the app was not running,
the transaction will be delivered right after the app comes up. You should treat
this the same way and update your expiration dates.
Testing
Once you’ve got this code all lined up, and you’ve received confirmation from
Apple that they’ve done their bit, you should begin to see your SKProduct
objects in the simulator. But you can’t purchase them yet, because you don’t
have a sandbox user.
Let’s go back to iTunes Connect, and go to the Users and Roles module:

There are three tabs here:
- iTunes Connect Users, which are real iTunes accounts of people on your team.
- TestFlight Beta Testers, which are real iTunes accounts that can access your builds via the TestFlight app.
- Sandbox Testers, which are your IAP test accounts. These must correspond to real e-mail addresses that you control, but must not exist anywhere else
in Apple’s ecosystem.
It’s vitally important that you don’t mess this one up: If you try to
log in to any other Apple service with a sandbox ID, it permanently borks
up that ID. You’ll have to toss it and start over. We recommend here that
you create a new e-mail address specifically for this (eg. my_app_sandbox_1337@gmail.com) and use that
address for your Sandbox user. You will need to click a link in the email to
activate, so make sure it’s a real email address. (It is also possible to do plus-based email segmentation, ie. myaddress+thisapp@mycompany.com.)
In order to see the builds in the TestFlight app, however, your device needs to
be logged in to one of the accounts shown on the second tab. Thus the testing
cycle becomes a bit of a hassle, going something like this:
- Increment your version and/or build number.
- Archive and upload your build.
- In iTunes Connect, select the build for Internal Testing.
- Log into the store on your device as one of your internal testers.
- Launch TestFlight and install the new build.
- Log out of the iTunes Store.
- Run your build and attempt your purchase.
- When prompted, log in with your Sandbox credentials.
- After testing, in Settings, log your sandbox credentials out of the app store.
Kind of ugly, isn’t it? Good reason to have a second device handy just for
testing, too. Who wants to log their personal phone out of all that stuff?
Before going down the hole of device testing,
you can be heartened by the news that the simulator now supports IAP. For the
most part, you can proof out your process there. You should leave the
account blank in the simulator’s Settings and force the app to sign you in.
When you do distribute builds to external testers via TestFlight, your app
will be reviewed by Apple. This review tends to be fairly cursory, not on
the order of an App Store review.
One last note: Automatically recurring subscriptions in the sandbox run on a compressed schedule
and auto-expire after six transactions, allowing you to observe the complete
lifecycle.
Off to the App Store
When you’re ready to go and you’ve tested your work not just in the simulator
but also on a device, you’re ready to put it in the store. Each new IAP must be
submitted to the store with a new app version, which should make sense. Your app
will be reviewed and then your purchase will be reviewed separately. You will
need to give directions on how to invoke the purchase.
After you’re reviewed and approved, you can launch. Now go make that money!

The post Monetizing Your Apps with Apple’s In-App Purchases appeared first on Big Nerd Ranch.
]]>It’s been a bit over a year since we got the Apple Watch, and
right at a year since we got watchOS 2. Back then, we were
excited to be given a way to interact with the digital crown. You created a WKInterfacePicker in IB, filled it with picker items, and
it would react to the crown for you. It was usable, but limited. It required
you to give up screen space, even though you could make it invisible.
The post Crowns and Sprites in WatchOS 3 appeared first on Big Nerd Ranch.
]]>It’s been a bit over a year since we got the Apple Watch, and
right at a year since we got watchOS 2. Back then, we were
excited to be given a way to interact with the digital crown. You created a WKInterfacePicker in IB, filled it with picker items, and
it would react to the crown for you. It was usable, but limited. It required
you to give up screen space, even though you could make it invisible.
This year we’ve been given a much better solution with the WKCrownSequencer.
It is a system-generated object that you retrieve from your interface controller
(by calling [self crownSequencer]) and assign a delegate to it. The delegate
methods will be called when the rotation rate of the crown changes.
To see how it worked, I wrote a very simple watch project that
only had a single label. I made the interface controller conform to WKCrownDelegate, and added this code:
- (void)willActivate {
    [super willActivate];
    self.crownSequencer.delegate = self;
    [self.crownSequencer focus];
}

- (void)crownDidRotate:(WKCrownSequencer *)crownSequencer rotationalDelta:(double)rotationalDelta {
    self.totalDelta = self.totalDelta + rotationalDelta;
    [self updateLabel];
}

- (void)updateLabel {
    [self.label setText:[NSString stringWithFormat:@"%f", self.totalDelta]];
}
(totalDelta is declared as a CGFloat property.)
When you run the app and turn the crown, you will get a sense
for what rotationalDelta means. A value of 1.0 appears to indicate
that the crown has completed a full rotation. That’s a nice usable way to
access the information: you can multiply by 360.0 for degrees, or 57.296 for
radians.
New Modes of Interaction
By enabling access to the raw data from the crown, Apple is opening up the
ways in which we can use it. There’s much more flexibility here than
WKInterfacePicker offered. You could use the sequencer to read velocity
just as easily as you could position. In fact… the crown might make for
good gameplay.
I have a Flappy Bird clone that I
wrote to play with SpriteKit on the watch. Like all such clones, when you tap
the screen, you add an upward impulse to the bird, after which gravity begins
to bring the bird back down. We could just as easily add an upward impulse from
the crown input. In fact, if you turned the crown at the right speed, you could
offset the gravity effect completely and play Hovering Bird!
The code to implement the spinner was five lines. We
conform to the WKCrownSequencerDelegate protocol, and set ourselves as
the sequencer’s delegate. Then, we implement the method to catch the event,
adding whatever rotationalDelta we see to the vertical velocity of the bird.
I am not sure that Spinny Bird is any easier than Tappy Bird, but it is fun.
I can also imagine a competitive “tug of war” game with another watch owner,
or using the crown to aim in a “missile command” game. And there’s one famous
old game built around a rotary encoder that I might take a stab at implementing…
What are you gonna make?
The post Crowns and Sprites in WatchOS 3 appeared first on Big Nerd Ranch.
]]>The post WatchKit 2: Complications appeared first on Big Nerd Ranch.
]]>Were you a watch geek before smartphones? I was.
There are a lot of nerds with a soft spot for horology. I tend towards chronographs; I love the extra functions for stopwatches, secondary time zones and time-to-speed conversions. All of those additional displays are called complications, so named because they used to be made of a clockwork, and thus each added a set of gears and a display to the mechanism.
Apple has done a pretty great job of enabling custom complications with watchOS 2. WatchOS now includes ClockKit, which has all the complication classes. The model is pretty straightforward: Your watch extension has a class that conforms to the CLKComplicationDataSource protocol. This protocol defines the methods that the complication needs in order to function.
Creating your Project with a Complication
To start adding a complication to your app, you simply tick a checkbox when creating the project:

Checking the “Include Complication” box adds a ComplicationController class to your project and configures the appropriate bits. When you go to view your extension target in Xcode, you’ll see checkboxes for
the five potential classes of complication:

Templates and Providers
Complications are populated via classes of the type CLKComplicationTemplate. There are numerous styles of template, depending on how you wish to present your data. In the next section, we’ll take a detailed look at them, but first, let’s talk about how values are transmitted.
To provide the values that are used to fill in the complication’s field, we set providers on the templates. It’s a bit more flexible than just calling setText: on the template. Instead, we hand the template a subclass of CLKTextProvider. There’s one called CLKSimpleTextProvider that is very commonly used. It has a text property, and whenever the template needs a value, it just uses that value.
There’s a text provider for dates, times, relative dates (e.g., “two weeks”) and relative times (e.g., “three hours”).
Delivering images is the job of the CLKImageProvider. The image provider has a foreground and a background image, with associated colors.
    CLKImageProvider *imageProvider = [CLKImageProvider
       imageProviderWithBackgroundImage:[UIImage imageNamed:@"circsmall_bg"]
       backgroundColor:[UIColor redColor]
       foregroundImage:[UIImage imageNamed:@"circsmall_fg"]
       foregroundColor:CLKImageProviderForegroundColorWhite];

    CLKComplicationTemplateCircularSmallSimpleImage *tmpl =
      [[CLKComplicationTemplateCircularSmallSimpleImage alloc] init];

    tmpl.imageProvider = imageProvider;
Note that we supply two images and two color specs. Only, one of the color parameters is actually a UIColor, while the other is an enum. Both images are treated as alpha-only (that is, color is discarded), and then colorized according to your wishes. The background image may be tinted any color, but the foreground image may only match the system white or the system black.
In both of these cases, the image provider will also appropriately scale the image. You shouldn’t use that feature, however, as it’s a performance hit. It shouldn’t be a problem to simply generate your images in the correct size.
Every place where I’ve specified a size below, those sizes are in pixels. All images for Apple Watch must have the @2x modifier, too.
All The Templates That Fit, We Print!
The primary data holder in ClockKit is the CKComplicationTemplate. Each different style of complication has subclasses specific to it; as of the first beta, there were 22 subclasses, grouped into five major groups. I am going to dig in deep on only a couple of them, and we can extrapolate from there.
Modular Large
The modular large template is for this big space in the middle of the Modular watch face.

The screen displayed here shows the Standard Body template. As you can see, it shows multiple lines of data. The first would be the header line, and then there’s “body 1” and “body 2.”
We can surmise that the code might look something like this:
    CLKComplicationTemplateModularLargeStandardBody *t = [[CLKComplicationTemplateModularLargeStandardBody alloc] init];
    t.headerTextProvider = [CLKSimpleTextProvider textProviderWithText:data[@"Waxing gibbous"]];
    t.body1TextProvider = [CLKSimpleTextProvider textProviderWithText:data[@"Moonrise 5:27PM"]];
    t.body2TextProvider = [CLKTimeIntervalTextProvider textProviderWithStartDate:[NSDate date] endDate:[NSDate dateWithTimeIntervalSinceNow:((6*60*60)+(18*60))];
Obviously there are other formatters involved—almost certainly a CLKTimeTextProvider for that 5:27PM bit—and maybe some funkiness with fonts as well. But the basic idea is here.
The large modular view has several templates. You could display a two-row, three-column grid, or a two-row, two-column grid, both with bold headers; the standard body displayed here; or a tall body, where you have a header line and then a double-height text string.
Modular Small

The Modular clock face has the one large section and four small sections. There are seven options for layout of Modular Small complications. The highlighted complication shows the Stack Image template.
There, we place an image and then some text below it. There are a bunch of other arrangements: two rows of text, a 2×2 table or a progress ring surrounding an image or text.
Utilitarian Large
There’s only one template for this form factor: CLKComplicationTemplateUtilitarianLargeFlat. This offers a fairly long string of text across the bottom of the watch.

The template also supports adding an image of size 18×42 / 20×44. Like the other templates that take an image with their text, that image gets prepended to the left.
Utilitarian Small
This is the most commonly appearing template in the system watch faces. It shrinks into the corner as much as possible (see the temperature in the upper right), but will expand to nearly the midline of the watch to hold your data.

The template higlighted here is CLKComplicationTemplateUtilitarianSmallFlat. It has a text provider and an image provider. The image provider is optional. The template in the upper right is also flat, with no image.
Circular Small
On the Color face, all four complications are a version of the Circular Small.

The bottom two are probably simple image templates. For those, you have to hand the server an image to display. Those images can be up to 32×32 on the 38mm face, and 36×36 on the 42mm. Those values are in pixels, and the image file names should be @2x.
The top left shows a ring text template. All the ring templates share the same interface. They have a ringStyle, a fillFraction and either an imageProvider or a textProvider. Image providers go with image templates.
The top right shows a Stack Image template. It presents an image (32×14 or 34×16) and a bit of text below it. And of course, there is also a Stack Text template that behaves the same way.
So How Does It Work?
When you install your app with complications, its extension is launched immediately. The method getPlaceholderTemplateForComplication:withHandler: is called once for each supported complication format. Values from that method are cached for the life of the application. The simplest way to support this is to have a method that will create the appropriate template when handed a model object, and then create a placeholder model object for this method.
Once the placeholder has been delivered, the user would be able to install your complication. And if it does get installed, your extension will be awakened and -getCurrentTimelineEntryForComplication:withHandler: will be invoked. It wants a single result, the value for right now. After this gets called, the system will call -getNextRequestedUpdateDateWithHandler: to schedule the next data refresh. Finally, the method -getPrivacyBehaviorForComplication:withHandler: lets the watch know if the values need to be obscured on a locked watch.
That’s an interesting pattern, this habit of passing in the complication and a handler block. I wonder why that is? My bet is that this entire system was built to be asynchronous. We’re dealing with different processes, don’t forget. The clock app has to receive this data over some form of interprocess communication. Plus, generating the complication template might involve you sending off a request to your parent app, or maybe even the Internet. For all those reasons, this call needs to separate the reply from the request.
And that’s why ClockKit has handler blocks all over.
Time Travel: Showing Past/Future Events
If the user moves the Digital Crown, the watch snaps into Time Travel mode. There are a few methods to support Time Travel:
-getSupportedTimeTravelDirectionsForComplication:withHandler:-getTimelineStartDateForComplication:withHandler:-getTimelineEndDateForComplication:withHandler:-getTimelineEntriesForComplication:beforeDate:limit:withHandler:-getTimelineEntriesForComplication:afterDate:limit:withHandler:
These methods work together to specify the range of Time Travel you’re willing to support. The entries are CLKComplicationTimelineEntry objects, which contain an NSDate and a CLKComplicationTemplate.
One of the funny things about that date is that it represents the time when this template should begin to be displayed. If your template discusses a future event, like a calendar entry might, then the NSDate passed in here should be equal to (or just after) the previous calendar entry closes. If I have a meeting from 1 p.m. to 2 p.m., and then another at 4 p.m., I should see the 4 p.m. entry only after 2 p.m.
Time Travel currently supports a 72-hour range, comprising yesterday, today and tomorrow. There’s no point in supplying start or end dates, or timeline entries that exceed those limits.
Triggering a Refresh
When your app’s underlying data changes, you might want to update the complications for your watch with the new data. There’s a mechanism for that, but be warned: It is rate limited. Once you’ve triggered your limit on refreshes for the day, you can’t refresh until the following day. It sounds a bit draconian, but Apple claims this is to protect battery life. I’d be interested to see just what the limit is.
- (void)refreshComplications {
    CLKComplicationServer *server = [CLKComplicationServer sharedInstance];
    for(CLKComplication *complication in server.activeComplications) {
        [server reloadTimelineForComplication:complication];
    }
}
See? Not Too Complicated!
Complications aren’t difficult to use; they’re just views of your data like any other. There’s a little more abstraction involved than in UIKit, but not too much. One of the things Apple has repeatedly driven home to us is that your interactions on the watch should be incredibly short, time-wise. What could be more convenient than a small display of your data right on the watch face?
As my traditional watches continue to rest in their cases, and my Apple watch
takes ownership of my wrist, I’m looking forward to installing some new and amazing complications. I hope this article helps you to write the next complication that tickles me!
The post WatchKit 2: Complications appeared first on Big Nerd Ranch.
]]>The post WatchKit 2 Hardware Bits: The Accelerometer appeared first on Big Nerd Ranch.
]]>When Apple announced WatchKit 2, I shot over to the developer website and immediately began consuming whatever documentation I could find.
I was tickled to encounter this page:

Awesome! Core Data, Core Graphics, Contacts and EventKit—those were all expected. Even PassKit and HealthKit were expected, after I thought about it for a minute.
There was something I didn’t really expect, but was happy to see: Core Motion. You see, I love Core Motion. I love sensors. I love hardware.
Sensing Your World
I originally went to school for Electromechanical Engineering, but after a few years, I switched to Computer Science; even in 1993, it was obvious that the Internet was where the action would be.
But truthfully, I’ve never really left electromech. To me, the most fun programming comes when you use electronics to manipulate the real world. Back in 1990, I came across an original IBM PC in an engineer’s case (it had push buttons on the side that cause the hinged lid to flip open, offering quick access to the ISA bus) and it came with a DACA, the very rare IBM Digital Acquisition and Control Adapter.
I used it to control a model train set,
using Hall effect sensors to detect the train and display its position on the screen. Commands from the computer would flip the track switches or turn on the lights in the station.
Since then, any time I’ve had a computer or gadget,I’ve worked on getting it to sense the world. Accordingly, I’ve been using Core Motion since Apple gave it to us. Core Motion has done an awesome job of making these sensors simple to use.
WatchKit’s Core Motion
Core Motion on iOS takes an accelerometer, a gyroscope and a magnetometer, combining the collected data to create a structure called “device motion.” The device motion struct can tell you not only how fast the device is moving (either linear or angular), but it also can tell you where it’s pointing vertically relative to the horizon, or the heading relative to North, either true or magnetic.¹
To see what WatchKit provides, I created a simple watch app containing only a label for status info. My interface controller’s -willActivate method
looked like this:
    CMMotionManager *motionMgr = [[CMMotionManager alloc] init];
    self.motionMgr = motionMgr;

    NSString *status = @"";
    if([motionMgr isAccelerometerAvailable])
        status = [status stringByAppendingString:@"A"];
    if([motionMgr isGyroAvailable])
        status = [status stringByAppendingString:@"G"];
    if([motionMgr isMagnetometerAvailable])
        status = [status stringByAppendingString:@"M"];
    if([motionMgr isDeviceMotionAvailable])
        status = [status stringByAppendingString:@"D"];

    [self.statusLabel setText:status];
I ran the app and was greeted with just an A. No gyroscope and no magnetometer means that there’s no device motion with the Apple Watch. That’s gonna really cut down on the usefulness of the API. Still, just because I’m the sort to play with these things, I wrote a little app anyway.
The app shows three bar graphs, one for each acceleration value (x, y and z). The values provided by the library are in G. If the watch were flat on a desk, I would expect
those accelerations to be 0.0, 0.0, and -1.0, given that Earth is continually pulling on everything. If you move the watch quickly in some direction, the dials should jump.
Generating Simple Bar Graphs
First, let’s generate some images. I used ImageMagick and a simple script to generate a series of bar graph images:
#!/bin/sh

OUTPUTSIZE=40x120
NAME=bar

CTR=0
until [ $CTR -gt 100 ]; do

  if [ $CTR -lt 50 ]; then
    BARCOLOR=green
  else
    BARCOLOR=red
  fi

  let OFFSET=$CTR+10
  convert -size $OUTPUTSIZE xc:black -fill $BARCOLOR
          -draw "rectangle 10,60 30,$OFFSET" $NAME${CTR}@2x.png
  let CTR+=1
done
I should note that convert is a cool utility. It’s got a a simple command to draw a rectangle and save it to disk, making it trivial to generate simple bar graphs for the watch’s picker view.
Setting Up The App
I added three picker views to the watch interface, arranging them vertically:

It’s permissible to use your array of WKPickerItem objects multiple times, so I arranged the init code like so:
- (void)awakeWithContext:(id)context {
    [super awakeWithContext:context];

    self.motionMgr = [[CMMotionManager alloc] init];
    self.motionQueue = [NSOperationQueue mainQueue];

    [self.xPicker setItems:self.pickerItems];
    [self.yPicker setItems:self.pickerItems];
    [self.zPicker setItems:self.pickerItems];
    // Configure interface objects here.
}

- (NSArray<WKPickerItem *> *)pickerItems {
    static NSArray *items;
    if(!items) {
        NSMutableArray *arr = [[NSMutableArray alloc] initWithCapacity:101];
        for(int c=100; c>=0; c--) {
            NSString *name = [NSString stringWithFormat:@"bar%d", c];
            WKImage *img = [WKImage imageWithImageName:name];
            WKPickerItem *item = [[WKPickerItem alloc] init];
            item.contentImage = img;
            [arr addObject:item];
        }
        items = [arr copy];
    }
    return items;
}
Once we’ve populated our pickers, it’s time to use them. Let’s modify -willActivate to enable motion updates:
    [motionMgr setAccelerometerUpdateInterval:0.1];
    [motionMgr startAccelerometerUpdatesToQueue:self.motionQueue withHandler:^(CMAccelerometerData *accel, NSError *error){
        CMAcceleration a = accel.acceleration;
        [self setOffset:a.x forPicker:self.xPicker];
        [self setOffset:a.y forPicker:self.yPicker];
        [self setOffset:a.z forPicker:self.zPicker];
        if(!error) {
            [self.statusLabel setText:@"tracking"];
        } else {
            [self.statusLabel setText:error.localizedDescription];
        }
    }];
The -setOffset:forPicker is a simple convenience method:
- (void)setOffset:(CGFloat)offs forPicker:(WKInterfacePicker *)picker {
    int idx = 50 + (offs * 50);
    if(idx < 0) idx = 0;
    if(idx > 100) idx = 100;

    [picker setSelectedItemIndex:idx];
}
An acceleration of 1.0 will result in a green bar that’s 50 pixels
long above the center. An acceleration of -1.0 will result in a red bar that’s 50 pixels long below the center. And I mentioned before, on a flat watch I would expect a nearly invisible bar for the X and Y dimensions, and a nearly full downward bar for the Z dimension. That’s exactly what I got:

Not having the gyroscope (and therefore not having the device motion struct that the gyroscope’s data enabled) limits the usability for things like games. On the phone, I use the Roll, Pitch and Yaw data (aka Tait-Bryan Angles and often misinterpreted as Euler angles) to make the default OpenGL cube stay in one orientation regardless of how you move the phone. However, no such demo is possible on the watch.
What about that Raise-To-Activate feature?
Oh yeah. When you move your arm, the screen goes off. Your app gets a call to -didDeactivate. Your accelerometer data stops coming. That, uh, wasn’t what I wanted.
By using HealthKit and registering to receive accelerometer data,
you can get that information when your app activates again.
The accuracy isn’t what you can get in realtime, but may be good enough for your purposes. HealthKit is a big topic and requires some explanation of the model, so we’ll discuss that in another post.
What Sort of Hardware is That?
iFixit’s teardown, which I mentioned in my post on the Taptic Engine, identified the included chip as a STMicroelectronics gyroscope + accelerometer. I believe their identification of the C451 part number to be in error; STM does not list any parts with a similar number, and their gyroscope products all have part numbers of the form L3Gxxx or A3Gxxx. Furthermore, these gyro chips do not indicate an accelerometer as part of the offering.
After looking through data sheets at STM’s website, I think the part is actually an LIS3DH. It has the appropriate pinout and 3mm² footprint. It’s a 3-axis accelerometer, just like Core Motion reports.
Bonus: A Sneak Peek At Core Location
I looked through the watchOS version of CLLocationManager.h
and saw that many of our favorite things are not in there. In fact, almost everything is marked with __WATCHOS_PROHIBITED. All you’re left with is the authorization stuff and a new one-shot version of -startUpdatingLocation called -requestLocation, a welcome new API for iOS 9. Those actions trigger callbacks through the delegate methods of CLLocationManagerDelegate as usual.
It makes sense to drop support for heading if the device doesn’t have a magnetometer, and the geofencing stuff needs to be close to the GPS chip to be of any use (hence its relegation to the iOS side as well). That said, one of the schemes Apple uses to detect your location is to compare wifi SSIDs to a list of known ones—I do wonder why they didn’t do that here.
As for the source of the data, it’s the phone, of course. I suspect the watch caches a fix for a longer period than the phone does. If they must, they ask the phone to get a new heading. The phone has several mechanisms to do this, but the only one the watch could possibly accomplish on its own is a Wifi positioning system. I see a post on that topic in my future, so check back!
–
¹ In celestial navigation terms, those values are called altitude and azimuth, respectively. These are good, nerdy names.
The post WatchKit 2 Hardware Bits: The Accelerometer appeared first on Big Nerd Ranch.
]]>The post WatchKit 2 Hardware Bits: The Taptic Engine appeared first on Big Nerd Ranch.
]]>When I put up the draft of my Digital Crown blog post for internal review, my friends MarkD and Step both saw the little one-liner I’d thrown in about making the Taptic Engine “click” as you scroll the Digital Crown. The response was, “Hey! there are other haptics?! Call ‘em out!” But to their disappointment, I declined, saying it was a post for another day.
Today is that day! Let’s take a quick look at the Taptic Engine, how it works and how to make it work.
What It Is
The Taptic Engine is an electromagnetic linear actuator. Under the hood, a varying electric current moves a magnetic mass around. Unlike typical “offset mass rotation” vibration motors, it’s possible to have a nearly instantaneous result. There’s no “spin up” time. Likewise, the mass stops pretty quickly. It’s not just quiet, it’s nearly silent. And finally, it is possible to make them directional. All of these are distinct advantages over offset mass motors.
Creative Electron published this video describing the linear actuator in the iPhone 6 Plus. It’s similar enough to the Taptic Engine to give a sense of how it operates.
You can also see iFixit’s torn-apart Taptic Engine. Fair warning: It’s not for the faint of heart; those iFixit guys can be pretty violent.
How To Use It
In the first version of WatchKit, the WKInterfaceDevice class consisted of some device metrics and the image cache. In WatchKit 2, it takes on a new role by adding the -playHaptic: method. This method takes one argument, an enum WKHapticType.
typedef NS_ENUM(NSInteger, WKHapticType) {
    WKHapticTypeNotification,
    WKHapticTypeDirectionUp,
    WKHapticTypeDirectionDown,
    WKHapticTypeSuccess,
    WKHapticTypeFailure,
    WKHapticTypeRetry,
    WKHapticTypeStart,
    WKHapticTypeStop,
    WKHapticTypeClick
} WK_AVAILABLE_WATCHOS_ONLY(2.0);
On iOS, we enjoy the ability to construct custom vibration patterns. Not in code, mind you, but through the Accessibility functions. Sadly, the watch offers no such customization.
Sample App: Taptester
In order to get a feel (ba-dump bump) for the various haptic types, I threw together a sample project. It contains a WKInterfacePicker and a WKInterfaceButton. The picker is populated with the known notification types.
First, the UI:

and the code. There’s almost nothing to it.
@interface InterfaceController()
@property (unsafe_unretained, nonatomic) IBOutlet WKInterfacePicker *picker;
@property (unsafe_unretained, nonatomic) IBOutlet WKInterfaceButton *button;
@property (nonatomic) NSInteger selectedType;
@end

@implementation InterfaceController

- (void)awakeWithContext:(id)context {
    [super awakeWithContext:context];
    [self.picker setItems:[self pickerItems]];
}

- (void)willActivate {
    [self.picker focusForCrownInput];
    [super willActivate];
}

- (IBAction)pickerDidChange:(NSInteger)value {
    self.selectedType = value;
}

- (IBAction)didTapButton {
    [[WKInterfaceDevice currentDevice] playHaptic:self.selectedType];
}

- (NSArray *)pickerItems {
    NSArray *strings = @[
                         @"Notification",
                         @"Direction Up",
                         @"Direction Down",
                         @"Success",
                         @"Failure",
                         @"Retry",
                         @"Start",
                         @"Stop",
                         @"Click",
                         ];

    NSMutableArray *items = [[NSMutableArray alloc] initWithCapacity:strings.count];
    for(NSString *str in strings) {
        WKPickerItem *item = [[WKPickerItem alloc] init];
        item.title = str;
        [items addObject:item];
    }

    return items;
}

@end
The first thing I noted is that all these sounds except the click have an audio counterpart. I hadn’t expected that, though I suppose I should have.
Notificationis exactly what you’d expect: it feels like the regular notification tone.- For
Direction UpandDirection Down, my first thought was, wow, directional haptics! Wrong. Two haptic taps corresponding with two ascending tones, or two descending tones. Successcomprises three tones forming an ascending major chord.Failureis a three-note octave: high, high, low.Retryis three quick taps with a single tone repeated.Startis one strong tap.Stopis two strong taps with about a half second interval.Clickis the quietest, most unobtrusive of them all.
Sending in values higher than WKHapticTypeClick will produce a response
exactly like WKHapticTypeNotification.
Sample app: Metronomic
We here at Big Nerd Ranch sometimes find ourselves wanting for demo app ideas. Unlike most development, we start wth an API call, and have to construct an app that exercises it. Much to my luck, the illustrious Erica Sadun mentioned on Twitter during the WWDC keynote that she was expecting a watch metronome app rather quickly. Thanks, Erica, for the great idea! Your watch metronome is here!
Only… it’s not such a great metronome. It keeps time reasonably well; I have no doubt that the NSTimer is firing right when expected. But once we make our call to -playHaptic:, we’re at the whim of the OS as to exactly when that plays. In practice, I felt a slight variation at higher tempos. If the Start type had a shorter sound, I could use it.
Further, the taps are pretty light. My wife is a choral conductor, and she would not be able to reliably feel the taps while moving her arms around as she does.
“Prominent Haptics” could help, I see you thinkin’. Ah, but you’re wrong.
Prominent Haptics prepends each event with a long vibration, rendering it useless when performing as a metronome. (Bzzzz tap. Bzzzz tap. Bzzzz tap.)
Tapped Out
There’s not a whole lot to cover in this API, so we’ll end this post here. In closing, I’d just like to suggest that using haptics can be overdone quite easily. It can really enhance to user experience, and Apple has
done a great job of using it tastefully within their apps. But it could be annoying.
Worse, it eats battery life. Moving that mass around requires a lot of your precious juice. You don’t want to make something that seems cool at first blush, but relegates your watch to the charger by 2 p.m. And power consumption is something we really have to watch (ha!) on the Apple Watch.
I hope this helps you build a better metronome!
Update: I am getting reports from the watchOS 2 Gold Master that the background operation no longer works. I thought this might happen. You see, originally I didn’t shut off the tap, figuring the extension would get killed right away. Imagine my surprise when the tap continued – even after I “killed” the app via the watch face. I added a little bit of code to stop the tap, and made it optional – making the “background tap” a feature!
As often happens, I built my “feature” on top of an undocumented assumption, that in fact went against the behavior the docs would suggest. And as Apple came closer to release, at some point, they tightened down that assumption, and my feature broke. Should I blame Apple? No, they clearly did the right thing.
But now what do I do if I want to schedule a tap of some sort from my app? Must I go back to the iOS app and schedule a local notification? I haven’t discovered this capability yet in watchOS, but it must exist: The watch’s timer app seems to be able to schedule notifications completely local to the watch. When you use the watch timer, your phone doesn’t know about it, but when you use the phone timer, the watch shows the alert as well. Perhaps the Timer app is using a private API that will become public in the next round.
The post WatchKit 2 Hardware Bits: The Taptic Engine appeared first on Big Nerd Ranch.
]]>The post WatchKit 2 Hardware Bits: Using the Digital Crown appeared first on Big Nerd Ranch.
]]>When WatchKit was announced, I was so excited to get the code and begin using the hardware on the Apple Watch. But like most everyone else, I was disappointed when WatchKit 1 leaned so heavily on the phone that hardware access was simply impossible. It felt a bit like the iPhone’s launch, when we asked about apps and were given Mobile Safari.
That changed when WatchKit 2 was announced. The big change is allowing code to run on the watch itself, rather than in the extension space on the phone.
Running on the watch increases the difficulty of some things like communication with your containing app, and it can lead to power consumption issues, but it unlocks so much potential that it’s worth it.
And most of that potential is in the hardware. The first and easiest piece to chew off is the Digital Crown.
In WatchKit 1, all we had was the WKInterfaceTable, which could be scrolled with the crown. With the new APIs, you can access the crown via a new interface class called a WKInterfacePicker. To use this class, you add it to your interface and add an outlet to your interface controller. In willActivate, you attach some items, call [self.picker focusForCrownInput] and you’re off.
Picker Types
The picker, like iOS pickers, requires a set of data items from which to pick. Unlike iOS, they are not retrieved via delegation, but set all at once via -setItems:. Why? Well, because the UI and the code are still running in two different processes. Changes to UI elements are batched up and transmitted in the next spin of the run loop.
The picker’s items are of type WKPickerItem. These items have a title, an accessory image, a caption and a content image. There are three methods of presentation: List, Stack and Sequence. Depending on the choice of presentation, you will set some of these values, but never all.
List
The list presentation is pretty close to the iOS representation of a UIPickerView. Things fade at the top and bottom of the list, and the selected item appears in the center. It’s good for the same sorts of things that you’d use a UIPicker for, such as a predetermined list of options (your favorite Pallookaville soda flavors, perhaps).
Filling your picker is pretty simple:
    NSMutableArray *items = [[NSMutableArray alloc] initWithCapacity:101];
    for(int ctr=0; ctr <= 100; ctr++) {
        WKPickerItem *item = [[WKPickerItem alloc] init];
        NSString *title = [NSString stringWithFormat:@"Title %d", ctr];
        item.title = title;
        [items addObject:item];
    }
    return [items copy];
The resulting list looks like this:
I found that the list presentation works great with text, but not so much for images. The contentImage or accessoryImage will be scaled down to the row height.
Another thing I noted was that if you set a title and an accessory image, they become left justified. Titles without the accessory image are centered.
Stack
The stack offers a little animation similar to a Rolodex. What’s a Rolodex, you young whippersnappers ask?
Apple’s version isn’t quite like this, but it’s similar. When it settles, only the selected card is visible.
For this, let’s switch the code to return image-based picker items. I used the Radial Chart Image Generator to create a ring of images and attached them to my picker with this code:
    NSMutableArray *items = [[NSMutableArray alloc] initWithCapacity:101];
    NSLog(@"requested items");
    // -images returns NSArray<WKImage>
    for(int ctr = 0; ctr <= 100; ctr++) {
        NSString *imgName = [NSString stringWithFormat:@"round%d",ctr];
        WKImage *image = [WKImage imageWithImageName:imgName];
        WKPickerItem *item = [[WKPickerItem alloc] init];
        item.caption = imgName;
        item.contentImage = image;
        [items addObject:item];
    }
    [self.picker setItems:[items copy]];
In Interface Builder, I also turned on “Focus: Outline with Caption.” The result was this:
Note: Not all images work well with the stack picker. Images that have transparency will show the backing image through those transparent holes.
Sequence
The sequence view is what you choose if you wish to spin through a set of images in a flat manner.
This is the one that is appropriate for most custom controls, as you can implement pretty much anything your heart desires. (I may put together a WKInterfaceSlider replacement that uses the crown. That needs to be a thing.)
Getting Events
The picker will fire off an IBAction when its value changes, so it’s easy to act upon it just as any other UI event. The picker supplies the selected index, which you can then map back to a meaningful construct.
Bonus: Use the Taptic Engine
Let’s make the watch tap the wrist as the value changes! This is simple enough to do…
- (IBAction)pickerChanged:(NSInteger)value {
    [[WKInterfaceDevice currentDevice] playHaptic:WKHapticTypeClick];
}
Now you will get tactile feedback as you scroll through your controller. There are a bunch of different haptic types; I’ll cover those in the next post.
Deployment Woes
It took me around 10 minutes to write the code necessary to work the Digital Crown, but deploying to the device was a long, sordid affair. To wit:
- Download Xcode 7 beta, iOS 9 beta and watchOS 2 beta.
- Install Xcode 7. This part is easy, just time consuming. We must download, copy and verify our standard multiple-gigabyte image. 4.22GB this time!
- That said, the iOS 9 installation was pretty painless. A reasonably slim download at 2GB, and a nice new font!
- The watch updates take a pretty long time, during which it must be connected to the charger and you’re required to enter the passcode a couple times.
- Once the update was complete, the watch had turned off my “unlock when phone unlocks” setting, which was irritating.
- Deploying the app to the watch is a bit of a hinky process. It may fail if you attempt to deploy a new copy while it is busily copying one up. I found myself following this process repeatedly:
- Via the Watch app on the phone, find my test app and deselect “Show app on Apple Watch.”
- Watch the Watch’s app launcher until the app icon disappears.
- Via Xcode, launch the app again.
- Eventually, Xcode gives up and says, “Finished running [xx] on Apple Watch.” If you look at the apps screen, it is slowly installing. (Images are big.)
- When the icon finally fills in, you can launch your app and play with it. No log output, however. Use the Simulator if you want such nice things.
- Battery life suffers tremendously for App Deployment. From 100% battery, using it for more or less continuous development for three hours left me at 35%.
Not once did I manage to get Xcode to show me the debug session on the extension. I wasn’t able to get console output, making NSLog useless. I am not sure how long it will take Apple to fix this, or whether I should just add my own mechanism for the purpose of remote logging.
In any event, that’s a topic for another day. In the meantime, we’ve got watch apps to write. Happy coding!
The post WatchKit 2 Hardware Bits: Using the Digital Crown appeared first on Big Nerd Ranch.
]]>