

Swift Regex Deep Dive
iOS MacOur introductory guide to Swift Regex. Learn regular expressions in Swift including RegexBuilder examples and strongly-typed captures.
I have an old arcade game in a cocktail table format. It’s Robotron:2084, the 1981 hit from Williams. You may remember the ridiculously difficult and fast gameplay:
A bona fide classic of the arcade era, this Eugene Jarvis-designed game has all of his hallmarks: fast, addictive gameplay, skyrocketing difficulty, and my favorite, conflicting goals. In his first hit Defender, one had to shoot the aliens while rescuing humans. In this game, the player (white with a red head) must shoot all the evil robots (red humanoids, large green boxy robots, and the pulsing circles in the corners that launch little homing bots) while not shooting any of the good guys (a man, woman, child or the other player.)
Fresh off my successful previous project and my experiments with controllers, I decided to make a weekend sprint of it. I gave myself this basic game plan:
In my previous post, I described spending some time learning how game controllers work. For this project, I would need a dedicated controller manager that can vend the correct controller for the player at any time. In fact, I might as well set up the logic to vend two controllers, and then, I should try to keep the second player in mind throughout development.
I created a Control protocol to hide the distinction between the different gamepads, instead offering game-appropriate data:
protocol Control {
    var moveVector : CGVector { get }
    var shootVector : CGVector { get }
    var buttonAPressed : Bool { get }
    var trigger : Bool { get }

    // the underlying controller
    var controller : GCController { get }

    // lower number is higher priority, for choosing controller v. remote
    var priority : Int { get }
}
Instead of the valueChangedBlock(), I am going to just read the inputs in the game loop.
In SpriteKit, the (0,0) pixel is the lower leftmost one. To move our character towards the upper right, we might send it a stream of move(CGVector(x: 1.920, y: 1.080)) commands. This will send the sprite in a nice line directly from one corner to the other. However, if you recall, the sprites in this game did not move smoothly. They either went horizontal, vertical, or on a diagonal. For that purpose, I’ll want to take any vector and turn it into one where the X value is either -1, 0, or 1, and the Y value is either -1, 0, or 1.
To determine this, I considered that you could divide the circle into sixteen wedges… or,
using absolute values, only four:
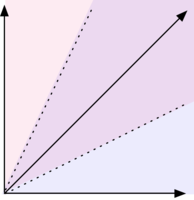
The pink portion is vertical, so I want the X component to be zero and the Y component to be the sign of the original Y. Likewise, the blue portion should have a Y component of zero and a signed X. The purple section is going to be signed for both X and Y.
extension CGVector {
    // returns a vector where dx = [-1, 0, 1] and dy = [-1, 0, 1]
    var simplifiedVector : CGVector {
        func sign(_ val: CGFloat) -> CGFloat {
            switch (val) {
            case let(val) where 0 > val : return -1
            case let(val) where 0 < val : return 1
            default: return 0
            }
        }

        var ret = CGVector(dx: 0, dy: 0)
        let isHoriz = (fabs(dx) > fabs(dy*2))
        if(!isHoriz) {
            ret.dy = sign(dy)
        }
        let isVert = (fabs(dy) > fabs(dx*2))
        if(!isVert) {
            ret.dx = sign(dx)
        }
        return ret
    }
}
TIL, in Swift you can put a function inside a function. :mindblown:
Last year when SpriteKit came to the Apple Watch, I threw together a quick Flappy Bird clone to get used to the framework. It’s tremendously easy to build 2D scenes with it, so it was an obvious choice for this project. You may want to spin through the previous post to become familiar with the framework. In short, there is a SKScene which holds many SKNode instances of different types. Typically we will use a SKSpriteNode, as it can be drawn as a box of a given color or as an image from an asset bundle. In this game, the other sort of node we will use is an SKEmitterNode, for explosions.
class GameUniverse : SKScene {
    static var shared = GameUniverse(size: CGSize(width: 1920, height: 1080))

    var playerOne = Player()

    func setupUniverse() {
        addPlayer()
    }

    func addPlayer() {
        let p1 = playerOne
        p1.name = "Player One"
        p1.position = self.frame.center
        addChild(p1)
        friendlies.append(p1)
    }

}
For all of the sprites that would be moving around the screen, I declared an abstract “movable” class with a move(vec: CGVector) method, and a walk() method that subclasses could override for their own peculiar walking needs. For the player and friendlies, it will call walk() thirty times a second. For the robots, it will call walk() on some of them each turn.
class Movable : GameNode {
    var lastWalkVector : CGVector = .zero=
    var nodeSpeed : CGFloat = 1.0

    func walk() { } // subclasses override

    func move(_ direction : CGVector) -> Bool {
        var vec = direction
        vec.dx *= (nodeSpeed * speedModifier)
        vec.dy *= (nodeSpeed * speedModifier)

        var pos = position
        pos.x = pos.x + vec.dx
        pos.y = pos.y + vec.dy

        position = pos
        return true
    }
}
I then stubbed out some types I knew I’d need, and went right to the player sprite:
// For later when the shooting starts
class Hittable : Movable { }

class Player : Hittable {
    enum PlayerNumber {
        case one
        case two
    }
    var playerNumber : PlayerNumber = .one

    var controller : Control? {
        switch(playerNumber) {
        case .one: return ControllerManager.shared.playerOneController
        case .two: return ControllerManager.shared.playerTwoController
        }
    }

    override func walk() {
        guard let ctrl = controller else {
            return
        }

        let vec = ctrl.moveVector
        if vec != .zero {
            let lastVec = player.lastWalkVector.simplifiedVector
            _ = move(vec)
        }
    }
}
So at this point, if the player has a controller, and we call walk(), it will move the sprite around the screen. I spent some time shaving the initialization yak, and then set up the game loop as described earlier. (If you want to look at the game loop, it’s highlighted here.)
And just like that, I am driving a white box around the screen!

Now it’s time to add the bad guys.
In order for the enemies to find the player they wish to kill, I need to add a little helper code to the GameUniverse that returns a simplified vector to the player. The enemies use that as their direction to walk and shoot. This gives the player a place to hide, along the dotted lines shown above. You will see the best players maximizing the number of dotted lines that converge on their location while minimizing the number of solid ones, thus reducing your chances of being hit.
func directionToNearestPlayer(from node: GameNode) -> CGVector {
    let c1 = node.position
    let player = universe.nearestPlayer(to: node)
    let c2 = player.position

    let diff = CGVector(dx: c2.x - c1.x, dy: c2.y - c1.y)
    let ret = diff.simplifiedVector
    return ret
}

override func walk() {
    let vec = directionToNearestPlayer(from: self)
    let lastVec = lastWalkVector.simplifiedVector
    _ = move(vec)
}
The wandering pattern for a civilian is pretty simple. Randomly choose a new direction and walk twenty or so steps, then randomly choose again. The direction chosen is always a cardinal one, no “northeast” wanderers. (Not shown here are utility functions like random() and reverse().)
enum WalkDirection : String {
    case north = "north"
    case south = "south"
    case east = "east"
    case west = "west"
}
In the Civilian class I stubbed out earlier, I added the walk logic.
class Civilian {
    var direction = WalkDirection.random()
    var stepCount = 0
    var stepDelay = 3 // step every Nth frame
    var stepDelayCount = 0

    override func walk() {
        stepDelayCount += 1
        if stepDelayCount > stepDelay {
            stepDelayCount = 0

            // move the sprite
            move(direction.vector()

            if(stepCount <= 0) {
                newDirection()
            }
            stepCount = stepCount - 1
        }
    }

    func newDirection() {
        stepCount = 10 + Int(arc4random()%20)
        direction = Movable.WalkDirection.random()
    }
}
At this point, I have a player that runs, pursuers that pursue, and civilians that wander.
They wander off the screen, true, but I’ll address that later.
I’m a long way from done, but SpriteKit has made it pretty simple to quickly get my items moving all over the screen. In our next post, I’ll show how to create simple animated characters for the sprites, shuffle through their textures and make the game look a whole lot better.
Our introductory guide to Swift Regex. Learn regular expressions in Swift including RegexBuilder examples and strongly-typed captures.

The Combine framework in Swift is a powerful declarative API for the asynchronous processing of values over time. It takes full advantage of Swift...

SwiftUI has changed a great many things about how developers create applications for iOS, and not just in the way we lay out our...