Swift Regex Deep Dive
iOS MacOur introductory guide to Swift Regex. Learn regular expressions in Swift including RegexBuilder examples and strongly-typed captures.
When Apple announced WatchKit 2, I shot over to the developer website and immediately began consuming whatever documentation I could find.
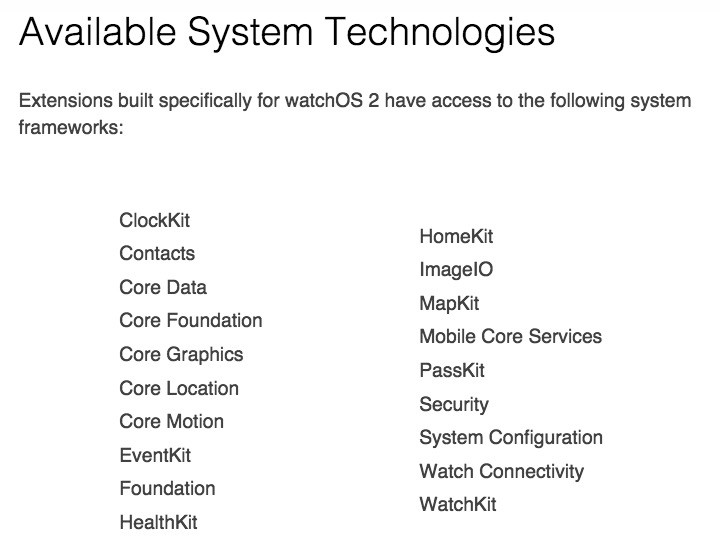
I was tickled to encounter this page:

Awesome! Core Data, Core Graphics, Contacts and EventKit—those were all expected. Even PassKit and HealthKit were expected, after I thought about it for a minute.
There was something I didn’t really expect, but was happy to see: Core Motion. You see, I love Core Motion. I love sensors. I love hardware.
I originally went to school for Electromechanical Engineering, but after a few years, I switched to Computer Science; even in 1993, it was obvious that the Internet was where the action would be.
But truthfully, I’ve never really left electromech. To me, the most fun programming comes when you use electronics to manipulate the real world. Back in 1990, I came across an original IBM PC in an engineer’s case (it had push buttons on the side that cause the hinged lid to flip open, offering quick access to the ISA bus) and it came with a DACA, the very rare IBM Digital Acquisition and Control Adapter.
I used it to control a model train set,
using Hall effect sensors to detect the train and display its position on the screen. Commands from the computer would flip the track switches or turn on the lights in the station.
Since then, any time I’ve had a computer or gadget,I’ve worked on getting it to sense the world. Accordingly, I’ve been using Core Motion since Apple gave it to us. Core Motion has done an awesome job of making these sensors simple to use.
Core Motion on iOS takes an accelerometer, a gyroscope and a magnetometer, combining the collected data to create a structure called “device motion.” The device motion struct can tell you not only how fast the device is moving (either linear or angular), but it also can tell you where it’s pointing vertically relative to the horizon, or the heading relative to North, either true or magnetic.¹
To see what WatchKit provides, I created a simple watch app containing only a label for status info. My interface controller’s -willActivate method
looked like this:
    CMMotionManager *motionMgr = [[CMMotionManager alloc] init];
    self.motionMgr = motionMgr;

    NSString *status = @"";
    if([motionMgr isAccelerometerAvailable])
        status = [status stringByAppendingString:@"A"];
    if([motionMgr isGyroAvailable])
        status = [status stringByAppendingString:@"G"];
    if([motionMgr isMagnetometerAvailable])
        status = [status stringByAppendingString:@"M"];
    if([motionMgr isDeviceMotionAvailable])
        status = [status stringByAppendingString:@"D"];

    [self.statusLabel setText:status];
I ran the app and was greeted with just an A. No gyroscope and no magnetometer means that there’s no device motion with the Apple Watch. That’s gonna really cut down on the usefulness of the API. Still, just because I’m the sort to play with these things, I wrote a little app anyway.
The app shows three bar graphs, one for each acceleration value (x, y and z). The values provided by the library are in G. If the watch were flat on a desk, I would expect
those accelerations to be 0.0, 0.0, and -1.0, given that Earth is continually pulling on everything. If you move the watch quickly in some direction, the dials should jump.
First, let’s generate some images. I used ImageMagick and a simple script to generate a series of bar graph images:
#!/bin/sh

OUTPUTSIZE=40x120
NAME=bar

CTR=0
until [ $CTR -gt 100 ]; do

  if [ $CTR -lt 50 ]; then
    BARCOLOR=green
  else
    BARCOLOR=red
  fi

  let OFFSET=$CTR+10
  convert -size $OUTPUTSIZE xc:black -fill $BARCOLOR
          -draw "rectangle 10,60 30,$OFFSET" $NAME${CTR}@2x.png
  let CTR+=1
done
I should note that convert is a cool utility. It’s got a a simple command to draw a rectangle and save it to disk, making it trivial to generate simple bar graphs for the watch’s picker view.
I added three picker views to the watch interface, arranging them vertically:

It’s permissible to use your array of WKPickerItem objects multiple times, so I arranged the init code like so:
- (void)awakeWithContext:(id)context {
    [super awakeWithContext:context];

    self.motionMgr = [[CMMotionManager alloc] init];
    self.motionQueue = [NSOperationQueue mainQueue];

    [self.xPicker setItems:self.pickerItems];
    [self.yPicker setItems:self.pickerItems];
    [self.zPicker setItems:self.pickerItems];
    // Configure interface objects here.
}

- (NSArray<WKPickerItem *> *)pickerItems {
    static NSArray *items;
    if(!items) {
        NSMutableArray *arr = [[NSMutableArray alloc] initWithCapacity:101];
        for(int c=100; c>=0; c--) {
            NSString *name = [NSString stringWithFormat:@"bar%d", c];
            WKImage *img = [WKImage imageWithImageName:name];
            WKPickerItem *item = [[WKPickerItem alloc] init];
            item.contentImage = img;
            [arr addObject:item];
        }
        items = [arr copy];
    }
    return items;
}
Once we’ve populated our pickers, it’s time to use them. Let’s modify -willActivate to enable motion updates:
    [motionMgr setAccelerometerUpdateInterval:0.1];
    [motionMgr startAccelerometerUpdatesToQueue:self.motionQueue withHandler:^(CMAccelerometerData *accel, NSError *error){
        CMAcceleration a = accel.acceleration;
        [self setOffset:a.x forPicker:self.xPicker];
        [self setOffset:a.y forPicker:self.yPicker];
        [self setOffset:a.z forPicker:self.zPicker];
        if(!error) {
            [self.statusLabel setText:@"tracking"];
        } else {
            [self.statusLabel setText:error.localizedDescription];
        }
    }];
The -setOffset:forPicker is a simple convenience method:
- (void)setOffset:(CGFloat)offs forPicker:(WKInterfacePicker *)picker {
    int idx = 50 + (offs * 50);
    if(idx < 0) idx = 0;
    if(idx > 100) idx = 100;

    [picker setSelectedItemIndex:idx];
}
An acceleration of 1.0 will result in a green bar that’s 50 pixels
long above the center. An acceleration of -1.0 will result in a red bar that’s 50 pixels long below the center. And I mentioned before, on a flat watch I would expect a nearly invisible bar for the X and Y dimensions, and a nearly full downward bar for the Z dimension. That’s exactly what I got:

Not having the gyroscope (and therefore not having the device motion struct that the gyroscope’s data enabled) limits the usability for things like games. On the phone, I use the Roll, Pitch and Yaw data (aka Tait-Bryan Angles and often misinterpreted as Euler angles) to make the default OpenGL cube stay in one orientation regardless of how you move the phone. However, no such demo is possible on the watch.
Oh yeah. When you move your arm, the screen goes off. Your app gets a call to -didDeactivate. Your accelerometer data stops coming. That, uh, wasn’t what I wanted.
By using HealthKit and registering to receive accelerometer data,
you can get that information when your app activates again.
The accuracy isn’t what you can get in realtime, but may be good enough for your purposes. HealthKit is a big topic and requires some explanation of the model, so we’ll discuss that in another post.
iFixit’s teardown, which I mentioned in my post on the Taptic Engine, identified the included chip as a STMicroelectronics gyroscope + accelerometer. I believe their identification of the C451 part number to be in error; STM does not list any parts with a similar number, and their gyroscope products all have part numbers of the form L3Gxxx or A3Gxxx. Furthermore, these gyro chips do not indicate an accelerometer as part of the offering.
After looking through data sheets at STM’s website, I think the part is actually an LIS3DH. It has the appropriate pinout and 3mm² footprint. It’s a 3-axis accelerometer, just like Core Motion reports.
I looked through the watchOS version of CLLocationManager.h
and saw that many of our favorite things are not in there. In fact, almost everything is marked with __WATCHOS_PROHIBITED. All you’re left with is the authorization stuff and a new one-shot version of -startUpdatingLocation called -requestLocation, a welcome new API for iOS 9. Those actions trigger callbacks through the delegate methods of CLLocationManagerDelegate as usual.
It makes sense to drop support for heading if the device doesn’t have a magnetometer, and the geofencing stuff needs to be close to the GPS chip to be of any use (hence its relegation to the iOS side as well). That said, one of the schemes Apple uses to detect your location is to compare wifi SSIDs to a list of known ones—I do wonder why they didn’t do that here.
As for the source of the data, it’s the phone, of course. I suspect the watch caches a fix for a longer period than the phone does. If they must, they ask the phone to get a new heading. The phone has several mechanisms to do this, but the only one the watch could possibly accomplish on its own is a Wifi positioning system. I see a post on that topic in my future, so check back!
–
¹ In celestial navigation terms, those values are called altitude and azimuth, respectively. These are good, nerdy names.

Our introductory guide to Swift Regex. Learn regular expressions in Swift including RegexBuilder examples and strongly-typed captures.

The Combine framework in Swift is a powerful declarative API for the asynchronous processing of values over time. It takes full advantage of Swift...

SwiftUI has changed a great many things about how developers create applications for iOS, and not just in the way we lay out our...