The post Software Maintainability in New Technologies appeared first on Big Nerd Ranch.
]]>Specifically, how can you prevent the seemingly-inevitable descent of a codebase into problems like fragility (where changes cause unexpected things to break), rigidity (where small adjustments force much larger changes), or incomprehensibility (where you can’t understand the code to be able to change it)? How can you onboard new developers to your team due to growth or turnover, ensuring they understand the code well enough to be productive—especially when the technology is new to them or new to everyone?
Options for Maintainability
Now, it’s not that writing maintainable software is impossible in newer technologies—but there are forces that make it difficult. Whatever benefits a technology might bring, it’s always possible to make a mess; there hasn’t been a technology yet that can completely prevent that. And new technologies’ documentation generally doesn’t explain how to apply software design techniques comprehensively. Instead, documentation focuses on explaining (1) why developers should use this technology and (2) how they can get it working.
Technology creators’ priority isn’t and can’t be explaining software maintainability practices. Instead, it’s other people who create resources to explain software design and architecture principles—and these resources are created within a specific historical context that doesn’t necessarily translate to new technologies. For example, what good are the classic object-oriented design principles when you’re working in a technology that doesn’t have objects? There are some principles in classic software design materials that do apply to newer technologies, but it can be challenging to identify which principles transfer and which don’t. It’s not realistic to expect authors to have foreseen future technologies and taken them into account as they wrote. Even if they did, there was no pressing need for those authors to emphasize which of their points was more likely to apply to that imagined future technology. And if you’re a newer developer attempting to read a software design book written in an older technology you haven’t used, you face a major obstacle. You would need to put some amount of effort into learning that book’s technology in the hope that some software design principles from that book transfer to your context. Few of us have the energy to expend that much effort with that little uncertainty about the payoff.
Evolutionary Design
So as new technologies steadily emerge, how can you keep writing maintainable software? This has been the main question I’ve asked myself for the past six years as I’ve studied, tried out, and worked within a number of different languages and platforms. As I’ve done so, one particular principle of maintainable software design has risen to the top. I’ve seen this principle work across so many technologies that I’m confident in adopting it as my default approach to any technology I work in. The reason this principle applies so broadly is that it’s squarely focused on addressing this universal need: keeping your software maintainable.
This universal software design principle goes by different names: incremental design, evolutionary design, emergent design, simple design. What the principle states is that you will achieve the best design if you:
- Build the system with a software design that’s an excellent fit for only today’s requirements, and
- When new requirements arrive, adjust the system’s design so that it is an excellent fit for those new requirements (that’s the “incremental”/”evolutionary” part)
How can you build a system that is flexible enough to handle such continual change, flexible enough that the software design itself is changing? By thoroughly covering it with automated tests so you can make changes safely, and by making changes in small refactoring steps that keep the system running the whole time.
Evolutionary design helps you avoid veering off the road into either of two ditches. On one side, your software can fall into under-design or no design: once you get the code working you immediately move on without further thought. If a new feature doesn’t fit into the existing code very well, you hack it in with complex conditional logic until it works. The problem with under-design is that its costs compound over time. Every time you put in a hack, it increases the likelihood that the next feature will not fit well either, necessitating an even bigger hack. The codebase turns into a “big ball of mud.” And if you had any hopes of adding tests to understand the behavior and prevent regressions, each hack makes writing tests harder as well.
If you want to try to avoid under-design, the other ditch your software can fall into is over-design or premature design. You try to think through everything in the code that could change someday, and you make a configuration option or extension point for each. But you can’t predict the future perfectly, so some of your guesses will be wrong: some of your configuration points won’t be needed and will add indirection without benefit, and other changes will be needed that don’t have a configuration point so that you’ll still need hacks.
Evolutionary design avoids the dilemma of having to choose between under-design and over-design. You build an excellent design for today, and you adjust it to new requirements tomorrow.
Something Missing?
Now, if you’re an experienced software designer you may be thinking I’m leaving out something essential. You may be asking yourself “isn’t object-oriented design necessary to accomplish this?” Or “doesn’t a good type system make this easier?” Or “aren’t you forgetting test-driven development?” Although all of these techniques and more can be helpful to achieving evolutionary design, none is essential. For example:
- Functional and object-oriented paradigms optimize for two different types of change, and a given project may benefit from one, the other, or both.
- Test-driven development is a great way to get the thorough test coverage necessary for evolutionary design. But it is less of a natural fit for some types of code and for some people’s wiring (as argued by Kent Beck and Martin Fowler). In those cases, you might choose to take alternative approaches to achieve thorough test coverage.
- Good modern static type systems can provide tooling support to help you make changes safely. A tradeoff is that their rigidity may also cause friction, leading to you defer evolving your system until you’ve dug a hole so deep that it’s hard to dig back out.
- Decoupling systems into separate services or serverless functions simplifies each piece, which makes it easier for each piece to evolve. But it also makes it harder to verify that the pieces keep interacting with one another correctly as they evolve.
If you have a particular collection of the above techniques that you think are essential, I’m not asking you to give them up: I’m encouraging you to shift how you think about them. If your goal is to practice evolutionary design, think of each technique as a means to an end. This mindset opens you up to the possibility that the ideal set of techniques might be different for different individuals, different teams, different platforms, different business domains, or at different times. Separating the end (evolutionary design) from the means allows us to find more common ground and learn from one another to drive the practice of evolutionary design forward.
Distinguishing the means from the end has been the bulk of my professional journey for the past six years. I first learned about evolutionary design in the Ruby world, where dynamic typing, object-oriented design, and test-driven development were paramount. The message I got, explicitly or implicitly, was that those techniques are an essential part of evolutionary design. But since that time I’ve seen from additional perspectives: I’ve seen how static typing helps to communicate APIs to large teams, how React.js’s function-based API provides its own kind of flexibility, and how test-driven development is more costly for some types of programs and some types of programmers. In those situations I found that the specific techniques weren’t the essential thing I was reaching for; instead, the essential was “how can I evolve my code over time with confidence?”
Next Steps
Whenever a new software technology is introduced, there will be utopians who claim that it guarantees code that is maintainable without any design effort needed. There will also be fatalists who argue that it prevents good software design altogether. (If these sound like exaggerations, take half an hour to read the comments on the tech news social media site of your choice!) Unsurprisingly, neither of these extremes is correct. Instead, new technologies challenge our conceptions of what is “essential” in software design, so that something we previously thought was “the whole thing” becomes just one possible tool. At their best, new technologies provide innovative software design tools that bend the curve of what’s possible in our code, giving us more benefits for less cost. But ultimately we developers are the ones at the wheel of our projects and responsible to steer. Will we veer off the road into under-design and get stuck in a big ball of mud? Or into over-design and getting stuck in a cumbersome structure? Or will we write code that is flexible so we can adjust it to handle whatever the future brings?
If you’re interested in the practice of evolutionary design, where do you go from here? Just hearing about the concept of evolutionary design isn’t enough to equip you to do it–there is a lot more to learn and to unlearn. Unfortunately, as I mentioned earlier, most writing about evolutionary design also includes a lot more specifics beyond the essentials. At Big Nerd Ranch we’re exploring this topic and are considering developing more resources. If you’re interested in getting more resources from us, let us know!
In the meantime, classic books on evolutionary design are still your best bet—just don’t feel the pressure to accept all the specifics they advocate. I’d recommend starting with Refactoring, Second Edition by Martin Fowler—the first two chapters in particular are an excellent survey of and argument for evolutionary design. If you’re already familiar with the literature on evolutionary design, and you feel like you’re the only one in your current technology stack who is, don’t be discouraged. Instead, look for ways to apply these principles yourself, then show others—once you’ve put in the work, others may see the benefits and get interested. You might consider rereading those classic books, not so much to learn new things as to separate specific techniques you’ve used in one ecosystem from the general principles that can apply anywhere.
The post Software Maintainability in New Technologies appeared first on Big Nerd Ranch.
]]>The post Where is Ruby Headed in 2021? appeared first on Big Nerd Ranch.
]]>Static Typing
Static type checking can improve the developer experience by preventing type errors and improving editor assistance. Static type checking is most commonly implemented with type declarations in code, and the third-party Sorbet library implements type declarations for Ruby. However, Yukihiro Matsumoto (the creator of Ruby, aka “Matz”) has emphasized in several RubyConf keynotes that Ruby will not add type declarations officially. Instead, the Ruby approach to static type checks is via Ruby Signature (RBS) files: separate files that record type information, analogous to TypeScript .d.ts files. RBS files can be written by hand or automatically generated by tooling.
RBS was introduced in Ruby 3.0, but up until now, its benefits have been largely theoretical. But those benefits are now starting to manifest with TypeProf-IDE, a VS Code extension created by Ruby core member Yusuke Endoh. This extension runs TypeProf on Ruby code as you edit it, inferring types, generating RBS type signature files, providing inline documentation and autocomplete, and calling out type errors. You can try out TypeProf-IDE today by following along with my TypeProf-IDE tutorial blog post.
Performance
Execution speed, I/O throughput, and parallel processing can all be grouped under the heading of performance, and work is happening in Ruby in all these areas.
Ruby execution speed is being worked on from multiple angles. First, performance enhancements are being made within YARV, the main CRuby interpreter. One significant example is Eileen Uchitelle from GitHub presenting “How we sped up CVARs in Ruby 3.1+”. Although CVARs, or class variables, aren’t used very widely in Ruby application code, they are heavily used within Rails itself, so any applications built on Rails will benefit.
Besides the interpreter, there are several ongoing efforts to compile Ruby to native code. MJIT is a just-in-time compiler that was included in Ruby 2.6. At this year’s RubyConf Shopify presented another JIT compiler, YJIT, which is included in the first Ruby 3.1 preview release. Stripe presented the Sorbet Compiler, an AOT (ahead-of-time) compiler that is in development, which leans on the static type information in code that uses Sorbet type declarations.
I/O throughput has been significantly improved via async fibers. Fibers are a lightweight concurrency mechanism that has been in Ruby since 1.9. The async gem, created by Samuel Williams, uses fibers to allow a Ruby program to switch to other fibers when blocked on supported I/O operations, without requiring any special language syntax. Bruno Sutic posted a helpful overview of the async gem, and presented more detail in his RubyConf session on Async Ruby. Async can be used back to Ruby 2.5 if you use async-specific I/O gems. But in Ruby 3.0 and above, all blocking operations are compatible with async, whether in the Ruby standard library or other gems. Fibers do not provide parallel execution: even with multiple cores, only one fiber can be actively executing at a time. But one Ruby process on one core can run millions of fibers concurrently, as Samuel Williams has demonstrated via a Ruby server handling one million WebSocket connections.
While async fibers do not run in parallel on multiple cores, Ractors were added in Ruby 3.0 as an experimental multicore concurrency mechanism. Each Ractor has an isolated object space and allows only limited sharing of data to other Ractors, which avoids threading issues like race conditions and deadlocks. As a result, Ractors are not bound by the Global Interpreter Lock, allowing true parallel processing on separate cores. Currently, each Ractor has its own native thread, but future work will allow Ractors to share threads to reduce the memory consumption of Ractors and make them easier to work with. At RubyConf Vinicius Stock demonstrated using Ractors to run tests on multiple CPUs.
Matz had set a “Ruby3x3″ goal to speed up Ruby 3 over Ruby 2.0 three times for some significant benchmarks, and Ruby 3.0 met that goal. This push for performance will continue: in this year’s keynote, Matz set a new performance goal, “Ruby3x3 Redux”: a future Ruby 3.x release will be three times faster than Ruby 3.0 in some benchmarks.
How to Think About Ruby
These new features seek to reduce the distance between Ruby and other languages: to gain some of the type safety of statically-typed languages, the I/O throughput of async languages like Node, and the parallelism of channel-based languages like Go. But there are several factors that limit how far Ruby can go in these directions. The first is compatibility: the core team doesn’t want to break existing Ruby programs if at all possible. The second limiting factor is language design: Matz called Ruby a human-oriented language, and although type safety and performance are being prioritized, they won’t be pursued in a way that compromises what the core team sees as Ruby’s human-oriented design.
The point of these language improvements is not that they erase the advantages other languages have. When the most important factor in your system is I/O throughput, multicore processing, or type safety, you wouldn’t want to choose Ruby from the start: you would want to go with a language like Node, Go, or Haskell respectively.
The way to think about these improvements to Ruby is that they incrementally increase the set of problems for which Ruby is a good solution.
For organizations already using Ruby, these improvements mean that they will be able to do more in Ruby before needing to write a native extension in C or Rust, before needing to extract a microservice in another language, or before considering a rewrite.
For organizations considering what technology to use for a new project, these improvements to Ruby mean that they don’t need to so quickly give up Ruby’s productivity benefits for the sake of other needs. There are still many systems for which the controlling factor is the ability to deliver functionality quickly and with minimal development cost, including startups needing to find a product or market fit and internal teams with a limited budget. Systems like these benefit tremendously from Ruby’s high level of abstraction, its rich and mature library ecosystem, and Rails’ support for delivering web services and applications with minimal effort. Each improvement to Ruby removes one more “what if” that could make decision-makers hesitate:
- “What if the development team gets big enough that we need type safety? Oh, then we can use RBS or Sorbet.”
- “What if we need to handle lots of WebSocket traffic? Oh, then we can use async fibers.”
- “What if we need to maximize CPU core usage for a lot of computation?” Okay, that one would still be a stretch for Ruby, but at least Ractors mean you won’t be locked into one core.
These enhancements to Ruby are expanding the set of systems for which the language can offer that velocity benefit. Companies can get a leg up on their competition by recognizing when they have a system for which development velocity is the controlling factor and taking advantage of Ruby’s strengths. RubyConf 2021 demonstrated that Ruby continues to evolve as the core team, individual contributors, and large companies make substantial investments in it.
The post Where is Ruby Headed in 2021? appeared first on Big Nerd Ranch.
]]>The post Live Ruby Type Checking with TypeProf-IDE appeared first on Big Nerd Ranch.
]]>Setup
First, install Ruby 3.1.0 preview 1. If you’re using rbenv on macOS, you can install the preview by executing the following commands in order:
brew updatebrew upgrade ruby-buildrbenv install 3.1.0-preview1
Next, create a project folder:
mkdir typeprof_sandboxcd typeprof_sandbox
If you’re using rbenv, you can configure the preview to be the version of Ruby used in that directory:
rbenv local 3.1.0-preview1
Next, initialize the Gemfile:
bundle init
Next, let’s set up Visual Studio Code. Install the latest version, then add the TypeProf VS Code extension and the RBS Syntax Highlighting extension.
Open your typeprof_sandbox folder in VS Code. Next, open the Gemfile and add the typeprof gem:
 git_source(:github) { |repo_name| "https://github.com/#{repo_name}" }

 #gem "rails"
+gem 'typeprof', '0.20.3'
Now install it:
bundle install
Getting Type Feedback
To see TypeProf in action, let’s create a class for keeping track of members of a meetup group. Create a file meetup.rb and add the following:
class Meetup
  def initialize
    @members = []
  end

  def add_member(member)
    @members.push(member)
  end

  def first_member
    @members.first
  end
end
It’s possible you will already see TypeProf add type signatures to the file, but more likely you won’t see anything yet. If not, to find out what’s going on, click the “View” menu, then choose “Output”. From the dropdown at the right, choose “Ruby TypeProf”. You’ll see the output of the TypeProf extension, which will likely include a Ruby-related error. What I see is:
[vscode] Try to start TypeProf for IDE
[vscode] stderr: --- ERROR REPORT TEMPLATE -------------------------------------------------------
[vscode] stderr:
[vscode] stderr: ```
[vscode] stderr: Gem::GemNotFoundException: can't find gem bundler (= 2.2.31) with executable bundle
[vscode] stderr:   /Library/Ruby/Site/2.6.0/rubygems.rb:278:in `find_spec_for_exe'
In my case, the command is running in my macOS system Ruby (/Library/Ruby/Site/2.6.0) instead of my rbenv-specified version. I haven’t been able to figure out how to get it to use the rbenv version. As a workaround, I switched to the system Ruby and updated Bundler:
rbenv local systemsudo gem update bundlerrbenv local 3.1.0-preview1
For more help getting the extension running, check the TypeProf-IDE Troubleshooting docs. Of note is the different places that the extension tries to invoke typeprof from. Ensure that your default shell is loading Ruby 3.1.0-preview1 and that a typeprof binary is available wherever the extension is looking.
After addressing whatever error you see in the output, quit and reopen VS Code to get the extension to reload. When it succeeds, you should see output like the following:
[vscode] Try to start TypeProf for IDE
[vscode] typeprof version: typeprof 0.20.2
[vscode] Starting Ruby TypeProf (typeprof 0.20.2)...
[vscode] Ruby TypeProf is running
[Info  - 9:03:49 AM] TypeProf for IDE is started successfully
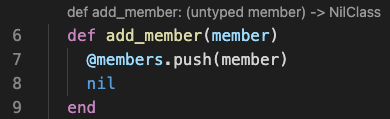
You should also see some type information added above the methods of the class:

Well, that’s not a lot of information. We see that #add_member takes in an argument named member, but its type is listed as untyped (which means, the type information is unknown). It returns an Array[untyped], meaning an array containing elements whose type is unknown. Then #first_member says it returns nil, which is incorrect.
Improving the Types and Code
For our first change, let’s look at the return value of #add_member. It’s returning an Array, but I didn’t intend to return a value; this is just a result of Ruby automatically returning the value of the last expression in a method. Let’s update our code to remove this unintentional behavior. Add a nil as the last expression of the method:
 def add_member(member)
   @members.push(member)
+  nil
 end
Now the return type is updated to be NilClass, which is better:
Next, how can we fix the untyped? Endoh recommends a pattern of adding some example code to the file showing the use of the class. Add the following at the bottom of meetup.rb:
if $PROGRAM_NAME == __FILE__
  meetup = Meetup.new
end
Next, type meetup.ad below the line where meetup is assigned. (We’ll explain the $PROGRAM_NAME line in a bit.) An autocomplete dropdown will appear, with add_member selected:
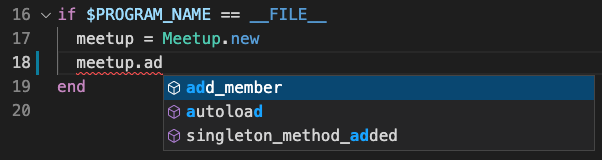
Because TypeProf can see that meetup is an instance of class Meetup, it can provide autocomplete suggestions for methods.
Click add_member in the list, then type an opening parenthesis (. VS Code will add the closing parenthesis ) after the cursor, and another popup will appear with information about the method’s arguments:

It indicates that the method takes one argument, member, and returns nil. Also note that the type of member is still listed as untyped; we’re still working toward fixing that.
Pass a string containing your name as the argument, then add the rest of the code below:
if $PROGRAM_NAME == __FILE__
  meetup = Meetup.new
  meetup.add_member('Josh')
  first_member = meetup.first_member
  puts first_member
end
What’s the significance of the if $PROGRAM_NAME == __FILE__ conditional? $PROGRAM_NAME is the name of the currently running program, and __FILE__ is the name of the current source file. If they are equal, that means that this Ruby file is being executed directly, which includes when TypeProf runs the file. So this is a way to provide supplemental information to TypeProf.
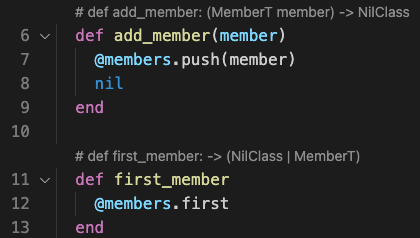
When you added this code, the type information should have updated to:
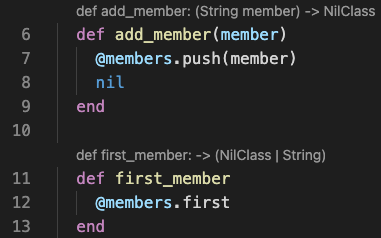
Why does this added code affect the type of information? TypeProf executes the code to see the types that are actually used by the program. By supplying an example of using the class, TypeProf has more type information to work with. Future TypeProf development may allow it to be more intelligent about inferring type information from RSpec tests and usages elsewhere in the project.
Note that TypeProf now indicates that the member argument is a String, and that #first_member may return either a NilClass or a String. (The reason it might return a NilClass is if the array is empty.)
Making the Code Generic with Type Variables
Let’s put our object-oriented design hats on and think about these types. Is it specific to Strings? No, the code doesn’t make any assumptions about what the members are. But TypeProf has coupled our class to one specific other class to use!
To prevent this, we can manually edit the RBS type signatures generated for our class to indicate just how generic we want Meetup to be.
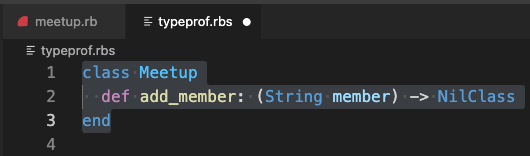
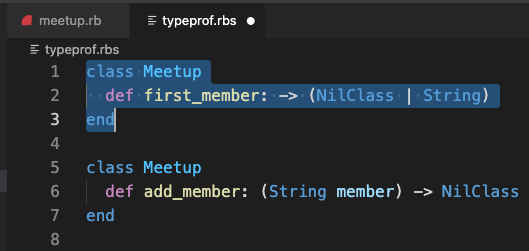
Create an empty typeprof.rbs file in your project folder. Next, command-click on the type signature above #add_member. The typeprof.rbs file will open, and the RBS type signature for that method will be automatically added to it:
Next, go back to meetup.rb and right-click the type signature above #first_member. This adds the signature for that method to the RBS file too, but as a separate class declaration:
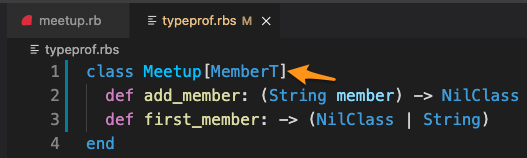
To keep things simpler, edit the RBS file so there’s a single class with two methods in the same order as in the Ruby file, and save the file:

Now, let’s edit the signature to use type variables. A type variable is a place where, instead of referencing a specific type, you use a variable that can represent any type. Everywhere the same type variable appears, the type must be the same.
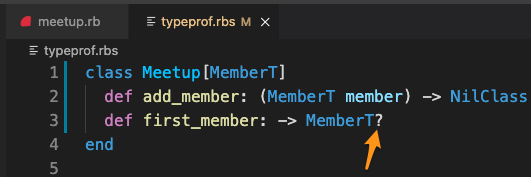
First, add a [MemberT] after the Meetup class name:
Next, replace the two occurrences of String with MemberT:
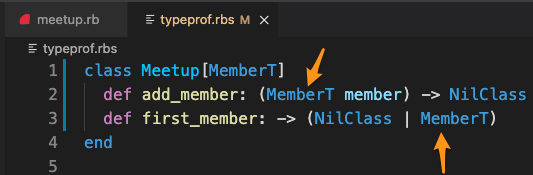
What this means is, a given Meetup instance applies to a certain type, called MemberT. That’s the type of the member you pass in to #add_member. That is the same type as what the return value of #first_member should be. So if you pass in a String you should get a String back. If you pass in a Hash, you should get a Hash.
Switch back to meetup.rb. If you don’t see the type signatures updated, you may need to close and reopen meetup.rb. Then, you should see updated type signatures:
Note that our MemberT types appear in the signatures of #add_member and #first_member. Also note that the signatures have a # in front of them: this indicates that they’re manually specified in the RBS file.
Now, let’s see what help this gives us. In the statement puts first_member, start typing .up after it. Note that an autocomplete dropdown appears and #upcase is selected:

TypeProf knows that member is a Meetup object. Because you passed a String into the #add_member method of the meetup object, TypeProf can tell that meetup’s type variable MemberT is equal to the type String. As a result, it can see that its #first_member method will also return a String. So it knows first_member is a string, and therefore it can suggest String’s methods for the autocomplete.
Click upcase to autocomplete it. Now note that first_member.upcase has a red squiggly underlining it. Hover over it to see the error:
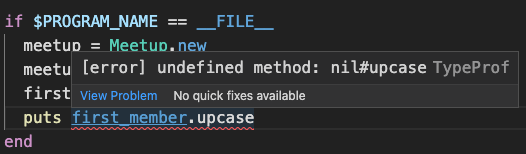
It says [error] undefined method: nil#upcase. But wait, isn’t first_member a String? The answer is maybe. But it could also be a nil if the meetup hasn’t had any members added to it. And if it is nil, this call to #upcase will throw a NoMethodError. Now, in this trivial program we know there will be a member present. But for a larger program, TypeProf will have alerted us to an unhandled edge case!
To fix this, we need to change the way the type signature is written slightly. In the RBS file, replace (NilClass | MemberT) with MemberT? (don’t miss the question mark):
? indicates an optional type, a case where a value could be a certain type or it could be nil.
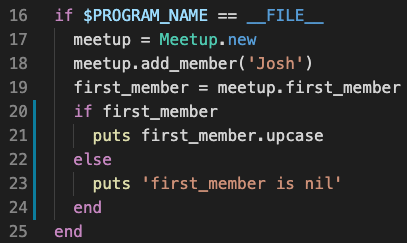
Now, in the Ruby file, wrap the puts call in a conditional:
 first_member = meetup.first_member
-puts first_member.upcase
+if first_member
+  puts first_member.upcase
+else
+  puts 'first_member is nil'
+end
If the red squiggly under the call to #upcase doesn’t disappear, close and reopen meetup.rb to get TypeProf to rerun. After that, if you made the changes correctly, the underline should disappear:
TypeProf has guided us to write more robust code! Note that currently TypeProf requires the check to be written as if variable; other idioms like unless variable.nil? and if variable.present? will not yet work.
Next Steps
If you’d like to learn more about TypeProf-IDE, Endoh’s RubyConf 2021 talk should be uploaded to YouTube within a few months. In the meantime, check out the TypeProf-IDE documentation and the RBS syntax docs. And you can help with the continued development of TypeProf-IDE by opening a GitHub Issue on the typeprof repo.
Thank you to Yusuke Endoh for his hard work building the TypeProf-IDE integration, for his presentation, and for helping me work through issues using it during RubyConf!
If you’d like to work at a place that explores the cutting edge of Ruby and other languages, join us at Big Nerd Ranch!
The post Live Ruby Type Checking with TypeProf-IDE appeared first on Big Nerd Ranch.
]]>The post Write What You Know appeared first on Big Nerd Ranch.
]]>How We Record Knowledge
Every project is different, but in general, I’ve seen knowledge recorded in these ways on BNR projects:
- The README. We make sure there is a README file in the code repository that records essential information, such as how to get the app running, how to run its tests, how it authenticates to external systems, where it is deployed, and other essentials. When we discover a necessary bit of information that wasn’t in the README, we add it. When we see that some information is out-of-date, we correct it. When we see that something in the README hasn’t turned out to be useful, we remove it. A README that is focused, thorough, and accurate helps us to efficiently onboard new developers and get the codebase running on new machines. And every time we onboard someone it’s a chance to test the instructions in the README and make any necessary updates.
- Up-to-date story descriptions. When a story is clarified, changed, split, or combined, we update that story’s description in our project management tool. This ensures that all team members who need to work with that story have the latest information on what is and isn’t included. The story comment thread may track the discussion of the changes, but the story description is the authoritative current state.
- Conversations in public chat channels. For project communications we tend to avoid direct messages, preferring discussions in public Slack channels. This gives others the option to follow along, chime in, or refer back to the conversation in the future. And “public” channels doesn’t just mean public to BNR, but public to our client team as well. This gets that information to our clients gives them visibility into our work, and provides us another layer of accountability.
- Architecture decision records. When we are assessing a technical decision that has tradeoffs, we often record the result in an architecture decision record. This write-up includes the need, options, evaluation criteria, and the ultimate decision. This way, if the decision needs to be revisited in the future, the thought process is available for reassessment.
- Commit messages and pull request descriptions. We do our work in small, focused commits, and we take the time to describe what they are doing accurately. We use pull requests (PRs) that include a description that covers the work, decisions made, and its relationship to other units of work. We link the PR to the relevant story in our project management tool. We do code review in comment conversations in the PR. All of this allows developers in the future to understand why a change to the code was made.
- Updating the code. Our goal is to have code that clearly communicates what it does. When the code has become difficult to understand or misleading, we update it to communicate more clearly. This can involve removing dead code, making names more precise and accurate, and making sure any comments are correct and useful.
Why do we record the knowledge in so many different places? In large part, it’s to keep the information close to where it will be the most useful and easily discoverable. For example, instead of writing a wiki page to describe getting the codebase running, we record that in a README file in the codebase itself, where a developer can easily find it. Instead of explaining hard-to-understand code with comments, first, we look to see if we can make the code itself easier to understand. Instead of keeping changes to a story’s scope in a Slack thread, we update the story’s description, so that anyone who reads the story will see the updated scope right away.
Why We Record Knowledge
Recording knowledge in all the above ways sounds like it could be a lot of work! Why do we think it’s a good use of our time? As I looked into our motivation, three themes, or beliefs, emerged. The more strongly you believe the following three ideas, the more it makes sense to invest in recording knowledge.
1. The code will change.
If we knew the code would never need to change because of bugs or new requirements, then recording knowledge of the system wouldn’t matter much. The system could be treated as a black box that gives you the result you want. There are some systems for which that’s true, they are simple enough or in a fixed-enough domain that they really don’t need to change (although keep in mind that the technical environment they’re in does occasionally need to change).
For most business and consumer applications, new requirements come in regularly. We will need to make changes and introduce new or fixed functionality in a cost-efficient manner while preserving existing functionality. To do this, we need to understand the system well. We invest in recording knowledge as we go, confident that that investment will pay off in improved ability to make changes in the future. If we skip this investment we might get stuck with a system we can’t understand, and therefore that we can’t enhance without breaking it in surprising ways.
2. Our capacity is limited.
Recording the team’s knowledge never feels urgent, because the team already understands the system now. But that doesn’t mean we’ll understand it later. It’s easy to forget what we know, especially as the system grows and as we move between different projects. Humans have finite mental capacity, so we shouldn’t expect ourselves to have a perfect memory or beat ourselves up when we don’t. Instead, we should help ourselves out by recording our knowledge for the future.
In the book Refactoring, here’s how Martin Fowler describes the process of recording knowledge, specifically by recording it in the code (emphasis mine):
At that point I have some understanding [of the code] in my head, but my head isn’t a very good record of such details. As Ward Cunningham puts it, by refactoring I move the understanding from my head into the code itself…If I move my understanding into the code, it will be preserved longer and be visible to my colleagues.
3. We should look out for one another.
I understand the code, but I’m not the only one who will need to. The team will grow, or I’ll be swapped onto a different project, or go on vacation, or win the lottery and leave the company. It’s especially frequent for us consultants to experience personnel changes because we usually won’t be working on the same system indefinitely. Someday another BNR Nerd or client developer will take my place.
Why don’t I always record knowledge for these future developers? Sometimes the thought just doesn’t occur to me, or I underestimate how hard my code is to understand. But other times it can be tempting to say “I had to work hard to learn this code, so it’s okay if others have to work hard too.”
That’s not the way we want to act toward our fellow developers. Collaboration means we should work together for the success of the project. And as fellow developers and humans, we should be looking for ways to help each other out. Software development has been one of the most explosively growing industries over the last few decades and demand almost always exceeds available developers, so it’s not as if we are competing for scarce opportunities. In fact, I would say we have a professional responsibility to help other developers level up to meet the development needs that no one individual or consultancy can meet.
Help Me, Help You
Recording knowledge is a mutually beneficial activity. Writing down my own understanding helps me verify and clarify it. It helps code reviewers confirm that it’s the best approach. It helps me in a few weeks when I’ve forgotten how something works or why we made a decision. And it helps future developers next month and next year who onboard onto the team and have to get up to speed.
If you recognize that your code will continuously change, that your human capacity is limited, and that you have a responsibility toward other developers, then recording your knowledge will help. The techniques described above will support you and others through that ongoing change.
The post Write What You Know appeared first on Big Nerd Ranch.
]]>The post Six Techniques to Split Large Stories appeared first on Big Nerd Ranch.
]]>In this blog post, we’ll look at six next-level techniques you can use to split up large stories. But first, let’s look at one approach that we would not recommend.
Not Recommended: “We’ll Do It As A Followup”
Often when working on a story you might finish the “main” functionality but having a number of “wrap-up” tasks remaining—for example, testing, accessibility, UI polish, or documentation. It can be tempting to move these tasks into one or more followup stories so that the main functionality can be reviewed and merged.
Be careful, though, as there are a lot of risks to deferring wrap-up tasks to future stories. If your tests really provide value in confirming the code works, then why merge the code before you have that information? If UI issues would prevent release, then merging the incomplete UI makes your application not releasable (unless that functionality is behind a feature flag). Also, even if you intend to work on these wrap-up tasks right away, priorities can always change. Keeping the code unmerged is an accountability to yourself that you have to finish those wrap-up tasks before moving on.
There’s also a deeper problem with deferring wrap-up tasks—doing so reinforces the mindset that a story is “done” when the main functionality is in. This mindset will tempt you to continue estimating and operating this way. To break this pattern, decide now that you won’t deliver this story until all the wrap-up tasks are done.
With that non-solution out of the way, let’s look at solutions that are recommended for splitting up stories.
1. Clarify Acceptance Criteria
When a story has vague acceptance criteria, it’s very likely the story will end up becoming large. Maybe there is a lot of functionality under the hood that is implied but not spelled out. In this case, every time you get something working you find something else that also needs to be built. Because you didn’t know about that work at the start to proactively split or sequence it, you may just continue working on it without thinking, or you may have coded yourself into a corner where it seems like you have to build it all at once. Avoid this trap by taking the time at the start to list out everything that’s necessary for a story.
2. Split Stories Proactively
If you approach a story by asking “do I think this is small enough or not,” you may be setting yourself up for failure. Humans as a whole are just bad at estimating software. Instead of relying on your questionable ability to estimate, try to split stories up as small as possible. Here’s the question Kent Beck asks in Extreme Programming Explained: “What’s the least you could do that is recognizably in the right direction?” If you find you’ve gone too far, it’s always easy to re-combine small stories into larger ones, but it’s hard to split large stories into smaller ones.
3. UI Component Library
For some stories, beyond the business functionality itself, a complex UI component also needs to be built. It can be a good idea to build and deliver this component in one story, then use it to implement the business functionality in a subsequent story.
One way to make it easier to deliver UI components as standalone stories is to set up an interface that allows you to see those components in isolation. This is sometimes referred to as a “living style guide,” and is a common practice when building a standalone UI component library. But this process can also add value if your components live directly in your application and if developing those components as standalone stories would help.
There are a few different ways to implement a living style guide. You could put it in an admin section of the app that isn’t accessible to end-users, or you could create a separate application or build a target to create the living style guide. In the frontend web world, Storybook is a cross-framework tool that can help.
4. Creative Ways to Set Up Data
Sometimes the need to set up data can make you feel like you need to build a lot at once. You have a user story to view some data, but your user account doesn’t have that data! So it seems like you need the functionality to create that data, even if the end-user doesn’t.
Before you decide to write code to set up data for yourself, there may be other ways to get that data set up:
- If there is another existing client application for your system that has adding functionality that you could use to create the data.
- Alternatively, you could ask a backend developer or database administrator to create records for your user account.
- Another option is to mock out the data by hard-coding it with a mocking tool like WireMock or by writing a lightweight web service. These options are more work to set up but can pay off if they’re needed for many stories.
5. Git Good
When you’ve put a lot of work into a branch and then discover that the story has become too big, what do you do? Leveling up your version control skills can help you reshuffle your work to support a smaller story. I’ll speak to git here, but similar skills would apply to any version control system.
When you’re first building your story, create small, focused commits that only do one thing. Then, if you find you need to split out some of that work into a smaller story, you have a few options:
git commit --amendmakes changes to the last commit, allowing you to undo parts that are no longer needed.git cherry-pickcopies an individual commit from one branch to another.git reset [commit-hash]takes changes from a commit and puts them back into the working tree, to edit them before recommitting.git rebase --interactiveis a powerful command that allows you to make changes to a series of commits, such as reordering, editing, or removing commits that are no longer needed.
To learn more about these commands, check out the “Rewriting History” chapter of Pro Git, available free online.
6. Feature Flags
Say you have a system in production that you’re making large additions or changes to. You don’t want to build the whole large feature at once, but you also don’t want to leave the system in a broken state by not shipping the full feature.
To accomplish this, you can use feature flags, which allow you to enable or disable features for specific builds of your app. This means that you can leave a feature disabled for production but enable it for developers and optionally QA engineers.
Feature flag setups can be very sophisticated, but if your immediate need is to split up a large story, I would recommend starting simple. Often an environment variable or build config variable is enough.
Conclusion
These six techniques can help you split a large story into smaller stories when there doesn’t seem to be a way to do so. They are useful in a variety of situations, but they won’t cover every possible project, team, and technology—you may need to come up with your own situation-specific techniques. Hopefully, these techniques serve as inspiration for the kind of creative thinking that can help you split your large stories so you can keep delivering value consistently.
The post Six Techniques to Split Large Stories appeared first on Big Nerd Ranch.
]]>The post Nine Reasons to Split Large Stories appeared first on Big Nerd Ranch.
]]>I agree with a lot of agile practitioners that it’s almost always better to put in the effort to find a way to split a large story to be smaller. Here are nine reasons why.
1. Delivering Value Sooner
Small stories allow you to deliver something of value to the business sooner. The rest of the large story might be delayed by problems that come up, so delivering some value now is better. Delivering a story is valuable even when it’s released to internal business review—and when the story is releasable to end-users, there’s even more of a reason to put in the work to split up the large story.
2. Delivering More Value Sooner
Frequently, some parts of a large story are more important than others. Those parts might help the user finish their task and make the company money, or they might be needed by most users most of the time. When your stories are small you can work on the highest-value story first, and then lower-value pieces can be prioritized below unrelated high-value stories.
3. Parallelization
When you split a large story into several smaller stories, those stories can often be assigned to separate developers to be worked on in parallel. Even if you don’t parallelize them at first, small stories preserve the option for you to do so in the future. The stories may not be parallelizable right away, but they may become so after you finish an initial small story to lay a foundation for the others to build on.
4. Estimation and Scheduling
The best way to forecast how long development will take is to see how long it does take. You can observe how quickly this project team working on that codebase can deliver completed stories, and make forecasts based on that. But when we have large stories that aren’t complete, it’s difficult to forecast, because we don’t know how long it will take to actually finish a story. A large story can seem almost done, but a long tail of wrap-up work can make it drag on. By making stories small and fully completing each one, you find out how long it actually takes to finish a unit of work, and that information can be used to forecast the future more accurately.
5. Merge Conflicts
The longer a branch of code is open, the more likely that there will be a large and tedious merge conflict when it’s merged back in. You can reduce conflicts by merging changes from the main branch into the feature branch repeatedly over the course of the branch, but this is still a large amount of merge effort, just spread out over time. When you work in small stories, you merge your branch down sooner. This means your code is in place to evolve along with the main branch instead of isolated on another branch to diverge.
6. Feedback
A core principle of agile development is to find ways to get feedback early and often. When we have a small story we deliver quickly, we get feedback from other developers via code review and from QA engineers and the business via testing. Also, by finalizing a small story’s tests, visual design, and accessibility, we get feedback on whether the way we wrote the code supports all those needs. With large stories, all this feedback is deferred for a long time, increasing the likelihood that at the end of a long development process, we may need to do significant rework.
7. Minimal Code
The smaller the story, the more you’re encouraged to write only the minimal code that’s needed for the moment. When you’re writing a lot of code at once it’s easy for unneeded code to sneak through, but when the diffs are small it’s easier to identify code that’s unnecessary. Writing only the code you need saves you time as you’re writing it and in the future when you’re maintaining it. Minimal code also makes it easier for you to visualize what’s happening in your app, leading to a more accurate mental model.
8. Motivation
It can be discouraging to be the only developer in standup who keeps saying they are working on the same large story day after day, as other developers get their stories merged in and released. Small stories give you motivation from seeing your own progress as a developer towards building up the system. It’s important to take account of human factors like this—they make the difference between a project that burns you out and one that excites you.
9. Flow
In Extreme Programming Explained, Kent Beck writes about the principle of “flow”:
Flow in software development is delivering a steady flow of valuable software by engaging in all the activities of development simultaneously.
Smaller stories are one important way to achieve flow. Instead of a week of core functionality development, a week of finalizing tests and polish, and a week of responding to code review, you’re doing it all over the course of a couple of days.
Flow benefits a project in many ways. The business is happier because they see steady progress being made and programmers are under less pressure because they can see their progress, too. There is no rush to finish a big story before a release because there are no big stories and there are no arguments about whether a story is really almost done or not because stories only ever take a few days.
Conclusion
Not all of the above factors will apply to every large story, but most of them apply most of the time—and for any given story, at least some of them apply. Together, they paint a picture of an approach to development where developers are making steady progress delivering the next most important functionality every few days.
When you have a large story that doesn’t seem possible to split up, it’s tempting to say that it’s not that big a deal. But I hope the above benefits are motivating for you to work to find a way to split up the story. Your project and team will be better for it.
Now you may be convinced that splitting up large stories is important, but still wondering: how do you actually do it for a given large story? In a followup post we’ll discuss techniques that can help you split up stories when it seems impossible to do so.
The post Nine Reasons to Split Large Stories appeared first on Big Nerd Ranch.
]]>The post Testing Webpacker Apps with RSpec System Tests appeared first on Big Nerd Ranch.
]]>To help with this, let’s walk through an example of using RSpec system tests. We’ll set up a Rails app using Webpacker, then set up an RSpec system test that exercises our app, including our JavaScript code, in Chrome.
Setting Up Webpacker
Create a new Rails project excluding Minitest and including Webpacker configured for React. Webpacker can be preconfigured for a number of different JavaScript frameworks and you can pick whichever you like, or even vanilla JavaScript. For the sake of this tutorial, we’ll use React; we won’t be touching any React code, but this demonstrates that this testing approach works with React or any other frontend framework.
$ rails new --skip-test --webpack=react rspec_system_tests
Webpacker organizes your code around the concept of “packs,” root files that are bundled into separate output JavaScript files. Webpacker will set up a sample pack for us in app/javascript/packs/hello_react.jsx, but it isn’t used in our app automatically. To use it, we need to create a route that’s not the default Rails home page, then add it to our layout.
Add a root route in config/routes.rb:
 Rails.application.routes.draw do
   # For details on the DSL available within this file, see https://guides.rubyonrails.org/routing.html
+  root to: 'pages#home'
 end
Create the corresponding app/controllers/pages_controller.rb:
class PagesController < ApplicationController
end
We don’t need to define a #home action on that controller, because when Rails attempts to access an action that isn’t defined, the default behavior will be to render the corresponding view. So let’s just create the view, app/views/pages/home.html.erb and put some text in it:
Hello Rails!
Now, to get our hello_react pack running, let’s add it to the head of app/views/layouts/application.html.erb:
  <%= stylesheet_link_tag 'application', media: 'all', 'data-turbolinks-track': 'reload' %>
   <%= javascript_pack_tag 'application', 'data-turbolinks-track': 'reload' %>
+  <%= javascript_pack_tag 'hello_react' %>
 </head>
Run your server:
$ rails s
Load http://localhost:3000 in a browser and you should see:
Hello Rails!
Hello React!
So our React pack is working. Great!
Setting Up RSpec
Now let’s get it tested. Add rspec-rails and a few other gems to your Gemfile:
 group :development, :test do
   # Call 'byebug' anywhere in the code to stop execution and get a debugger console
   gem 'byebug', platforms: [:mri, :mingw, :x64_mingw]
+  gem 'rspec-rails'
 end

+group :test do
+  gem 'capybara'
+  gem 'selenium-webdriver'
+end
rspec-rails should be added to both the :development and :test groups so its generators can be run from the command line. capybara provides test methods for us to simulate users interacting with our app, and selenium-webdriver lets us interact with real browsers to run the tests.
Ask Rails to set up the necessary RSpec configuration files:
$ rails generate rspec:install
You’ll also need to install chromedriver, a tool for running Google Chrome in tests. Download Chromedriver or install it with Homebrew:
$ brew tap caskroom/cask
$ brew cask install chromedriver
Getting Our Test Working
Now we’re ready to write our test! In older versions of RSpec, the tests that simulated user interaction with Capybara were called feature tests, but now that Rails has built-in system testing functionality, it’s recommended to use RSpec system tests to use that same testing infrastructure under the hood.
Generate a system test:
$ rails generate rspec:system hello_react
This creates the humorously-pluralized hello_reacts_spec.rb with the following contents:
require 'rails_helper'

RSpec.describe "HelloReact", type: :system do
  before do
    driven_by(:rack_test)
  end

  pending "add some scenarios (or delete) #{__FILE__}"
end
Replace the pending line with our test:
-  pending "add some scenarios (or delete) #{__FILE__}"
+  it 'should render a React component' do
+    visit '/'
+    expect(page).to have_content('Hello React!')
+  end
 end
Run the test:
$ bundle exec rspec
Oh no, it fails! Here’s the error:
Failures:

  1) HelloReact should render a React component
     Failure/Error: expect(page).to have_content('Hello React!')
       expected to find text "Hello React!" in "Hello Rails!"
It looks like our test is seeing the “Hello Rails!” content rendered on the server in our ERB file, but not the “Hello React!” content rendered on the client by our JavaScript pack.
The reason for this is found in our test here:
RSpec.describe "HelloReact", type: :system do
  before do
    driven_by(:rack_test)
  end
By default, when we generate an RSpec system test, the test specifies that it should be driven_by(:rack_test). Rack::Test is a testing API that allows you to simulate using a browser. It’s extremely fast, and that’s why it’s the default for RSpec system tests.
The downside of Rack::Test is that because it doesn’t use a real browser, it doesn’t execute JavaScript code. So when we want our tests to exercise Webpacker packs, we need to use a different driver. Luckily this is as easy as removing the before block:
 RSpec.describe "HelloReact", type: :system do
-  before do
-    driven_by(:rack_test)
-  end
-
   it 'should render a React component' do
Rails’ system test functionality uses selenium-webdriver by default, which connects to real browsers such as Google Chrome. When we don’t specify the driver in our test, selenium-webdriver is used instead.
Run the test again. You should see Google Chrome popping up and automatically navigating to your app. Our test passes! We’re relying on Chrome to execute our JavaScript, so we should get maximum realism in terms of ensuring our JavaScript code is browser-compatible.
One more useful option for a driver is “headless Chrome.” This runs Chrome in the background so a browser window won’t pop up. This is a bit less distracting and can run more reliably on CI servers. To run headless chrome, add the #driven_by call back in with a new driver:
 RSpec.describe "HelloReact", type: :system do
+  before do
+    driven_by(:selenium_chrome_headless)
+  end
+
   it 'should render a React component' do
When you rerun the test, you’ll see a Chrome instance launch, but you should not see a browser window appear.
Alternatives
System tests are Rails’ built-in mechanism for end-to-end testing. An alternative end-to-end testing tool you may want to consider is Cypress. It’s framework agnostic and built from the ground up for rich frontend applications. One of the main benefits of Cypress is a GUI that shows your executing tests. It allows you to step back in time to see exactly what was happening at each interaction, even using Chrome Developer Tools to inspect the state of your frontend app in the browser.
But Rails’ system tests have a few benefits over Cypress as well. For experienced Rails developers, it’s helpful to write your system tests with the familiar RSpec and Capybara API and running them as part of the same test suite as your other tests. You can also directly access your Rails models to create test data in the test itself. In the past, doing so required something like the database_cleaner gem because the server was running in a separate process, but Rails system tests handle wrapping both the test and server in the same database transaction. Because Cypress doesn’t have knowledge of Rails, setting up that data in Cypress takes some custom setup.
Whether you go with Rails system tests or Cypress, you’ll have the tooling you need to apply your testing skills to rich JavaScript applications.
The post Testing Webpacker Apps with RSpec System Tests appeared first on Big Nerd Ranch.
]]>The post Live Updates With Queues, WebSockets, and Push Notifications. Part 6: Push Notifications with Expo appeared first on Big Nerd Ranch.
]]>
This is pretty great when we’re running the app. But what about when it’s in the background? In that case, we can use device push notifications to alert the user to events. Here’s the complete architectural diagram of the system, with push notifications added:
Push notifications are available on the web as well (but, as of the time of this writing, not on Safari). However, users are frequently less willing to enable push notifications in web apps than in native mobile apps. Because of this, we chose to build our client app in React Native using Expo. Expo has great support for push notifications across both iOS and Android—let’s give them a try!
If you like, you can download the completed server project and the completed client project for the series.
Asking for Push Permission
Before we can send a push notification to a user, we need to request permission from them. In our Expo app, in src/MainScreen.js, add a new PushPermissionRequester component:
 import React from 'react';
 import { View } from 'react-native';
+import PushPermissionRequester from './PushPermissionRequester';
 import MessageList from './MessageList';

 export default function MainScreen() {
   return (
     <View style={{ flex: 1 }}>
+      <PushPermissionRequester />
       <MessageList />
     </View>
   );
 }
Now let’s implement PushPermissionRequester. Create a src/PushPermissionRequester.js file and enter the following:
import React, { useState } from 'react';
import { View } from 'react-native';
import { Notifications } from 'expo';
import * as Permissions from 'expo-permissions';
import { Button, Input } from 'react-native-elements';

const askForPushPermission = setToken => async () => {

};

export default function PushPermissionRequester() {
  const [token, setToken] = useState('(token not requested yet)');

  return (
    <View>
      <Input value={token} />
      <Button
        title="Ask Me for Push Permissions"
        onPress={askForPushPermission(setToken)}
      />
    </View>
  );
}
This component tracks a push notification token that can be requested, then is displayed afterward. Now let’s fill in askForPushPermission to request it:
const askForPushPermission = setToken => async () => {
  const { status: existingStatus } = await Permissions.getAsync(
    Permissions.NOTIFICATIONS,
  );
  let finalStatus = existingStatus;

  if (existingStatus !== 'granted') {
    const { status } = await Permissions.askAsync(Permissions.NOTIFICATIONS);
    finalStatus = status;
  }

  console.log('push notification status ', finalStatus);
  if (finalStatus !== 'granted') {
    setToken(`(token ${finalStatus})`);
  }

  let token = await Notifications.getExpoPushTokenAsync();
  setToken(token);
};
This is boilerplate code from the Expo Push Notification docs; what’s happening is:
- We retrieve the existing permission status for push notifications.
- If permission is not yet granted, we attempt to ask for permission.
- Either way, if permission is not granted in the end, we display the status we got. If permission is granted, we request the token and set it in the component state to display it.
Reload the Expo app on your virtual device, and tap on “Ask Me for Push Permissions.” You should see the message “(token undetermined),” and a yellow box error at the bottom of the screen. The error says “Error: Must be on a physical device to get an Expo Push Token.”
Time to take this app to your real phone!
Running on Device
On Android, there are a few different ways to get the app running on your physical device. On iOS things are a bit more locked down. Let’s look at the approach that will work for both iOS and Android.
On your phone, search for “Expo” in the App Store or Google Play Store, respectively. This is a client app from Expo that allows you to run your app before going through the whole app publishing process, which is a nice speed boost. Download the Expo app. If you haven’t already created a free Expo account, create one. Then log in to the Expo app.
Now we need to get our React Native application published to Expo so we can load its JavaScript assets into the Expo app. Open the Metro Bundler browser tab that Expo opens when you run it. In the sidebar, click “Publish or republish project…”:
Choose a unique “URL Slug” for your app, then click “Publish project.”
Expo will take a minute or two to bundle up your JavaScript and upload it. Ultimately you should get a box at the bottom-right of the browser window saying “Successfully published to…”
Reopen the Expo app on your phone, go to the Profile tab, and in the “Published Projects” list you should see your app. Tap on it, and it should open and display the initial data from Heroku.
Getting and Testing a Token
Now, tap “Ask Me for Push Permissions” again, and give permission. This time, on a physical device, it should work!
You should see a token that looks like ExponentPushToken[…], with a string of letters and numbers in between the square brackets. This is a token that uniquely identifies your app running in Expo on your device. You can use this to hit Expo’s API to send a push notification.
Select the whole token, copy it, and transfer it to your development computer somehow. Emailing yourself is always an option if nothing else!
Before we code anything, we can test this push notification out through Expo’s Push Notifications Tool. Make sure Expo is in the background on your phone. Then, on your development machine, go to the Push Notifications Tool.
Paste your full token including the string ExponentPushToken into the “Expo Push Token” field. For “Message Title,” type something.
Scroll to the bottom of the page and click “Send a notification”. A push notification should appear on your phone from the Expo app, displaying the title you entered.
Feel free to play around with other fields in the push notification tool as well.
Adding an Expo Module
Now that we have a token, we can provide it to our backend. In a production application, you would set up a way for each user to send that token up to the server and store it with their user account. Since user accounts aren’t the focus of our tutorial, we’re just going to set that token via an environment variable instead.
In our node app, in .env.sample, add the following line:
 CLOUDAMQP_URL=fake_cloudamqp_url
+EXPO_PUSH_TOKEN=fake_expo_push_token
 MONGODB_URI=fake_mongodb_uri
In .env add your token, filling in the real value. This is the value we wanted to keep out of our git repo; you don’t want me to find your push token and send spam to you!
 CLOUDAMQP_URL=amqp://localhost
+EXPO_PUSH_TOKEN=ExponentPushToken[...]
 MONGODB_URI=mongodb://localhost:27017/nodeifier
Next, add Expo’s SDK as a dependency to your Node app:
$ yarn add expo-server-sdk
As we did with MongoDB and RabbitMQ, let’s wrap Expo’s SDK in a module of our own, to hide it from the rest of our app. Create a lib/expo.js file and add the following:
const Expo = require('expo-server-sdk').default;

const token = process.env.EXPO_PUSH_TOKEN;

const expo = new Expo();

async function push({ text }) {
  if (!Expo.isExpoPushToken(token)) {
    console.error(`Push token ${token} is not a valid Expo push token`);
    return;
  }

  const messages = [
    {
      to: token,
      title: text,
    },
  ];

  console.log('sending to expo push', messages);
  const chunks = expo.chunkPushNotifications(messages);

  for (let chunk of chunks) {
    try {
      let ticketChunk = await expo.sendPushNotificationsAsync(chunk);
      console.log(ticketChunk);
    } catch (error) {
      console.error(error);
    }
  }
}

module.exports = { push };
We export a push function that our app can use to send a push notification. We only use the text field of the message. First, we get the Expo push token from the environment variable and confirm it’s valid. Then we construct a message object with the structure Expo’s Push Notification SDK expects. The SDK is set up to allow sending push notifications in batches, which is a bit overkill in our case, but we work with it. We log the success or error message just in case.
Setting Up a Worker
Now let’s send out a push notification from our worker. In an earlier part we mentioned that you could conceivably separate different webhook endpoints into different microservices or lambda functions for scalability. You could do the same thing with workers. But since we’re hosting on Heroku, which will give us one web dyno and one worker dyno for free, we’ll keep our worker code in a single worker process that is watching multiple queues.
How should we organize this one worker service with multiple concerns? Currently our worker is very small, so adding code to monitor a second queue to the same file wouldn’t clutter it up much. But for the sake of illustrating how to separate concerns, let’s refactor our worker into separate modules.
Create a workers/incoming.js file, and copy and paste the require and handleIncoming code from workers/index.js into it. Then export the handler:
const queue = require('../lib/queue');
const repo = require('../lib/repo');

const handleIncoming = message =>
  repo
    .create(message)
    .then(record => {
      console.log('Saved ' + JSON.stringify(record));
      return queue.send('socket', record);
    });

module.exports = handleIncoming;
Update workers/index.js to import that function instead of duplicating it:
 if (process.env.NODE_ENV !== 'production') {
   require('dotenv').config();
 }

 const queue = require('../lib/queue');
-const repo = require('../lib/repo');
-
-const handleIncoming = message =>
-  repo
-    .create(message)
-    .then(record => {
-      console.log('Saved ' + JSON.stringify(record));
-      return queue.send('socket', record);
-    });
+const handleIncoming = require('./incoming');

 queue
   .receive('incoming', handleIncoming)
Now, where should we call our push function? In this case, we could probably do it directly in handleIncoming. But when you’re using a queue-based architecture it can be valuable to separate units of work into small pieces; that way if one part fails it can be retried without retrying the entire process. For example, if we can’t reach Expo’s push notification service, we don’t want a retry to inadvertently insert a duplicate record into our database.
So instead, let’s create a new push queue that will receive messages each time we have a push notification to send. In workers/incoming.js, just like we send a message to the socket queue, we’ll send one to the push queue as well:
const handleIncoming = message =>
   repo
     .create(message)
     .then(record => {
       console.log('Saved ' + JSON.stringify(record));
-      return queue.send('socket', record);
+      return Promise.all([
+        queue.send('socket', record),
+        queue.send('push', record),
+      ]);
     });
Note that we wrap our two queue.send calls in a Promise.all() and return the result; that way if either of the sends fails, the rejection will be propagated up and eventually logged with console.error.
Next, add a new workers/push.js file with the following contents:
const expo = require('../lib/expo');

const handlePush = message => {
  console.log('handling push', message);
  return expo.push(message);
};

module.exports = handlePush;
An extremely simple worker, this just forwards the received message along to our Expo module. Connect it in workers/index.js:
 const queue = require('../lib/queue');
 const handleIncoming = require('./incoming');
+const handlePush = require('./push');

 queue
   .receive('incoming', handleIncoming)
   .catch(console.error);
+queue
+  .receive('push', handlePush)
+  .catch(console.error);
With this, we should be set up to send push notifications. Run your two node processes locally:
$ node web
$ node workers
Send a test notification:
$ curl http://localhost:3000/webhooks/test -d "this should be pushed"
You should see the push notification show up on your phone. Note that although your Expo app is pointing to your production server, it still receives the push notification from your local server. This is because we’re using your device’s Expo push token, and it doesn’t know or care about any other backing servers.
Going to Production
Our final step is to get push notifications working in production. Whereas our previous Heroku environment variables were provided for us by add-ons, we need to set our EXPO_PUSH_TOKEN variable manually. There are two ways we can do this:
- If you’d like to use the CLI, run
heroku config:set "EXPO_PUSH_TOKEN=ExponentPushToken[...]"(entering your full token as usual) - If you’d like to use Heroku’s web dashboard, pull up your app, then go to “Settings”, then click “Reveal Config Vars”. In the row that has the “Add” button, fill in
EXPO_PUSH_TOKENfor the KEY and your token for the VALUE, then click Add.
Commit your latest changes then push them to Heroku:
$ git add .
$ git commit -m "updated for push tokens"
$ git push heroku master
When your app finishes deploying, try sending it a webhook, filling in your app’s URL instead of mine:
$ curl https://murmuring-garden-42327.herokuapp.com/webhooks/test -d "push from production"
You should receive a push notification on your phone.
You can also try toggling your GitHub PR to see that your other webhooks also deliver push notifications now too.
Where We’ve Been
With that, our app is complete! Let’s review what we’ve built one last time:
We’ve been able to hook up to live updates coming from services like GitHub, Heroku, and Netlify. We set up a queue-based architecture to ensure that on real systems that would have far more load than this, that each piece of the process can run performantly. We push data to running apps over WebSockets, and apps in the background using push notifications.
Adding live updates to your mobile or web applications using approaches such as these can be a big boost to your app’s usefulness to your users. If you’re a developer, give these technologies a try. And if Big Nerd Ranch could help train you in these technologies or help build the foundation of a new live-updating application for you, let us know!
The post Live Updates With Queues, WebSockets, and Push Notifications. Part 6: Push Notifications with Expo appeared first on Big Nerd Ranch.
]]>The post Live Updates With Queues, WebSockets, and Push Notifications. Part 5: Deploying to Heroku appeared first on Big Nerd Ranch.
]]>If we weren’t using WebSockets, then functions-as-a-service would be a great option for deployment. But since WebSockets are stateful, you need to run a service like Amazon API Gateway in front of the functions to provide WebSocket statefulness, and setting that up can be tricky. Instead, we’ll deploy our app on Heroku, an easy hosting platform that allows us to continue to use WebSockets in the normal way.
If you like, you can download the completed server project and the completed client project for part 5.
Heroku
If you don’t already have a Heroku account, create one for free. (You may need to add a credit card, but it won’t be charged.) Then install and log in to the Heroku CLI.
Go into our node app’s directory in the terminal. If you aren’t already tracking your app in git for version control, initialize a git repo now:
$ git init .
$ echo node_modules > .gitignore
Heroku’s main functionality can be accessed either through the web interface or through the CLI. In this post we’ll be using both, depending on which is easiest for any given step.
To begin, create a new Heroku app for our backend using the CLI:
$ heroku create
This will create a new app and assign it a random name—in my case, murmuring-garden-42327. It will also add a git remote named heroku to your repo alongside any other remotes you may have. You can see this by running the following command:
$ git remote -v
heroku  https://git.heroku.com/murmuring-garden-42327.git (fetch)
heroku  https://git.heroku.com/murmuring-garden-42327.git (push)
We aren’t quite ready to deploy our app to Heroku yet, but we can go ahead and set up our database and queue services. We’ll do this step in the Heroku dashboard. Go to the dashboard, then click on your new app, then the “Resources” tab.
Under Add-ons, search for “mongo”, then click “mLab MongoDB”.

A modal will appear allowing you to choose a plan. The “Sandbox – Free” plan will work fine for us. Click “Provision.”

Next, search for “cloud,” then click “CloudAMQP.”

The default plan works here too: “Little Lemur – Free,” so click “Provision” again.

This has set up our database and queue server. How can we access them? The services provide URLs to our app via environment variables. To see them, click “Settings,” then “Reveal Config Vars.”
 From the CLI, you can run
 heroku config to show the environment variables.
Here’s what they’re for:
CLOUDAMQP_APIKEY: we won’t need this for our tutorial appCLOUDAMQP_URL: our RabbitMQ access URLMONGODB_URI: our MongoDB access URL
Using Environment Variables
We need to update our application code to use these environment variables to access the backing services, but this raises a question: how can we set up analogous environment variables in our local environment? The dotenv library is a popular approach: it allows us to set up variables in a .env file in our app. Let’s refactor our app to use dotenv.
First, add dotenv as a dependency:
$ yarn add dotenv
Create two files, .env and .env.sample. It’s a good practice to not commit your .env file to version control; so far our connection strings don’t have any secure info, but later we’ll add a variable that does. But if you create and commit a .env.sample file with example data, this helps other users of your app see which environment variables your app uses. If you’re using git for version control, make sure .env is in your .gitignore file so it won’t be committed.
Add the following to .env.sample:
CLOUDAMQP_URL=fake_cloudamqp_url
MONGODB_URI=fake_mongodb_uri
This just documents for other users that these are the values needed.
Now let’s add the real values we’re using to .env:
CLOUDAMQP_URL=amqp://localhost
MONGODB_URI=mongodb://localhost:27017/notifier
Note that the name CLOUDAMQP_URL is a bit misleading because we aren’t using CloudAMQP locally, just a general RabbitMQ server. But since that’s the name of the environment variable CloudAMQP sets up for us on Heroku, it’ll be easiest for us to use the same one locally. And since CloudAMQP is giving us a free queue server, we shouldn’t begrudge them a little marketing!
The values we set in the .env file are the values from our lib/queue.js and lib/repo.js files respectively. Let’s replace the hard-coded values in those files with the environment variables. In lib/queue.js:
-const queueUrl = 'amqp://localhost';
+const queueUrl = process.env.CLOUDAMQP_URL;
And in lib/repo.js:
-const dbUrl = 'mongodb://localhost:27017/notifier';
+const dbUrl = process.env.MONGODB_URI;
Now, how can we load these environment variables? Add the following to the very top of both web/index.js and workers/index.js, even above any require() calls:
if (process.env.NODE_ENV !== 'production') {
  require('dotenv').config();
}
When we are not in the production environment, this will load dotenv and instruct it to load the configuration. When we are in the production environment, the environment variables will be provided by Heroku automatically, and we won’t have a .env file, so we don’t need dotenv to run.
To make sure we haven’t broken our app for running locally, stop any node processes you have running, then start node web and node workers, run the Expo app, and post a test webhook:
$ curl http://localhost:3000/webhooks/test -d "this is with envvars"
The message should show up in Expo as usual.
Configuring and Deploying
Heroku is smart enough to automatically detect that we have a node app and provision an appropriate environment. But we need to tell Heroku what processes to run. We do this by creating a Procfile at the root of our app and adding the following:
web: node web
worker: node workers
This tells Heroku that it should run two processes, web and worker, and tells it the command to run for each.
Now we’re finally ready to deploy. The simplest way to do this is via a git push. Make sure all your changes are committed to git:
$ git add .
$ git commit -m "preparing for heroku deploy"
Then push:
$ git push heroku master
This pushes our local master branch to the master branch on the heroku remote. When Heroku sees changes to its master branch, it triggers a deployment. We’ll be able to see the deployment process as it runs in the output of the git push command.
Deployment will take a minute or two due to provisioning the server and downloading dependencies. In the end, we’ll get a message like:
remote:        Released v7
remote:        https://murmuring-garden-42327.herokuapp.com/ deployed to Heroku
We have one more step to do. Heroku will start the process named web by default, but when we have any other processes we will need to start by ourselves. In our case, we need to start the worker process. We can do this a few different ways:
- If you want to use the CLI, run
heroku ps:scale worker=1. This scales the process namedworkerto run on a single “dyno” (kind of like the Heroku equivalent of a server) - If you want to use the web dashboard instead, go to your app, then to “Resources.” Next to the
workerrow, click the pencil icon to edit it, then set the slider to on, and click Confirm.

Testing
Now let’s update our Expo client app to point to our production servers. We could set up environment variables there as well, but for the sake of this tutorial let’s just change the URLs by hand. Make the following changes in MessageList.js, putting in your Heroku app name in place of mine:
 import React, { useState, useEffect, useCallback } from 'react';
-import { FlatList, Linking, Platform, View } from 'react-native';
+import { FlatList, Linking, View } from 'react-native';
 import { ListItem } from 'react-native-elements';
...
-const httpUrl = Platform.select({
-  ios: 'http://localhost:3000',
-  android: 'http://10.0.2.2:3000',
-});
-const wsUrl = Platform.select({
-  ios: 'ws://localhost:3000',
-  android: 'ws://10.0.2.2:3000',
-});
+const httpUrl = 'https://murmuring-garden-42327.herokuapp.com';
+const wsUrl = 'wss://murmuring-garden-42327.herokuapp.com';
Note that the WebSocket URL uses the wss protocol instead of ws; this is the secure protocol, which Heroku makes available for us.
Reload your Expo app. It should start out blank because our production server doesn’t have any data in it yet. Let’s send a test webhook, again substituting your app’s name for mine:
$ curl https://murmuring-garden-42327.herokuapp.com/webhooks/test -d "this is heroku"
You should see your message show up. We’ve got a real production server!
Next, let’s set up a GitHub webhook pointing to our Heroku server. In the testing GitHub repo you created, go to Settings > Webhooks. Add a new webhook and leave the existing one unchanged; that way you can continue receiving events on your development server as well.
- Payload URL: your Heroku app URL, with
/webhooks/githubappended. - Content type: change this to
application/json - Secret: leave blank
- SSL verification: leave as “Enable SSL verification”
- Which events would you like to trigger this webhook? Choose “Let me select individual events”

- Scroll down and uncheck “Pushes” and anything else if it’s checked by default, and check “Pull requests.”
- Active: leave this checked
 Now head back to your test PR and toggle it open and closed a few times. You should see the messages show up in your Expo app.
Congratulations — now you have a webhooks-and-WebSockets app running in production!
Heroku Webhooks
Now that we have a Heroku app running, maybe we can set up webhooks for Heroku deployments as well!
Well, there’s one problem with that: it can be hard for an app that is being deployed to report on its deployment.

Surprisingly, if you set up a webhook for your Node app, you will get a message that the build started. It’s able to do this because Heroku leaves the existing app running until the build completes, then swaps out the running version. You won’t get a message that the build completed over the WebSocket, however—by that time the app has been restarted, your WebSocket connection is lost. The success message has been stored to the database, however, so if you reload the Expo app it will appear.
With that caveat in place — or if you have another Heroku app that you want to set up notifications for — here are a few pointers for how to do that.
To configure webhooks, open your site in the Heroku dashboard, then click “More > View webhooks.” Click “Create Webhook.” Choose the api:build event type: that will allow you to receive webhook events when builds both start and complete.

The webhook route itself should be very similar to the GitHub one. The following code can be used to construct a message from the request body:
const {
  data: {
    app: { name },
    status,
  },
} = req.body;

const message = {
  text: `Build ${status} for app ${name}`,
  url: null,
};
Note that the Heroku webhook doesn’t appear to send the URL of your app; if you want it to be clickable, you would need to use the Heroku Platform API to retrieve that info via another call.
What’s Next?
Now that we’ve gotten our application deployed to production, there’s one more piece we can add to make a fully-featured mobile app: push notifications to alert us in the background. To get push notifications, we’ll need to deploy our Expo app to a real hardware device.
The post Live Updates With Queues, WebSockets, and Push Notifications. Part 5: Deploying to Heroku appeared first on Big Nerd Ranch.
]]>The post Meeting Customers Where They Are With a Multiexperience Development Strategy appeared first on Big Nerd Ranch.
]]>Facing users’ expectations to interact on a variety of platforms, many companies struggle to provide a high-quality customer experience across all of them. It can be a challenge even to keep feature parity between the web and a single mobile platform. As a result, companies will often pick either iOS or Android to launch on and defer their entry onto the other mobile platform until later, limiting their potential customer base. As each of these apps evolves over time, development speed slows down. The functionality of the apps on different platforms drifts as new features don’t make it onto every platform. Bugs appear as different platforms use slightly different logic to interpret data. When it is this challenging just to target web and mobile platforms, adding even more platforms like chat, voice assistants, and wearables is a non-starter.
Failing to provide a high-quality experience for users across different platforms risks losing users on those platforms. Users perceive the apps as out-of-date and unreliable. Large segments of users who prefer to use other platforms will reach for competitors that have offerings on them. The result is the loss of users to competitors with broader reach across platforms.
To avoid this problem, you can use a multiexperience development strategy to satisfy and retain those customers. A multiexperience development strategy is a plan for delivering consistent, high-quality apps across a multitude of platforms. There is no off-the-shelf solution to this that meets the quality demands of the market. Instead, companies will need to apply their application engineering capabilities in an intentional way to come up with their own approach.
When you are thinking about creating a multiexperience development strategy internally or finding a partner to work with you, here are some important areas to plan:
- Technology Selection: First, you need to decide which platforms are the most important for your company to target and which technologies you should use to build for those platforms. Should you use cross-platform solutions like Flutter, Kotlin Multiplatform, or React Native to help keep your mobile apps in sync while reducing costs, or is traditional native development the best path to the quality you need? For the web, what new browser technologies are available to make your users’ web experience more app-like? Should your company consider building apps for chat, voice assistant, and wearable platforms, and if so, when is the time right to build them? Teams who have experience building for these platforms can provide valuable information to help make these decisions.
- API-First Development: It’s important to ensure each frontend app has the data it needs in a consistent way, and one of the best ways to do this is to design your backend API before development begins. Mocking tools such as those provided by SwaggerHub and Apollo GraphQL can allow frontend development to begin in parallel to backend development. This allows frontend apps to uncover needs that weren’t anticipated before backend work has started on them, preventing wasted effort. With a consistent API, your company will be ready to spin up additional platforms in the future as soon as the need arises.
- Cross-Team Collaboration: For a consistent user experience, projects across multiple frontend and backend platforms need to be coordinated. The best way to facilitate this communication is with small, fast, cost-efficient teams. Features should be delivered on a regular basis so they can be rolled out quickly without being blocked by one platform that is moving more slowly. Designers with expertise in mobile and web application design should be integrated with the teams to ensure your apps deliver a world-class experience to your users.
- Speed of Delivery: Delivery automation technologies are important to ensure that development teams stay focused on building features, not performing repetitive deployment tasks. Continuous Integration servers can run automated tests across all platforms to ensure your apps stay stable for your users as new features are added. Test and production builds can be automatically deployed to low-maintenance Platform-as-a-Service hosting and app distribution tools such as TestFlight and Microsoft App Center, allowing business users to quickly test and provide feedback.
Technology selection, API-first development, cross-team collaboration, and speed of delivery will all significantly impact your company’s ability to implement an effective multiexperience development strategy.
As you are evaluating your internal resources and potential partners, Big Nerd Ranch would be happy to help. We have a breadth of experience developing for platforms ranging from web, native mobile, cross-platform, and platforms such as chat, voice, and wearables. Our API-first strategies, team collaboration, and speed-of-delivery tooling can help give you momentum developing world-class apps for the right platforms.
The post Meeting Customers Where They Are With a Multiexperience Development Strategy appeared first on Big Nerd Ranch.
]]>