The post Everything You Need to Know About Ruby for iOS Development appeared first on Big Nerd Ranch.
]]>On iOS projects, we often find ourselves using command-line tools for testing and distributing our apps. More often than not, these tools were written in Ruby.
Ensuring we, as a team, are all running the same version of these tools is an important step in keeping our configurations consistent. We also want to ensure our continuous integration builds are using the exact same versions. Finally, our engineers often need to move between different code bases without being blocked by the tools. At the Ranch, we can be found working on a combination of consulting projects, open-source projects or course materials (such as our iOS development course). Thorough code review and pair programming with our peers further increase our need to move unencumbered between projects.
In this post, we will start from the top with Ruby, work our way down to the command-line tools themselves and wrap up with a little bit of automation magic!
Ruby Versions
Just like any other programming language, there are different versions of Ruby. We can see which version of Ruby shipped with our operating system (assuming you’re on a Mac) by typing into our terminal:
$ /usr/bin/ruby --version
My output on macOS Sierra 10.12.6 is:
Ruby 2.0.0p648 (2015-12-16 revision 53162) [universal.x86_64-darwin16]
If we relied on the system installed version of Ruby, there would be no guarantee everyone on the team has the same version. This is our first step in the chain to ensuring everyone is in sync.
rbenv
There are a number of tools dedicated to managing versions of Ruby. Our personal favorite is a lightweight tool called rbenv, which allows us to install multiple different versions of Ruby on our system. Even more importantly for our purposes, rbenv allows us to configure a specific version of Ruby for a given directory.
The preferred way for installing rbenv on your computer is via Homebrew. Homebrew is a tool for compiling and installing software packages on macOS machines. You can think of this as being similar to downloading an app and installing it, except these programs are compiled directly from source on your machine.
rbenv will pick up on your project’s specific version of Ruby simply by looking for a version in a file named .ruby-version within our project’s root directory. The only thing this file needs is a Ruby version such as: 2.2.5.
Now when any team member moves into this directory, rbenv will know to use version 2.2.5. If this person has not installed that version of Ruby on their system, they will see the following error and step to remedy the problem:
rbenv: version `2.2.5' is not installed (set by ~/workspace/project/.ruby-version)

`rbenv install 2.2.5`
Adding a new version of Ruby is now a trivial task with the rbenv install command.
Bundler
Now that everyone on the team is running the same version of Ruby, we need to make sure our tools are the same version. In Ruby libraries and tools are packaged up as gems.
Each team member could install tools like fastlane or cocoapods just by executing gem install toolname. However, we want to keep everyone locked on the same version. Luckily this is a solved problem in the Ruby community.
Enter Bundler. Bundler is itself a Ruby gem that allows you to specify all your project’s gems, and their version, in a file within your project’s root directory. This file is aptly named a Gemfile. For example the contents of CoreDataStack’s Gemfile are:
source "https://Rubygems.org"

gem 'fastlane'
gem 'jazzy'
gem 'cocoapods'
Since Ruby Gems are tied to a specific version of Ruby, you may see that Bundler has not been installed for the version of Ruby that your project specified earlier. That error would look like this:
rbenv: bundle: command not found

The `bundle' command exists in these Ruby versions:
  2.3.1
  2.4.0
  2.4.1
This can easily be fixed by executing gem install bundler. After you have installed Bundler and created your Gemfile, Bundler will go out and fetch the gems when you execute bundle install. If you are the first person on the team to set up the Gemfile this command will also create a Gemfile.lock.
The lock file maintains the exact version of each gem and is used to install those exact versions on each team member’s machine. These files should be added to your project’s version control so that new team members will get the exact same version of the tools you have installed.
Fetching newer versions of your Gems is quite easy. Just execute bundle update.
Now that everyone has their tools’ versions in lock-step, we invoke the tools with the prefix bundle exec. This command ensures that in the event your tool was also installed at a global level, we are still using our project’s specific version of the tool.
Putting It All Together
The hardest part of getting everyone on your team on the same page is getting everyone to install the tools above. It is admittedly a complex and time-consuming process. The folks at ThoughtBot also found this process tedious and created a script called laptop that installs everything mentioned above and a lot more.
A couple of us at Big Nerd Ranch, inspired by this script, created our own stripped-down version that installs the bare minimum tools an iOS developer needs. The macOS-bootstrap script is a convenient way to get a base setup for productive iOS and macOS development. There are even hooks for installing all types of extra software for each person’s choosing.
Now that you have a solid understanding of each step in the Ruby toolchain you can confidently set up a consistent environment for your development team. You will also be able to solve some of the common pain points others may experience along the way.
And if you want more help in creating iOS projects, join us for a bootcamp! Our iOS bootcamps are created for both intermediate and advanced developers, and are taught at locations in both Georgia and California.
The post Everything You Need to Know About Ruby for iOS Development appeared first on Big Nerd Ranch.
]]>The post Breaking Down Type Erasure in Swift appeared first on Big Nerd Ranch.
]]>As a fan of strongly typed programming languages, I love relying on the type system to catch common mistakes and typos early. Occasionally, though, I want to relax the strict rules to gain the payoff of flexibility over safety. Just like a rubber eraser is used to remove written material, a concept known as Type Erasure can be used to remove type information from a program.
Why Would We Remove Type Information?
Let’s start with some background on the Swift programming language.
Swift is a multi-paradigm language, allowing the developer to write constructs in the style of imperative, object-oriented, functional, generic, and protocol-oriented programming. The latter in particular received some special attention from this 2015 WWDC presentation (featuring the now-famous Crusty).

The cornerstone of protocol-oriented programming is writing code against a common contract and avoiding the tight coupling associated with inheritance. Be forewarned though, following this pattern, it’s only a matter of time before you hit the following error:
error: protocol 'MyAwesomeProtocol' can only be used as a generic constraint because it has Self or associated type requirements
There is a lot going on in this single compiler error. The error references both Swift’s protocol’s associated types as well as Swift’s generic constraints. In this post we’ll start by illustrating the problem in a concrete example. Next we’ll explore generic constraints and protocol associated types in isolation. Finally we’ll apply the type erasure pattern to work around the error.
What Causes This Error?
This error is caused by attempting to use a protocol, with an associated type, as an argument to a function or as a collection of objects. We’ll use a specific example to highlight the problem. If you’d like to follow along with our playground, hop over to our GitHub repository.
Say we want to display a collection of files and folders in a UITableView. We may also have multiple views for our files and folders, such as a detailed view. We start our development with a Row protocol, defining what our views must supply, and our two concrete data types (Folder and File).
protocol Row {
    associatedtype Model

    var sizeLabelText: String { get set }

    func configure(model: Model)
}

struct Folder {}
struct File {}
Next we create our views for each data type that implements our Row protocol, along with an additional detail view for our File types.
class FolderCell: Row {
    typealias Model = Folder
    var sizeLabelText: String = ""
    func configure(model: Folder) {
        print("Configured a (type(of: self))")
    }
}

class FileCell: Row {
    typealias Model = File
    var sizeLabelText: String = ""
    func configure(model: File) {
        print("Configured a (type(of: self))")
    }
}

class DetailFileCell: Row {
    typealias Model = File
    var sizeLabelText: String = ""
    func configure(model: File) {
        print("Configured a (type(of: self))")
    }
}
Now with our types in place, what we’d like to do is treat our protocol just like any other concrete type. Some examples include holding a reference to a collection of Rows, accessing a random Row, supplying a Row as an argument to a function, or returning an instance of Row from a function.
// Collect an array of Row items
let cells: [Row] = [FileCell(), DetailFileCell()]

// Grab a random instance of Row
let randomFileCell: Row = (arc4random() % 2 == 0) ?
                            FileCell() :
                            DetailFileCell()

// Pass a Row as a function argument
func resize(row: Row) {
    …
}

// or return an instance of Row
func firstRow() -> Row {
    …
}
However attempting any of those actions will result in the aforementioned error: error: protocol 'Row' can only be used as a generic constraint because it has Self or associated type requirements.
How Can We Work Around This?
At first glance it would seem like Swift’s generic types would give us the functionality we’re looking for with our protocol.
// Try making our protocol generic
protocol Row<Model> {
    func configure(model: Model)
}

let cells: Row<File> = [FileCell(), DetailFileCell()]
However you’d be promptly corrected by the compiler with this error: error: Protocols do not allow generic parameters; use associated types instead. Before moving forward with another solution, let’s first examine how Swift’s generic types differ from a Swift protocol’s associated type.
The use of generic types for Swift’s structs, classes & enumerations, as well as associated types for protocols, are all constructs for generalizing functionality. They allow us to write code once that can later be used on multiple concrete types defined elsewhere.
While similar in that regard, generic types and associated types accomplish their abstraction differently and come with various trade offs.
Generic Type Parameters
Generic type parameters are placeholders for types that can be used within a Swift struct, class or enum. The concrete type will be supplied at a later time and at the time of compilation the concrete type will replace the placeholders.
Any code that plans to use the generic type, whether it be create an instance or simply access one, will be aware of the, now concrete, type occupying the placeholder.
For example if we defined a generic struct MyRow<T> like so:
struct MyRow<T> {
    var sizeLabelText: String = ""
    func configure(model: T) {
        print("Configured a (type(of: self))")
    }
}
In order to hold a reference to an instance of MyRow we must be explicit about the type filling in our placeholder.
/// Must be explicit
let myFileRow: MyRow<File> = MyRow<File>()

/// Cannot leave the placeholder unfilled
let myGenericRow = MyRow<T>() /// Error: Use of undeclared type T
The generic placeholder is part of our type’s public API.
Associated Types
Associated types on the other hand, are a different type of placeholder. A protocol is the only Swift type that can make use of Swift’s associated types.
Just like a generic type, the associated type can be used anywhere in the definition of your protocol. The key difference comes from when the placeholder is filled. At the time a concrete type adopts the protocol, it will also supply the concrete type to replace the placeholder (i.e. File in FileCell).
class FileCell: Row {
    typealias Model = **File**
    ...
    func configure(model: **File**) {
        ...
    }
}
Since the adopter of the protocol provides this type, the compiler is not aware of the placeholder’s type when we use an instance of the protocol as an argument in a method, a return type, a type for a var or let and so on.
Hopefully, the error we saw above (e.g., let cells: [Row] = [FileCell(), DetailFileCell()]) makes more sense now. The compiler cannot know what the type is for Model because all it knows about each cell in the array is that it conforms to the Row protocol. The adopter of the protocol is responsible for providing the concrete type to replace Model.
Type erasure will be our ticket around this problem.
Type Erasure Pattern
We can use the type erasure pattern to combine both generic type parameters and associated types to satisfy both the compiler and our flexibility goals.
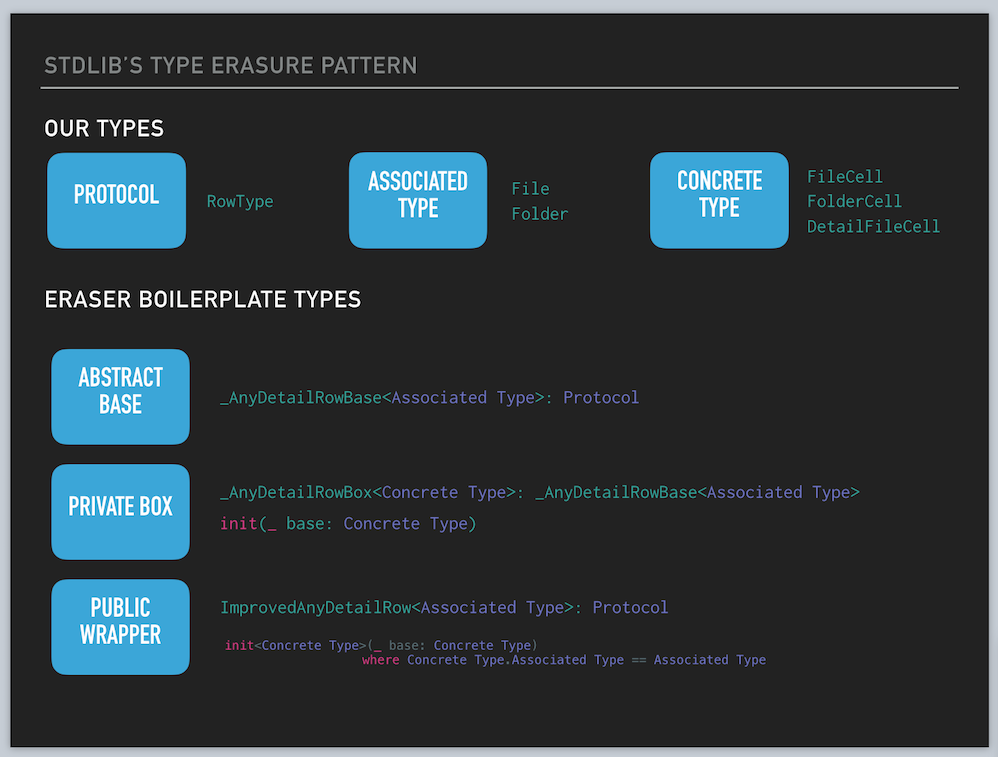
We will need to create three discrete types in order to satisfy these constraints. This pattern includes an abstract base class, a private box class, and finally a public wrapper class. This same pattern, as diagramed below, is even used in the Swift standard library.
Abstract Base
The first step of the process is to create an abstract base class. This base class will have three requirements:
- Conform to the
Rowprotocol. - Define a generic type parameter
Modelthat serves asRow’s associated type. - Be abstract. (each function must be overridden by a subclass)
This class will not be used directly, but instead subclassed in order to bind the generic type constraint to our protocol’s associated type. We’ve marked this class private as well as by convention prefixing it with an _.
// Abstract generic base class that implements Row

// Generic parameter around the associated type

private class _AnyRowBase<Model>: Row {
    init() {
        guard type(of: self) != _AnyRowBase.self else {
            fatalError("_AnyRowBase<Model> instances can not be created;
          create a subclass instance instead")
        }
    }

    func configure(model: Model) {
        fatalError("Must override")
    }

    var sizeLabelText: String {
        get { fatalError("Must override") }
        set { fatalError("Must override”) }
    }
}
Private Box
Next we create a private Box class with these requirements:
- Inherit from the generic base class
_AnyRowBase. - Define a generic type parameter
Concretethat itself conforms toRow. - Store an instance of
Concretefor later usage. - Trampoline each
Rowprotocol function calls to the storedConcreteinstance.
This class is referred to as a Box class, because it holds a reference to our concrete implementer of the protocol. In our case this would be a FileCell, FolderCell or DetailFileCell all of which implement Row. We receive the Row protocol conformance from our super class _AnyRowBase and override each function by trampolining the call over to the concrete class. Finally, this class serves a conduit to connect our concrete class’s associated type with our base classes generic type parameter.
// Box class

// final subclass of our abstract base

// Inherits the protocol conformance

// Links Concrete.Model (associated type) to _AnyRowBase.Model (generic parameter)

private final class _AnyRowBox<Concrete: Row>: _AnyRowBase<Concrete.Model> {
    // variable used since we're calling mutating functions
    var concrete: Concrete

    init(_ concrete: Concrete) {
        self.concrete = concrete
    }

    // Trampoline functions forward along to base
    override func configure(model: Concrete.Model) {
        concrete.configure(model: model)
    }

    // Trampoline property accessors along to base
    override var sizeLabelText: String {
        get {
            return concrete.sizeLabelText
        }
        set {
            concrete.sizeLabelText = newValue
        }
    }
}
Public Wrapper
With our private implementation details in place, we need to create a public interface for our type erased wrapper. The naming convention used for this pattern is to prefix Any in front of the protocol you’re wrapping, in our case AnyRow.
This class has the following responsibilities:
- Conform to the
Rowprotocol. - Define a generic type parameter
Modelthat serves asRows associated type. - Within its initializer, take a concrete implementer of the
Rowprotocol. - Wrap the concrete implementer in a
privateBox_AnyRowBase<Model>. - Trampoline each
Rowfunction call along to the Box.
This final piece of the puzzle performs the actual type erasing. We supply the AnyRow class with a concrete implementer of Row (i.e. FileCell) and it erases that concrete type allowing us to work with simply any adopter of Row with matching associated types (i.e. AnyRow<File>).
// Public type erasing wrapper class

// Implements the Row protocol

// Generic around the associated type

final class AnyRow<Model>: Row {
    private let box: _AnyRowBase<Model>

    // Initializer takes our concrete implementer of Row i.e. FileCell
    init<Concrete: Row>(_ concrete: Concrete) where Concrete.Model == Model {
        box = _AnyRowBox(concrete)
    }

    func configure(model: Model) {
        box.configure(model: model)
    }

    var sizeLabelText: String {
        get {
            return box.sizeLabelText
        }
        set {
            box.sizeLabelText = newValue
        }
    }
}
Notice that while our concrete implementer is a property of type _AnyRowBase<Model>, we have to wrap it up in an instance of _AnyRowBox. The only requirement on _AnyRowBox’s initializer is that the concrete class implements Row. This is where the actual type easement occurs. Without this layer in our stack we’d be required to supply the associated type Model to _AnyRowBase<Model> explicitly; and we’d be back to square one.
The Payoff!
The biggest benefit to this process is all the messy boilerplate is an implementation detail. We are left with a relatively simple public API. Let’s revisit our original goals that are now possible with our type erased AnyRow<Model>.
// Collect an array of Row items
let cells: [AnyRow<File>] = [AnyRow(FileCell()),
AnyRow(DetailFileCell())]

// Grab a random instance of Row
let randomFileCell: Row = (arc4random() % 2 == 0) ?
                            AnyRow(FileCell()) :
                            AnyRow(DetailFileCell())

// Pass a Row as a function argument
func resize(row: AnyRow<File>) {
…
}

// Return an instance of Row
func firstRow() -> AnyRow<File> {
…
}

// Configure our collection of cells with a new File
cells.map() {
    $0.configure(model: File())
}

// Mutate and access properties on a Cell
if let firstCell = cells.first {
    firstCell.sizeLabelText = "200KB"
    print(firstCell.sizeLabelText) // Prints 200KB
}
Homogeneous Requirement
One important thing to note is we haven’t lost all of the conveniences and safety of strong typing. With Swift type checker still helping us out we cannot hold an array of just any AnyRow, our Model type must remain consistent.
This differs from how other more loosely typed languages such as Objective-C would handle the situation. The following is perfectly valid in Objective-C:
// Any array containing both a FolderCell and a FileCell
NSArray<Row> *cells = @[[FolderCell new], [FileCell new]];
Swift, on the other hand, requires our array to be homogeneous around our protocol’s associated type. If we attempt the same line of code in Swift we’re presented with an error:
let cells = [AnyRow(FileCell()), AnyRow(FolderCell())]

error: Heterogeneous collection literal could only be inferred to '[Any]'; add explicit type annotation if this is intentional.
This is a good thing; we’re allowed enough flexibility to work with multiple types conforming to Row but we cannot be bitten by receiving a type we did not expect.
Wrapping Up
Assembling all the pieces required in the type erasure pattern can be overwhelming at first. Fortunately, it’s a formulaic process that will not differ based on your protocol. It’s such a systematic process that the Swift standard library may very well do this for you at some point. See the Swift Evolution’s Completing Generics Manifesto
To explore type erasure concepts in a Swift Playground, check out our accompanying Type Erasure Playgrounds:
The post Breaking Down Type Erasure in Swift appeared first on Big Nerd Ranch.
]]>When we at the Ranch use Core Data, we inevitably end up using it in a multi-threaded environment. The Right Way™ to use Core Data across multiple threads is a topic of fierce debate, one that we had ourselves when we set out to create a shared Core Data stack.
The post Introducing the Open-Source Big Nerd Ranch Core Data Stack appeared first on Big Nerd Ranch.
]]>When we at the Ranch use Core Data, we inevitably end up using it in a multi-threaded environment. The Right Way™ to use Core Data across multiple threads is a topic of fierce debate, one that we had ourselves when we set out to create a shared Core Data stack.
And now we want to share the Core Data stack we created with you. The Big Nerd Ranch Core Data Stack was designed to effortlessly fit the needs of most users, while providing the flexibility to accommodate more esoteric needs.
Stack Design Patterns
To best describe the design choices made in the Big Nerd Ranch Core Data stack, we’ll first walk through the various patterns of multi-threaded Core Data stacks.
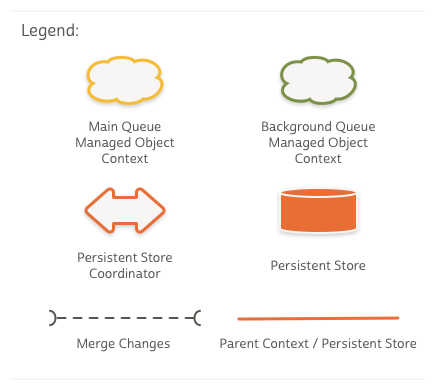
Shared Persistent Store Coordinator Pattern
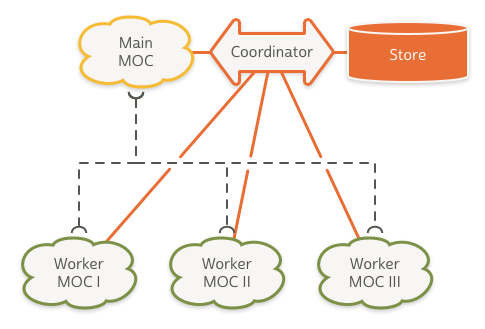
The first pattern is constructed with a single persistent store coordinator, connected to a main queue managed object context. Background worker managed object contexts are created as needed and share the same single instance of the persistent store coordinator.
Saving any one of these managed object contexts will push changes through the shared coordinator and on to the backing store file. While the changes from each context are available in the store after a save, no context is aware of the changes made in any other context.
In order to keep all contexts in sync, the stack must subscribe to NSManagedObjectContextDidSaveNotification notifications and then call mergeChangesFromContextDidSaveNotification() on the remaining contexts.
Pros
- Worker contexts are kept in sync with each other
- Can be more performant with large data sets. More to come on this later in the post.
Cons
- Greater complexity with setup to ensure consistency across contexts
- Increased chance of conflicting changes at the store level since they share a single coordinator
- Persistent store coordinator spends more time locking the store, affecting performance
Nested Managed Object Context Pattern
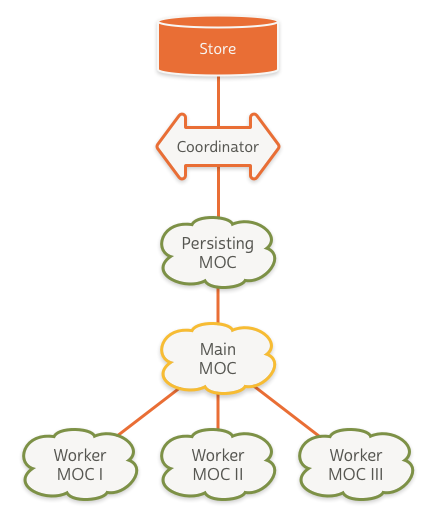
In iOS 5.0 / OS X 10.7, Apple introduced the concept of nested managed object context through the property parentContext. Fetch requests performed on a context will work their way up through the context’s parentContexts until it reaches an NSPersistentStore where the objects are retrieved. Performing a save operation on a context will push the changes up a single level.
Pros
- Much simpler setup compared to Shared Persistent Store Coordinator Pattern
- Children contexts always have most recent changes from parents available
- Minimizes contexts interfacing with the coordinator to a single context
- Writes to the store performed on a background queue
Cons
- Slower than Shared Persistent Store Coordinator Pattern when inserting large data sets
awakeFromInsertbeing called onNSManagedObjectsubclasses for each context in the parent chain- Merge policies only apply to a context saving to a store and not to its parent context
Shared Store Stack Pattern
One criticism of the nested managed object context pattern is that inserting a large number of objects (on the order of thousands) is significantly slower than doing the same operation with a shared persistent store coordinator stack. See Concurrent Core Data Stack Performance Shootout. For this reason some have outright avoided using a nested managed object context pattern in favor of the shared persistent store coordinator pattern.
Apple, however, recommends an alternate approach for solving this type of performance issue, saying:
If you’ve exhausted all other optimizations and are still seeing performance issues, you might want to consider using a different concurrency style, and this time you have two persistent store coordinators, two almost completely separate Core Data stacks. One stack for your background work, one stack for your main queue work and they both talk to the same persistent store file.
(via WWDC 2013 Session 211 – Core Data Performance Optimization and Debugging. Transcript.)
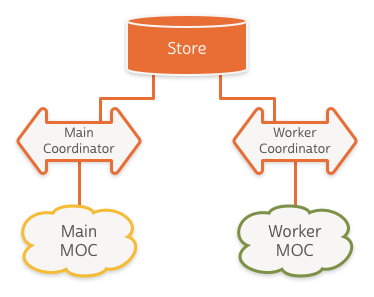
This setup allows the two stacks to work in parallel with the exception of locking the store file, which is a very fast operation.
The changes could be propagated across contexts using the same pattern described in shared persistent store coordinator pattern using mergeChangesFromContextDidSaveNotification(). However, since this pattern is built for performance, it’s preferable to simply listen for the NSManagedObjectContextDidSaveNotification and re-perform your fetch request on the main queue context stack. This will be considerably faster than trying to merge thousands of objects between the two stacks.
Pros
- Much faster when inserting large data sets
Cons
- Heavy-weight setup when creating the background context because of the need to create an entire stack
- More complex setup compared to nested managed object context pattern
- Syncing changes between stacks is manual
The Big Nerd Ranch Core Data Stack
This brings us to the Big Nerd Ranch Core Data Stack. For us, the simplicity of the nested managed object context pattern greatly outweighs any performance deficiencies.
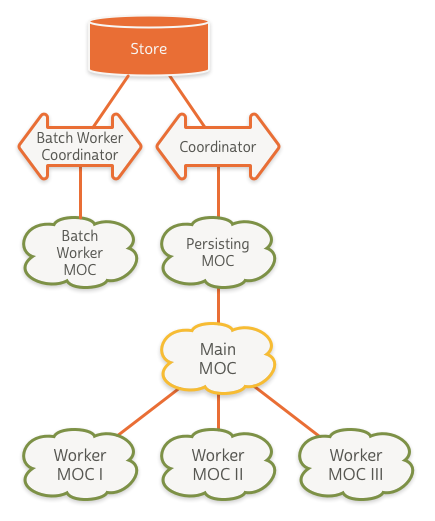
At the root of our stack is a PrivateQueueConcurrencyType managed object context that handles writing to our store. Because this context is on a private queue, we benefit from moving disk writing off the main queue. Interacting with managed objects themselves should occur through one of this context’s children.
The root context has one child context, which is a MainQueueConcurrencyType context. This context should be used for any main queue or UI related tasks. Examples include setting up an NSFetchedResultsController, performing quick fetches, making UI related updates like a bookmark or favoriting an object.
For any longer running task, such as inserting or updating data from a web service, you should use a new background worker context. The stack will vend you one via the newBackgroundWorkerMOC() function.
Since saving an NSManagedObjectContext will only propagate changes up a single level to the parentContext, the Big Nerd Ranch Core Data Stack listens for save notifications and ensures that the changes get persisted all the way up the chain to your store.
You may sometimes need to perform large import operations where the nested context performance would be the bottleneck. For that, we’ve included a function to vend you a managed object context with its own stack newBatchOperationContext(setupCallback: CoreDataStackBatchMOCCallback). This follows the pattern outlined in Shared Store Stack Pattern.
Asynchronous Setup
The Big Nerd Ranch Core Data stack can be constructed with either an NSSQLiteStoreType store or an NSInMemoryStoreType store. Since a SQLite backed store could potentially need to perform model migrations and take an indefinite amount of time, the stack construction is asynchronous. Similarly, creating a new batch operation context will also be asynchronous, since it relies on constructing a discrete stack of its own.
For usage details, see Usage – Standard SQLite Backed.
Large Import Operation Context
In most cases, offloading your longer-running work to a background worker context will be sufficient to alleviate performance woes. If you find yourself inserting or updating thousands of objects, then perhaps the shared store pattern is a good fit for your use case. The following WWDC videos are helpful in ensuring you’ve done your due diligence in optimizing your fetches, inserts and queries before opting to go this route:
- Core Data Performance Optimization and Debugging
- Optimizing Your Core Data Application
- Optimizing Core Data Performance on iPhone OS
For usage details, see Usage – Large Import Operation Context.
Our Core Data Stack and Your Projects
We’re happy to say we’ve had success incorporating this stack on multiple client projects. We hope it brings success to your project.
The post Introducing the Open-Source Big Nerd Ranch Core Data Stack appeared first on Big Nerd Ranch.
]]>The post New in Core Data and iOS 8: Asynchronous Fetching appeared first on Big Nerd Ranch.
]]>In our last installment we covered the NSBatchUpdateRequest in iOS 8. Today we will outline the NSAsynchronousFetchRequest, along with its appropriate use cases.
Asynchronous Fetching
Using Core Data in a multi-threaded environment has always required a deep understanding of the framework and a healthy dose of patience. Asynchronous fetching is not necessarily a feature of a multi-threaded Core Data environment. However, its ability to alleviate a common performance issue could potentially free you up from the added complexity of a multi-threaded CoreData stack.
First, ask yourself the following questions:
- Do my most time-consuming Core Data functions involve the actual execution of the fetch request?
- Do I only need to read my objects asynchronously, leaving write operations to occur synchronously?
- Can I allow meaningful interaction with my app to the user during fetching?
If you have answered “Yes” to these questions, an NSAsynchronousFetchRequest may be all you need to remedy your performance woes. As an example, an application with mostly pre-canned data that requires computationally expensive activities, such as sorting, filtering or charting, would be a good candidate for this approach.
Multi-threaded Core Data vs. Asynchronous Fetching
Setting up a separate context and thread for Core Data allows you to perform any necessary operations (Fetching, Inserting, Deleting, Modifying) on your managed objects on a background thread. This will free up your main thread for smooth user interaction. However, even on that background thread, each operation will block the context while it’s being performed.
An NSAsynchronousFetchRequest allows you to send off your fetch request to the NSManagedObjectContext and be notified via a callback block when the objects have been populated in the context. This means that, whether on the main thread or a background thread, you can continue to work with your NSManagedObjectContext while this fetch is executing.
Progress and Cancellation
NSAsynchronousFetchRequest uses NSProgress to allow you to get incremental updates on how many objects have been fetched via Key-Value Observing (KVO). The only catch with incremental notifications is that because database operations occur in streams, there is no upfront way for the NSAsynchronousFetchRequest to know exactly how many objects will be returned. If you happen to know this number in advance, you can supply this figure to the NSProgress instance for incremental updates.
An added benefit of using NSProgress is being able to give the user the ability to cancel a long-running fetch request.
Example
Continuing our unread items example from earlier, lets see how an asynchronous fetch with progress updates would look. Assuming we have pre-computed the number of unread items, our fetch request would look like this:
NSFetchRequest *fetchRequest = [[NSFetchRequest alloc] initWithEntityName:@"MyObject"];
fetchRequest.predicate = [NSPredicate predicateWithFormat:@"read == %@", @(NO)];
NSPersistentStoreAsynchronousFetchResultCompletionBlock resultBlock = ^(NSAsynchronousFetchResult *result) {
   NSLog(@"Number of Unread Items: %ld", (long)result.finalResult.count);
   [result.progress removeObserver:self
                        forKeyPath:@"completedUnitCount"
                           context:ProgressObserverContext];
   [result.progress removeObserver:self
                        forKeyPath:@"totalUnitCount"
                           context:ProgressObserverContext];
};
NSAsynchronousFetchRequest *asyncFetch = [[NSAsynchronousFetchRequest alloc]
                                          initWithFetchRequest:fetchRequest
                                          completionBlock:resultBlock];
[context performBlock:^{
    //Assumption here is that we know the total in advance and supply it to the NSProgress instance
    NSProgress *progress = [NSProgress progressWithTotalUnitCount:preComputedCount];
    [progress becomeCurrentWithPendingUnitCount:1];
    NSAsynchronousFetchResult *result = (NSAsynchronousFetchResult *)[context
                                                               executeRequest:asyncFetch
                                                                        error:nil];
    [result.progress addObserver:self
                 forKeyPath:@"completedUnitCount"
                    options:NSKeyValueObservingOptionOld|NSKeyValueObservingOptionNew
                    context:ProgressObserverContext];
    [result.progress addObserver:self
                 forKeyPath:@"totalUnitCount"
                    options:NSKeyValueObservingOptionOld|NSKeyValueObservingOptionNew
                    context:ProgressObserverContext];
    [progress resignCurrent];
}];
Here we’ve started with our standard fetch request just as before. We then create an NSPersistentStoreAsynchronousFetchResultCompletionBlock that will be executed once the asynchronous fetch completes. This block will log the final count of returned objects to the console, as well as remove ourselves as an observer of the incremental progress updates. We assemble these two pieces together to create our NSAsynchronousFetchRequest.
Now, it is time to begin executing our fetch request. We first call the NSManagedObjectContext method performBlock to ensure our operation is dispatched on the correct queue. Before kicking off the request, we create an NSProgress instance with our pre-computed unread item count as the totalUnitCount. Immediately after we execute the asynchronous request, we are returned an NSAsynchronousFetchResult “future” instance. This object can be used to grab the fetch result’s NSProgress instance for observing incremental updates. Lastly, we make sure to call resignCurrent on our NSProgress instance so that the NSAsynchronousFetchResult’s NSProgress instance can take over.
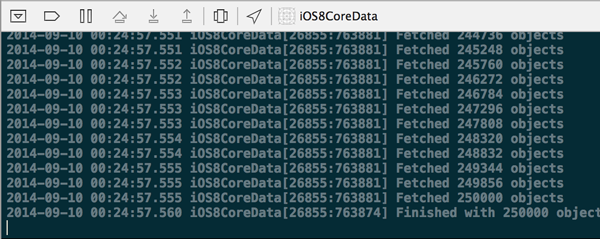
The only thing left to do is to observe the KVO notifications being broadcast by the NSProgress instance for progress updates.
- (void)observeValueForKeyPath:(NSString *)keyPath ofObject:(id)object
        change:(NSDictionary *)change context:(void *)context {
    if (context == ProgressObserverContext) {
        if ([keyPath isEqualToString:@"completedUnitCount"]) {
            NSNumber *newValue = change[@"new"];
            NSLog(@"Fetched %@ objects", newValue);
        } else if ([keyPath isEqualToString:@"totalUnitCount"]) {
            NSNumber *newValue = change[@"new"];
            NSLog(@"Finished with %@ objects fetched", newValue);
        }
    }
}
Continued Improvements
Asynchronous fetching enables a lightweight means to executing a long-running fetch without grinding the system to a halt, or getting tangled in a complex multi-threaded universe.
While I don’t think NSAsynchronousFetchRequest or NSBatchUpdateRequest, on their own, will be winning over Core Data detractors, it does show Apple’s continued improvement of the framework. Each feature attacks a specific pain point that Core Data enthusiasts have encountered in the past.
Be sure to check out the accompanying sample project detailing both of these features over on GitHub. And if you want to learn iOS 8 with us, check out our one-day iOS 8 bootcamps in cities across the U.S.
The post New in Core Data and iOS 8: Asynchronous Fetching appeared first on Big Nerd Ranch.
]]>In this tutorial, I talk about about Core Data and what’s new in iOS 8. I focus on two new APIs, both centered around performance: batch updating and asynchronous fetching.
The post Core Data Demo: Batch Updating and Asynchronous Fetching appeared first on Big Nerd Ranch.
]]>In this tutorial, I talk about about Core Data and what’s new in iOS 8. I focus on two new APIs, both centered around performance: batch updating and asynchronous fetching.
Follow along with our iOS 8 demo repo, and check out the previous post I wrote for more details.
Can’t get enough info about iOS 8? Join us for our one-day iOS 8 bootcamps in cities across the U.S.
The post Core Data Demo: Batch Updating and Asynchronous Fetching appeared first on Big Nerd Ranch.
]]>Can’t get enough info about iOS 8? Join us for our one-day iOS 8 bootcamps in cities across the U.S.
The post New in Core Data and iOS 8: Batch Updating appeared first on Big Nerd Ranch.
]]>Can’t get enough info about iOS 8? Join us for our one-day iOS 8 bootcamps in cities across the U.S.
Core Data has had a polarizing effect within the development community. You’d be hard pressed to meet a Cocoa developer who is completely ambivalent to the topic. I won’t mask my opinion: I am a true fan.
I believe that Apple has made significant improvements to the framework each year. This year was no exception, as two highly specialized APIs were introduced. NSBatchUpdateRequest and NSAsynchronousFetchRequest, while somewhat esoteric, were introduced to combat specific issues developers encounter with the framework. And each will come to be invaluable APIs to the serious Core Data developer.
In this first installment, we will be tackling the NSBatchUpdateRequest.
Batch Updating
An often-cited shortcoming of Core Data is its inability to efficiently update a large number of objects with a new value for one or more of its properties. Traditional RDBMS implementations can effortlessly update a single column with a new value for thousands upon thousands of rows. With Core Data being an object graph, updating a property is a three-step process that involved pulling the object into memory, modifying the property and finally writing the change back to the store. Iterating these steps across thousands of objects leads to long wait times for the user, as well as increased memory and CPU load on the device.
The Request
The NSBatchUpdateRequest allows you to go directly to the store and modify your records in a manner similar to traditional databases, rather than with an object graph.
Creating a batch request starts off the same way it does with a standard fetch request. An entity name must be supplied to indicate the type of objects being fetched. As always, an NSPredicate can be supplied to return a limited subset of your entities.
In most cases, you will be dealing with a single NSPersistentStore; however, you do have the option of supplying an NSArray to the affectedStores property if needed.
The additional required property, unique to NSBatchUpdateRequest, is propertiesToUpdate. Here an NSDictionary containing key/value pairs will be used to set the properties with their new values. The keys are NSStrings representing the property names, and the values can be any NSExpression.
Here is an example of various expressions for values:
batchRequest.propertiesToUpdate = @{@"lastVisitDate": [NSDate date],
                                    @"activeThisMonth": @(YES),
                                    @"lastVisitLocation": @"BNR IGHQ"};
Result Types
You have a few options when it comes to the format of a confirmation you receive after applying the batch update.
NSStatusOnlyResultTypeincludes only a success or failure statusNSUpdatedObjectsCountResultTypeis the count of modified objectsNSUpdatedObjectIDsResultTypeis an array ofNSManagedObjectIDs. In some situations, this result type is necessary, as you will see below.
Example
Say we want to update all unread instances of MyObject to be marked as read:
NSBatchUpdateRequest *req = [[NSBatchUpdateRequest alloc] initWithEntityName:@"MyObject"];
req.predicate = [NSPredicate predicateWithFormat:@"read == %@", @(NO)];
req.propertiesToUpdate = @{
	@"read" : @(YES)
};
req.resultType = NSUpdatedObjectsCountResultType;
NSBatchUpdateResult *res = (NSBatchUpdateResult *)[context executeRequest:req error:nil];
NSLog(@"%@ objects updated", res.result);
Our batch request is initialized with the entity name MyObject and then filtered for only unread items. We then create our propertiesToUpdate dictionary with a single key/value pair for the property read and constant NSExpression value YES. In this case, we are interested only in a count of updated values, so we use the resultType NSUpdatedObjectsCountResultType.
Speed Comparison
Using Mark Dalrymple’s trusty BNRTimeBlock, we can see that a batch update on 250,000 objects takes just over one second, while an update that involves iterating over each item takes around 16 seconds for the same number of objects.
(Note: All tests were run using XCode 6 Beta 7, along with the iPhone 5s Simulator on a late-2013 MacBook Pro.)

Memory Comparison
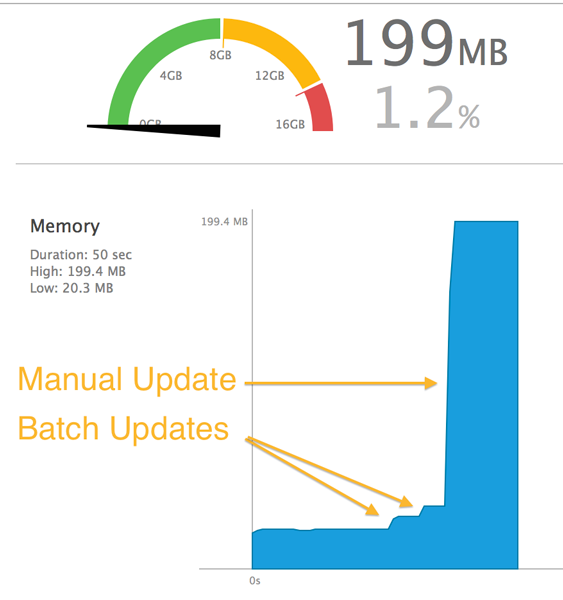
In additon to speed considerations, memory usage on the batch update side is significantly lower. By monitoring the heap size in Xcode, we can observe a batch update increasing the memory footprint by only a few MBs during the fetch. Contrast that with an update that iterated over each object, which resulted in a sharp increase of memory load close to 200 MBs!
What’s the catch?
With results that are far more efficient than iterating each object, you might guess there are some tradeoffs. As mentioned earlier, this type of operation is something database systems handle easily, while object graphs stumble. As such, it’s important to understand that when performing a batch operation, you’re essentially telling Core Data “Step aside, I got this”. Apple even equates the batch operation to “running with scissors”.
Here are a few things to keep in mind:
Property Validation: Property validation will not be performed on your new values. Because of this, you can inadvertently introduce bad data into your store. Furthermore, your bad data could go unnoticed until the next time your user makes a modification preventing them from being able to save. In order to mitigate this risk, always sanitize your data prior to executing the update.
Referential Integrity: Referential integrity will not be maintained between related objects. As an example, setting an employee’s department will not in turn update the array of employees on the department object. In light of this, its typically best to avoid using a batch update request on properties that reference other NSManagedObjects.
Reflecting Changes in UI: NSManagedObjects already in an NSManagedObjectContext will not be automatically refreshed. This is where using the NSUpdatedObjectIDsResultType is required if you want to reflect your updates in the UI. With the modified NSManagedObjectIDs in hand, you can refresh the objects as needed:
[objectIDs enumerateObjectsUsingBlock:^(NSManagedObjectID *objID, NSUInteger idx, BOOL *stop) {
    NSManagedObject *obj = [context objectWithID:objID];
    if (![obj isFault]) {
        [context refreshObject:obj mergeChanges:YES];
    }
}];
Merge Conflicts: You must ensure that your NSManagedObjectContext has a merge policy, as you can potentially introduce a merge conflict.
What’s Next
Batch updating provides a seamless way of bypassing Core Data’s convenient, albeit expensive, features. When you need to update a large set of data, this new API allows you to accomplish the task more quickly and efficiently. I know this will become an invaluable tool in my Core Data repertoire!
Stay tuned for my next installment detailing the NSAsynchronousFetchRequest.
*Editor’s note: Robert will discuss Core Data in our live iOS 8 demo Wednesday, Sept. 17, at 2 p.m. EDT. He will be joined by Nerds discussing Interactive Playgrounds and Functional Programming, Asynchronous Testing, Extensions, Cloud Kit, HomeKit, HealthKit and Handoff, along with Adaptive UI and what iOS 8 means for design.
The post New in Core Data and iOS 8: Batch Updating appeared first on Big Nerd Ranch.
]]>