The post Why Netlify and Fauna Are My Foundation for Composable Solutions appeared first on Big Nerd Ranch.
]]>Serverless infrastructures provide scaling on-demand to grow with business needs and the distributed systems lower network latency for users. These elements work together to create superior end-user experiences since the business can focus on product, has automated scaling, and is delivering content from the user’s region. Clients are requesting serverless architectures to build for scalability and longevity while reduced costs. Composable solutions increase development velocity thus increasing business outcomes while delighting developers and end-users.
Architectural Considerations
When making architectural decisions, engineers need to consider performance impacts as well. Given the on-demand nature of serverless architectures, engineers need to consider cold start times as resources are being provisioned, long running processes that exceed serverless runtime limits, network overhead of requests to external resources, and the possibility of vendor lock-in. Depending on an application’s needs and usage, a dedicated server may be less expensive or more performant for some or all of the infrastructure. When making these decisions consider who uses the application, where they are located, and how these trade-offs impact the business needs.
Common Application Needs
Building and deploying a web application typically requires a host to serve the application code, authentication to allow users into the system, and a database to store and retrieve data from. In the serverless realm, static files from the application build step are often deployed to a CDN to provide high availability to users; application code that needs to run in a server environment can be deployed to serverless functions that run on-demand. Authenticating a user can be solved by integrating an Identity Provider (IdP) to manage users, provide login flows, and return an access token for a user’s session. Serverless databases replace the need for hosting and scaling a data storage solution.
From this base, additional composable solutions can be integrated to add functionality. This may include serverless solutions for long running background jobs or scheduled cron jobs, running tests for continuous integration, optimizing images or video, managing content, implementing a search engine, payment processing, geocoding, web sockets, or other services. What these elements have in common is the fact that they are all APIs that can be composed and work together to provide rich user experiences while easing development overhead and getting a product to market sooner.
How to build a fully-composed web application
Building a fully-composed web application will end up looking like a mesh of API calls to external systems, which combine results to implement your business needs. The next few sections will dive into specific technologies that can be used to implement different parts of your system. While there are many options to choose from, in this blog post, I’ll be focusing on the technologies I use on a regular basis.
Deploying static assets to a Content Delivery Network (CDN)
If you are building a purely static website, then your build step will produce a set of static files that can be deployed to a Content Delivery Network (CDN). Unlike a centralized server, a CDN’s content is distributed across the world. This means content is delivered to a user from the closest node on the network, thus increasing the speed of delivery to the user. If you are building a Single Page Application (SPA), then you still have static assets that can be deployed to a CDN, allowing your application to be delivered to users by the closest network node as well. One of the solutions that Netlify provides is deploying your static assets to a CDN for you automatically. After Netlify runs your build command, the assets in your build directory are deployed to Netlify’s CDN. For a more in-depth introduction to Netlify, view Getting Started with Netlify: Creating your first Netlify Site.
Building an API with Serverless Functions
If you are building a SPA or an API without a front-end, then you’ll need somewhere for this code to run. On server-based applications, your API would run on your server(s) and would be limited to the resources of that hardware. You are responsible for managing and scaling the servers to meet the demand. Since the server is always on, this means there are also times when the resources are under utilized. Serverless Functions provide an on-demand solution for running your code and implementing an API that doesn’t require you to manage or scale servers. Netlify Functions seamlessly deploys your API endpoints to AWS Lambdas during the build step, allowing your API to scale to user demand.
Providing Authentication with an Identity Provider (IdP)
If the site you are building requires distinct users, then you’ll need a way of managing and authenticating those users. An Identity Provider (IdP) provides authentication as a service. Auth0 is an Identity Provider that provides login flows for your application and returns an access token for the authenticated user. The access token can then be included in the Authorization header when making requests to your Serverless Functions and verified by your API.
Providing Dynamic Data with a Serverless Database
A central requirement of most applications is persistence of user data to a database. Databases tend to be a bottleneck, and are challenging to scale if you are managing them yourself with a centralized database. If multiple users are trying to write to the same database record, you may encounter deadlock while each request is waiting on the other to give up the lock preventing your users from using the system. As your database grows larger, you will need to shard or otherwise partition your data, which will make keeping the database consistent more challenging as well as querying the data across database instances.
One of the challenges with Serverless Databases is the trade off between consistency and availability. Many Serverless Databases suffer from Eventual Consistency, which means that users may not always get the current version of the data. Eventual Consistency errors can lead to more complexity on the application level and increased user confusion and frustration. Luckily, there is one Serverless Database that remains ACID-compliant—that is, to have the presence of atomicity, consistency, isolation, and durability—and provides Strong Consistency, and that’s Fauna.
Fauna is a unique Serverless Database allowing you to implement relational data in a schema-less document datastore while remaining ACID compliant, providing strong consistency, temporal queries, User-Defined Functions, User-Defined Roles, and an Access Provider integration with Identity Providers like Auth0. By integrating with Fauna’s Access Provider you can use the access token from Auth0 to query Fauna as that user. Learn more about Fauna’s unique offerings by reading this Intro to FaunaDB and FQL.
What about handling cron jobs and long-running processes?
Serverless Functions aren’t always enough for your needs. Sometimes you need to run code that takes longer than the 10 seconds typically allotted to Serverless Functions, or you need to run a task on a schedule like a cron job. GitHub Actions is a great option if you are already using GitHub and need this functionality. I’m currently using GitHub Actions to implement cron jobs and to process long running webhooks in the background. Netlify offers Background Functions as a beta feature and recently added Scheduled Functions as an experimental feature. I haven’t used these newer Netlify options, but am excited to try them and look forward to them being production ready.
Continuous Integration
The last piece that most projects need is a Continuous Integration (CI) solution. GitHub Actions fits in nicely here as well, assuming you are already using GitHub for your project. Since GitHub Actions is a GitHub product, it’s easy to trigger your CI workflow from git events like a pull_request or a push. Configuring a GitHub Action to run on a pull_request will also automatically include the CI workflow in the Checks section of your pull request.
What else do you need?
From here, your application needs will probably be more variable based on the project. I’ll highlight additional services that I’ve used or have had my eye on to address additional solutions you made need, but remember there are often many options to choose from and you should choose the solution that meets your needs.
- Cloudinary provides APIs for optimizing your images and videos for delivery to different devices.
- Contentful is a rich Content Management System that allows you to define models and has built-in support for internationalization.
- Algolia Search makes it easy to create a custom search engine for your content.
- Stripe provides APIs for integrating payment processing solutions.
- AWS WebSocket APIs in Amazon API Gateway provides web sockets as a service.
- HERE provides geocoding and other map related APIs.
- Plaid provides access to financial data by connecting bank accounts.
Keeping it DRY with Shared Modules
You may find yourself duplicating code in Netlify Functions, GitHub Actions, your front-end and/or other parts of your composed stack. To mitigate this I suggest creating a shared module that can be used by the various parts of the system instead. It might not be obvious what is needed in a shared module when you are starting off, but if you begin to repeat yourself, make a note of the opportunity to refactor that functionality to a shared module.
One way to create such a shared module is in a separate repository. This is particularly useful if you need to share this module across multiple applications. However, having the shared module in another repository can hinder your development workflow, especially in the early stages. I like to get started with a local shared module with a longer vision of moving it to a separate repository once it’s mature enough to do so. In the early stages, it’s convenient to have a local module that doesn’t require additional management. As such, I like to leverage package.json to install a local module with something like "core": "file:./core" in dependencies. I like to keep business logic and other functional utilities in a shared module like this. Just keep in mind that each project’s needs are unique and you’ll need to decide what makes sense for your project. Explore the starter repository linked below to see how this can be used.
Front-end considerations
Likewise, on the front-end I’ve long advocated for using Web Components since they are composable and now have interoperability support in many front-end frameworks. From a composability perspective, I think building components as web components provides for the most flexibility. For additional context, read Building a Design System and Consuming it in Multiple Frameworks using Stencil.js.
Get Started
To get you started with Netlify, Fauna, GitHub Actions, Stencil, and a local shared module, I’ve created a starter repository as an example to build from. The Starter Repository is the code base that will be deployed to Netlify using the Deploy to Netlify button. The Demo Site is an example of the Netlify Site that will be deployed.
Follow the instructions in the Starter Repository Read Me for the additional steps needed to create a Fauna database with demo data, generate a Fauna Server Key, and configure an Environment Variable in Netlify with your Fauna Server Key.
If you already have Fauna and Netlify accounts, a Fauna database with sample data, and a Fauna Server Key, then you can click the Deploy to Netlify button below to get started.
The post Why Netlify and Fauna Are My Foundation for Composable Solutions appeared first on Big Nerd Ranch.
]]>The post Building a Design System and Consuming it in Multiple Frameworks using Stencil.js appeared first on Big Nerd Ranch.
]]>This blog post will be exploring these questions by building a design system with Stencil.js. The design system will support white-labeling via CSS Variables. Then the design system will be used without a framework, and with the React, Vue, Svelte, and Stencil frameworks.
Stencil is a compiler for web components that can build custom elements for use across multiple frameworks. The compatibility of custom elements with various frameworks is tracked by Custom Elements Everywhere.
The code for this blog can be found on GitHub at https://github.com/BNR-Developer-Sandbox/BNR-blog-stencil-design-system.
Building the Components
Each component encapsulates its own CSS and functionality. Developers wanting to publish a web component library can follow the Getting started guide for Stencil. The Stencil API provides decorators and lifecycle hooks to reduce boilerplate code and define implementation patterns.
Stencil Decorators
The Stencil API provides a number of decorators that are removed at compile time.
Each Stencil Component uses the @Component() decorator to declare a new web component defining the tag, styleUrl, and if the Shadow DOM should be used or not.
@Component({
  tag: "ds-form",
  styleUrl: "ds-form.css",
  shadow: true,
})
Lifecycle Hooks
The Stencil API also provides various lifecycle hooks. The only lifecycle hook used in this codebase is the render() method which uses JSX to return a tree of components to render at runtime.
Application Shell
The ds-shell component provides a header, main, and footer section available via slots. The header and footer slots are named slots, while the main content area uses the default unnamed slot. This component provides the general layout for an application.
import { Component, Host, h } from "@stencil/core";

@Component({
  tag: "ds-shell",
  styleUrl: "ds-shell.css",
  shadow: true,
})
export class DsShell {
  render() {
    return (
      <Host>
        <header>
          <slot name="header"></slot>
        </header>
        <main>
          <slot></slot>
        </main>
        <footer>
          <slot name="footer"></slot>
        </footer>
      </Host>
    );
  }
}
Hero
The ds-hero component provides a default slot container and encapsulates the CSS for the component.
import { Component, Host, h } from "@stencil/core";

@Component({
  tag: "ds-hero",
  styleUrl: "ds-hero.css",
  shadow: true,
})
export class DsHero {
  render() {
    return (
      <Host>
        <slot></slot>
      </Host>
    );
  }
}
Form
The ds-form component provides generic form handling by listening for input, change, and click events that bubble up to the form element. The component uses the @Element() decorator to declare a reference to the host element in order to dispatch the formdata event from the host element when the form is submitted. The component also uses the @State() decorator to declare the internal state of the form data.
import { Component, Element, Host, State, h } from "@stencil/core";

@Component({
  tag: "ds-form",
  styleUrl: "ds-form.css",
  shadow: true,
})
export class DsForm {
  @Element() el: HTMLElement;
  @State() data: any = {};
  onInput(event) {
    const { name, value } = event.target;
    this.data[name] = value;
  }
  onChange(event) {
    const { name, value } = event.target;
    this.data[name] = value;
  }
  onClick(event) {
    if (event?.target?.type === "submit") {
      const formData = new FormData();
      Object.entries(this.data).forEach(([key, value]) => {
        formData.append(key, String(value));
      });
      const formDataEvent = new FormDataEvent("formdata", { formData });
      this.el.dispatchEvent(formDataEvent);
    }
  }
  render() {
    return (
      <Host>
        <form
          // form event
          onInput={(event) => this.onInput(event)}
          onChange={(event) => this.onChange(event)}
          onClick={(event) => this.onClick(event)}
        >
          <slot></slot>
        </form>
      </Host>
    );
  }
}
White-labeling the components
In order to implement white-labeling, CSS Variables are used in the components which can be set by the design system consumer. The example repository only sets three variables to illustrate the idea; a complete design system would likely include more variables including sizes, fonts, etc.
Each application defines CSS Variables to implement a different brand.
:root {
  /* CSS Variables for theming white-labeled components */
  --primary-color: red;
  --secondary-color: gold;
  --tertiary-color: green;
}
Each application also defines a simple CSS Reset.
body {
  margin: 0;
  background-color: var(--tertiary-color);
}
Consuming the components
While consuming the custom elements the same HTML structure was used in each framework. Each example application implemented in each framework composes the ds-shell component for application layout, with a ds-hero to provide a call-to-action content area, and a unique form and form handler to process the form.
<ds-shell>
  <h1 slot="header">App Name</h1>
  <ds-hero>
    <ds-form>
      <label>
        Your Name:
        <br />
        <input type="text" name="name" />
      </label>
      <br />
      <label>
        Your Expertise:
        <br />
        <input type="text" name="expertise" />
      </label>
      <br />
      <input type="submit" value="Say Hello" />
    </ds-form>
  </ds-hero>
  <span slot="footer">
    <span>1</span>
    <span>2</span>
    <span>3</span>
  </span>
</ds-shell>
Event binding
The main difference between frameworks was binding the formdata event. Each framework has a slightly different syntax for declaring event handlers. The following examples demonstrate the event binding syntax for each framework.
Without a Framework
The Design System includes an implementation of the application without a framework in index.html. CSS Variables are defined in a <style> tag in the <head> tag. The event listener is added in a <script> tag at the end of the <body> tag.
<!DOCTYPE html>
<html dir="ltr" lang="en">
  <head>
    <meta charset="utf-8" />
    <meta
      name="viewport"
      content="width=device-width, initial-scale=1.0, minimum-scale=1.0, maximum-scale=5.0"
    />
    <title>Design System</title>

    <script type="module" src="/build/design-system.esm.js"></script>
    <script nomodule src="/build/design-system.js"></script>
    <style type="text/css">
      :root {
        /* CSS Variables for theming white-labeled components */
        --primary-color: red;
        --secondary-color: gold;
        --tertiary-color: green;
      }

      body {
        margin: 0;
        background-color: var(--tertiary-color);
      }
    </style>
  </head>
  <body>
    <ds-shell>
      <h1 slot="header">App Name</h1>
      <ds-hero>
        <ds-form>
          <label>
            Your Name:
            <br />
            <input type="text" name="name" />
          </label>
          <br />
          <label>
            Your Expertise:
            <br />
            <input type="text" name="expertise" />
          </label>
          <br />
          <input type="submit" value="Say Hello" />
        </ds-form>
      </ds-hero>
      <span slot="footer">
        <span>1</span>
        <span>2</span>
        <span>3</span>
      </span>
    </ds-shell>

    <script>
      function handleFormData(event) {
        event.stopPropagation();
        const { formData } = event;
        const data = Object.fromEntries(formData);
        const { name, expertise } = data;
        alert(`Hello ${name}, I hear you are good at ${expertise}.`);
      }

      const form = document.getElementsByTagName("ds-form")[0];
      form.addEventListener("formdata", (event) => handleFormData(event));
    </script>
  </body>
</html>
In order to add the event listener without a framework the native addEventListener method is used.
form.addEventListener("formdata", (event) => handleFormData(event));
React
The React application is implemented in App.js with CSS Variables in index.css.
import "design-system/ds-shell";
import "design-system/ds-hero";
import "design-system/ds-form";

function handleFormData(event) {
  event.stopPropagation();
  const { formData } = event;
  const data = Object.fromEntries(formData);
  const { reaction } = data;
  alert(`I am surprised that you reacted ${reaction}.`);
}

function App() {
  return (
    <ds-shell>
      <h1 slot="header">React App</h1>
      <ds-hero>
        <ds-form onformdata={(event) => handleFormData(event)}>
          <label>
            How did you react?:
            <br />
            <input type="text" name="reaction" />
          </label>
          <br />
          <input type="submit" value="What is your reaction?" />
        </ds-form>
      </ds-hero>
      <span slot="footer">
        <span>1</span>
        <span>2</span>
        <span>3</span>
      </span>
    </ds-shell>
  );
}

export default App;
React uses a lowercase onformdata attribute in JSX to bind the formdata event to a handler.
<ds-form onformdata={(event) => handleFormData(event)}>
  <!-- ... -->
</ds-form>
Vue
The Vue application is implemented in App.vue with CSS Variables in base.css.
<script setup>
  import "design-system/ds-shell";
  import "design-system/ds-hero";
  import "design-system/ds-form";

  function handleFormData(event) {
    event.stopPropagation();
    const { formData } = event;
    const data = Object.fromEntries(formData);
    const { view } = data;
    alert(`${view}!?! Wow! What a view!`);
  }
</script>

<template>
  <ds-shell>
    <h1 slot="header">Vue App</h1>
    <ds-hero>
      <ds-form @formdata="handleFormData">
        <label>
          How's the view?:
          <br />
          <input type="text" name="view" />
        </label>
        <br />
        <input type="submit" value="Looking good?" />
      </ds-form>
    </ds-hero>
    <span slot="footer">
      <span>1</span>
      <span>2</span>
      <span>3</span>
    </span>
  </ds-shell>
</template>

<style>
  @import "@/assets/base.css";
</style>
Vue uses a lowercase @formdata attribute set to the function name to bind the formdata event to a handler.
<ds-form onformdata={(event) => handleFormData(event)}>
  <!-- ... -->
</ds-form>
Svelte
The Svelte application defines application variables and the form handler in main.js.
import App from "./App.svelte";

const app = new App({
  target: document.body,
  props: {
    appName: "Svelte App",
    fieldLabel: "Your Location",
    fieldName: "location",
    submitLabel: "Where you at?",
    handleFormData: (event) => {
      event.stopPropagation();
      const { formData } = event;
      const data = Object.fromEntries(formData);
      const { location } = data;
      alert(`Where's ${location}?`);
    },
  },
});

export default app;
App.svelte uses the variables from main.js to render HTML and bind events.
<script>
  export let appName, fieldLabel, fieldName, submitLabel, handleFormData;
  import "design-system/ds-shell";
  import "design-system/ds-hero";
  import "design-system/ds-form";
</script>

<ds-shell>
  <h1 slot="header">{appName}</h1>
  <ds-hero>
    <ds-form on:formdata="{handleFormData}">
      <label>
        {fieldLabel}:
        <br />
        <input type="text" name="{fieldName}" />
      </label>
      <br />
      <input type="submit" value="{submitLabel}" />
    </ds-form>
  </ds-hero>
  <span slot="footer">
    <span>1</span>
    <span>2</span>
    <span>3</span>
  </span>
</ds-shell>
The CSS Variables are defined in global.css.
Svelte uses a lowercase on:formdata attribute to bind the formdata event to a handler.
<ds-form on:formdata="{handleFormData}">
  <!-- ... -->
</ds-form>
Stencil
The Stencil application is implemented in app-root.tsx with CSS Variables in app.css.
import { Component, h } from "@stencil/core";
import "design-system/ds-shell";
import "design-system/ds-hero";
import "design-system/ds-form";

@Component({
  tag: "app-root",
  styleUrl: "app-root.css",
  shadow: true,
})
export class AppRoot {
  handleFormData(event) {
    event.stopPropagation();
    const { formData } = event;
    const data = Object.fromEntries(formData);
    const { expertise } = data;
    alert(`So you are good with ${expertise}...`);
  }
  render() {
    return (
      <ds-shell>
        <h1 slot="header">Stencil App</h1>
        <ds-hero>
          <ds-form onFormData={(event) => this.handleFormData(event)}>
            <label>
              Your Expertise:
              <br />
              <input type="text" name="expertise" />
            </label>
            <br />
            <input type="submit" value="Say Something" />
          </ds-form>
        </ds-hero>
        <span slot="footer">
          <span>1</span>
          <span>2</span>
          <span>3</span>
        </span>
      </ds-shell>
    );
  }
}
Stencil uses a camel case onFormData attribute to bind the formdata event to a handler.
<ds-form onFormData={(event) => this.handleFormData(event)}>
  <!-- -->
</ds-form>
Conclusions
Building web components allows developers to reuse UI elements in multiple frameworks. Starting with a design system, developers are able to develop a basic app shell in React, Vue, Svelte, and Stencil. The compatibility within frameworks is tracked by Custom Elements Everywhere. The application for each framework had different ways to handle events but each project handled imports, html, and CSS similarly. A properly configured Stencil project can be used to publish a component library that is consumed by developers across multiple frameworks.
Event Bindings
The main difference is how events are bound to handlers in each framework.
Without a framework use addEventListener(). In React use onformdata to listen for formdata events. In Vue use the @formdata shorthand or v-on:formdata to listen for events. In Svelte use on:formdata to declare a handler for formdata events. In Stencil use onFormData in order to handle events published by components.
The post Building a Design System and Consuming it in Multiple Frameworks using Stencil.js appeared first on Big Nerd Ranch.
]]>The post Learn the Lifecycle of a Web Component by Building a Custom Element appeared first on Big Nerd Ranch.
]]>Web components are a web standard that was first introduced in 2011 but have not seen much adoption. Adopting web standards creates a future-proof solution because the web is built to be backward compatible. Custom elements are part of the web component ecosystem, and the lifecycle methods of a custom element are key to creating the desired UI experience. The following is an exploration of the available lifecycle methods and how they could be used when creating a custom button component. The button component used in this blog post is part of a larger photo gallery demo. The full code for the photo gallery can be found here. We also have a demo available. Explore the photo gallery code base and demo to learn more about web components.
TL;DR
This is the button that will be built in this post with all available lifecycle methods:
const template = document.createElement("template");
template.innerHTML = `<button id="button">Click ME</button>`;

customElements.define(
  "wc-button",
  class extends HTMLElement {
    constructor() {
      super();
      this.attachShadow({ mode: "open" });
      this.shadowRoot.appendChild(template.content.cloneNode(true));
    }

    connectedCallback() {
      this.addEventListener("click", this.onclick);
    }

    adoptedCallback() {
      console.log(“moved to a new document”);
    }

    disconnectedCallback() {
      this.removeEventListener("click", this.onclick);
    }

    static get observedAttributes() {
      return ["disabled"];
    }

    set disabled(bool) {
      this.setAttribute("disabled", bool.toString());
    }

    get disabled() {
      return this.getAttribute("disabled") === "true";
    }

    attributeChangedCallback(attrName, oldVal, newVal) {
      switch (attrName) {
        case "disabled": {
          this.shadowRoot.getElementById("button").disabled = newVal === "true";
          break;
        }
        default: {
          console.log("unhandled attribute change", attrName, oldVal, newVal);
          break;
        }
      }
    }

    onclick() {
      const button = this.shadowRoot.getElementById("button");
      if (event.composedPath().includes(button)) {
        console.log("button clicked");
      }
    }
  },
);
Defining Custom Elements
In order to register a web component, you must define a Custom Element. To define a custom HTML element, use customElements.define(). This function registers a custom element that extends the HTMLElement interface, a native browser API. customElements.define() takes three parameters: the name of the custom element, the constructor for that element, and an optional options object. As of this writing, the options object only supports a single option called extends which is used to specify the name of a built-in element to extend in order to create a customized built-in element. In this example, the name of the custom element is wc-button and the second parameter is the element class.
customElements.define(
  "wc-button",
  class extends HTMLElement {
    // ...
  }
);
It is important to note that the name of a custom element must include a dash to avoid naming conflicts with any built-in HTML elements. Additionally, custom elements need a closing tag because there are only a few HTML elements that can be self-closing. Custom elements can be imported into HTML files inside a <script type="module"> tag and then used in the same manner as any standard HTML element. Setting the type attribute equal to module is important in order to declare the script as a JavaScript module, and for the component to be imported properly.
<html>
  <head>
    <script type="module">
      import "/button.js";
    </script>
  </head>
  <body>
    <wc-button></wc-button>
  </body>
</html>
constructor()
The constructor is defined within the class to define a custom element. Generically, the constructor is a method used to create and initialize an object instance of that class. In the web component lifecycle, the constructor is the first method of the lifecycle and is called once the web component is initialized. The first method called in the constructor is super, a keyword used to access and call functions on the parent object. super must be called first in order to access this and establish the correct prototype chain. In this case, the parent element being accessed is HTMLElement, a class that provides a standard set of properties, event handlers, methods, and events.
Using the Shadow DOM provides encapsulation of the HTML, CSS, and behavior of the web component keeping it hidden from other elements on the same web page.
const template = document.createElement("template");
template.innerHTML = `<button id="button">Click ME</button>`;

customElements.define(
  "wc-button",
  class extends HTMLElement {
    constructor() {
      super();
      this.attachShadow({ mode: "open" });
      this.shadowRoot.appendChild(template.content.cloneNode(true));
    }
  }
);
Following super, a shadow root is created and attached to the custom element thereby creating an internal shadow DOM structure. When attaching the custom element to the shadow root, the mode must be set to open. When open, the shadow DOM can be accessed using JavaScript. However, when closed, the shadow DOM cannot be accessed from the outside. Once attached, content can be added to the shadow DOM via this.shadowRoot. For example, here the template content is appended to the shadow root using this.shadowRoot.appendChild().
connectedCallback()
The connectedCallback() method will be called once each time the web component is attached to the DOM. Since the shadow root was attached in the constructor(), then connectedCallback() can be used to access attributes, child elements, or attach event listeners. If the component is moved or removed and re-attached to the DOM, then connectedCallback() will be called again.
customElements.define(
  "wc-button",
  class extends HTMLElement {
    // ...
    connectedCallback() {
      this.addEventListener("click", this.onclick);
    }

    onclick() {
      console.log("clicked handled");
    }
  }
);
In the button example, the connectedCallback() lifecycle method is used to add a click event listener to the component.
attributeChangedCallback()
To use the attributeChangedCallback() method, the attributes to be observed must first be defined in a static method called observedAttributes(). This method returns an array of the attribute names.
Once the attribute has been returned from observedAttributes(), the lifecycle method attributeChangedCallback() will be called every time that attribute is updated. This method has three parameters: the attribute name being changed, the old value of that attribute, and the updated value. Attributes are updated when this.setAttribute() is triggered.
customElements.define(
  "wc-button",
  class extends HTMLElement {
    // ...
    static get observedAttributes() {
      return ["disabled"];
    }
    attributeChangedCallback(attrName, oldVal, newVal) {
      if (attrName === "disabled") {
        this.shadowRoot.getElementById("button").disabled = newVal === "true";
      }
    }
    set disabled(bool) {
      this.setAttribute("disabled", bool.toString());
    }
    get disabled() {
      return this.getAttribute("disabled") === "true";
    }
  }
);
<html>
  <head>
    <script type="module" src="./button.js"></script>
  </head>
  <body>
    <script>
      document.querySelector("wc-button").disabled = true;
    </script>
  </body>
</html>
This example watches the custom element’s disabled attribute; when that attribute is changed, the node’s disabled property is also updated.
Attributes are stored as serialized data. getters and setters can be defined on the class to handle serializing and deserializing data on storage and retrieval.
adoptedCallback()
The adoptNode() method is used to move a node from one document to another. This is often used when working with iFrame components. adoptedCallback() is triggered when document.adoptNode() is used to move the web component to a new document.
customElements.define(
  "wc-button",
  class extends HTMLElement {
    // ...
    adoptedCallback() {
      console.log(“moved to a new document”);
    }
  }
);
document.adoptNode(
  document.getElementById("iframe").contentDocument.getElementById("wc-button")
);
disconnectedCallback()
The disconnectedCallback() method will be called when the web component is removed from the DOM.
customElements.define(
  "wc-button",
  class extends HTMLElement {
    // ...
    disconnectedCallback() {
      this.removeEventListener("click", this.onclick);
    }
  }
);
document.body.removeChild(document.getElementById("wc-button"));
In the button example, this lifecycle method is used to clean up and remove the click event listener.
Conclusion
This custom button element can be reused throughout a project. To recap, when building web components, first the custom element must be registered using customElements.define(). Then, once initialized, the constructor() is called to append the node to the shadow DOM. When the element is attached, the connectedCallback() is triggered and is used to attach an event listener. Each time the disabled attribute on the element is updated, the attributeChangedCallback() is triggered. If moved to another document, the adoptedCallback() method will be used. Finally, when removed from the DOM, the disconnectedCallback() method is called to clean up the event listener.
The post Learn the Lifecycle of a Web Component by Building a Custom Element appeared first on Big Nerd Ranch.
]]>The post How I finally closed my Google Chrome browser windows on my Mac appeared first on Big Nerd Ranch.
]]>Features like Google Chrome’s tab groups allow you to organize your tabs within a window. Tab groups can also be expanded or collapsed as you work on different groups of tabs throughout the day.
Continue reading if you’d like to learn how to further organize your workflow with separate browser sessions that you can close and restore using a shell script from the command line.
At Big Nerd Ranch I often find myself working on multiple tasks throughout the week. I found myself with multiple browser windows open, each with multiple tabs open. Each browser window represented some unit of work I was working on. Sometimes a group of windows represented a unit of work. As the number of browser windows grew, it became hard to find the window or group of windows I needed when I needed them.
This challenge led me to explore options on how to start Google Chrome from the command line on my Mac. My goal was to be able to start, save, and restore named browser sessions that were easy to find.
TL;DR
The code for this script is available on GitHub at BNR-Developer-Sandbox/BNR-blog-chrome-management.
Here’s where I landed on the script:
#!/bin/bash

WORKING_ON=$1; # get directory name from first command line argument

# Create working directory and error log if needed
mkdir -p ${WORKING_ON};
touch ${WORKING_ON}/error.log;

echo "Working on... ${WORKING_ON}";
echo "Google Chrome error log at ./${WORKING_ON}/error.log";
echo "Use ^C to close your browser session.";

# Create or Restore a Google Chrome session based on what you are working on
# Redirect Google Chrome output errors to error.log
/Applications/Google\ Chrome.app/Contents/MacOS/Google\ Chrome \
  --user-data-dir="./${WORKING_ON}" --restore-last-session \
  2>> ./${WORKING_ON}/error.log;

GOOGLE_CHROME_EXIT=$?; # capture Google Chrome exit code

echo;

if [ $GOOGLE_CHROME_EXIT -eq 0 ]
then
  echo "Google Chrome Session saved: ${WORKING_ON}";
else
  echo "Google Chrome exited with error code: ${GOOGLE_CHROME_EXIT}.";
  echo "See ./${WORKING_ON}/error.log for error details.";
fi

echo "Run rm -r ./${WORKING_ON} to permanently delete this session."
echo "Re-run ./work-on.sh ${WORKING_ON} to restore this session.";

exit $GOOGLE_CHROME_EXIT;
To install the script, you can clone the repository:
$ git clone git@github.com:BNR-Developer-Sandbox/BNR-blog-chrome-management.git Browsers

Cloning into 'Browsers'...
remote: Enumerating objects: 26, done.
remote: Counting objects: 100% (26/26), done.
remote: Compressing objects: 100% (25/25), done.
Receiving objects: 100% (26/26), 4.24 KiB | 2.12 MiB/s, done.
remote: Total 26 (delta 8), reused 2 (delta 0), pack-reused 0
Resolving deltas: 100% (8/8), done.
Then, change into the Browsers directory where the work-on.sh script is found:
$ cd Browsers
Now you can execute work-on.sh to run the script and use ^C to close the script:
$ ./work-on.sh BNR
Working on... BNR
Google Chrome error log at ./BNR/error.log
Use ^C to close your browser session.
^C
Google Chrome Session saved: BNR
Run rm -r ./BNR to permanently delete this session.
Re-run ./work-on.sh BNR to restore this session.
The Problem…
I had way too many browser windows open. Each with multiple tabs. Each window represented a different project I was working on. Sometimes I’d have multiple windows open for a project.
My current list of projects includes long-running projects like:
- my day-to-day email, calendar, and time tracking = 1 browser window
- my 1-on-1 with my manager and my career goals = 1 browser window
- 1-on-1 meetings with my team – 1 window for each person = 4 browser windows
- resources I use on the hiring team for code challenges and interviews = 1 browser window
That’s 7 browser windows so far that I need throughout the week or come back to periodically as needed.
In addition to those long-running projects, I also have more finite initiatives like:
- 3 blog posts I’m working on including this one = 3 browser windows
- plans for my next Professional Development Nerd Camp = 1 browser window
- 13 different Tech Sales engagements = 13 browser windows
That’s 17 more browser windows to sort through! 😱
I was minimizing browser windows for the projects I wasn’t working on at the moment and my dock began to look cluttered with browser windows.

I have a similar problem on my home computer as I have browser windows open for communication, art, music, and various other projects.
Command-line options for Google Chrome
I knew I could start Google Chrome from the command line and that there were command-line options I could pass to it. I began my research by reading:
I searched through the list of command-line options and experimented until I found that --user-data-dir and --restore-last-session met my needs. --user-data-dir allows you to specify a directory name to save session data. --restore-last-session restores the session saved in the directory specified by --user-data-dir.
I started from the command line and then encapsulated the workflow in a simple shell script. This example is implemented on a Mac. See the resources linked above if you’d like to alter this for another operating system. If you are using a different browser, you’ll need to change the path to your browser and update the command line options to match what your browser expects in the work-on.sh shell script.
Writing the Shell Script
The only variable needed was the project name. I didn’t want to remember the command line options I needed or type out the long command each time. So, I wrote the script above to encapsulate what I learned and provide some useful output.
The script starts by saving the first command-line argument, the name of the project you are working on, in a variable called WORKING_ON.
WORKING_ON=$1; # get directory name from first command line argument
The WORKING_ON variable is used to create the directory for the browser session data and an error.log.
# Create working directory and error log if needed
mkdir -p ${WORKING_ON};
touch ${WORKING_ON}/error.log;
Next, the script starts Google Chrome with the desired command-line options for saving and restoring your session.
# Create or Restore a Google Chrome session based on what you are working on
# Redirect Google Chrome output errors to error.log
/Applications/Google\ Chrome.app/Contents/MacOS/Google\ Chrome \
  --user-data-dir="./${WORKING_ON}" --restore-last-session \
  2>> ./${WORKING_ON}/error.log;
The script also redirects error output from Google Chrome to error.log in your ${WORKING_ON} directory.
This was done to remove visual noise from recurring error messages that were being printed out to the terminal. If you examine error.log you might find messages about checking Bluetooth availability and default browser status.
When Google Chrome exits successfully, the script will print out that your session was saved. If Google Chrome exits with an error, the error code and log path will be printed out to the terminal.
GOOGLE_CHROME_EXIT=$?; # capture Google Chrome exit code

echo;

if [ $GOOGLE_CHROME_EXIT -eq 0 ]
then
  echo "Google Chrome Session saved: ${WORKING_ON}";
else
  echo "Google Chrome exited with error code: ${GOOGLE_CHROME_EXIT}.";
  echo "See ./${WORKING_ON}/error.log for error details.";
fi
Next, the script will print out some additional tips to remove your session data or restore your session.
echo "Run rm -r ./${WORKING_ON} to permanently delete this session."
echo "Re-run ./work-on.sh ${WORKING_ON} to restore this session.";
Finally, the script will exit with the exit code returned by Google Chrome.
exit $GOOGLE_CHROME_EXIT;
Installation
In your terminal, clone the BNR-Developer-Sandbox/BNR-blog-chrome-management git repository and specify the directory name where you’d like to save your browser sessions. In this example, you’ll clone the repository to a directory called Browsers.
git clone git@github.com:BNR-Developer-Sandbox/BNR-blog-chrome-management.git Browsers
Next, change into the Browsers directory.
cd Browsers/
From here you will execute the work-on-sh script.
Working on… BNR
Run ./work-on.sh BNR to create a new browser session in a directory called BNR.
The command will print out some information about what you are working on and how to close your browser session from the terminal.
 $ ./work-on.sh BNR
Working on... BNR
Google Chrome error log at ./BNR/error.log
Use ^C to close your browser session.
Google Chrome will start a new instance and you’ll notice the icon bouncing in your dock.
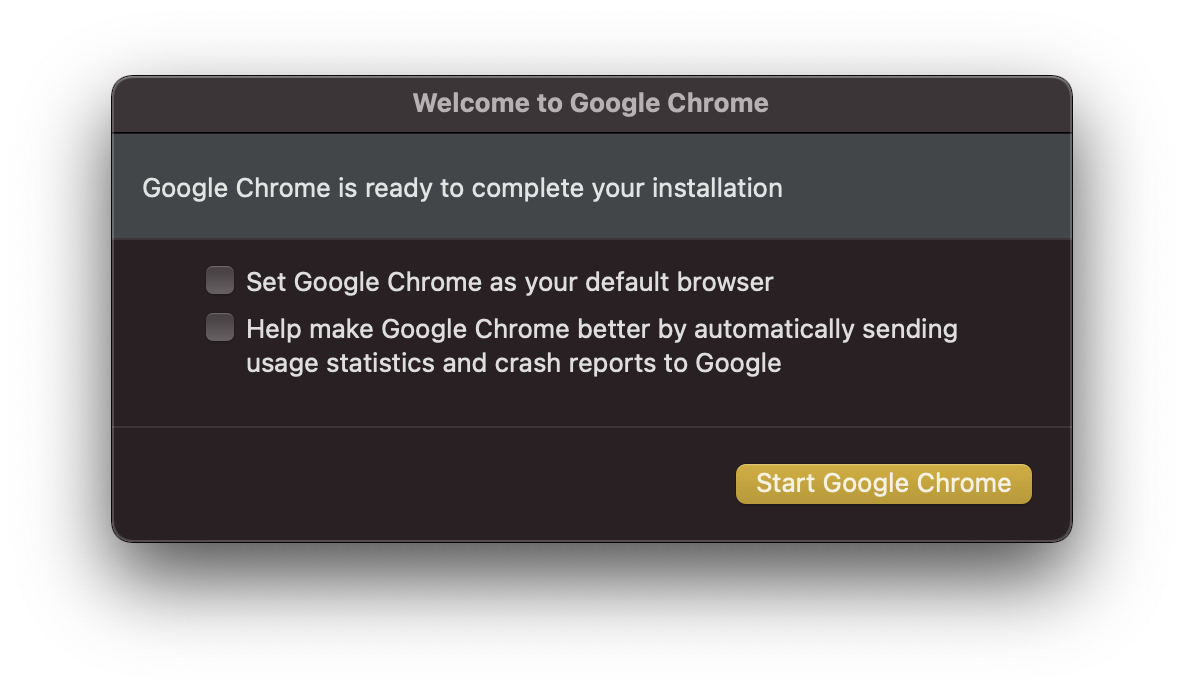
![]()
Click on the new Google Chrome icon and you’ll see a welcome prompt. Choose your default browser and usage statistic settings and click the “Start Google Chrome” button.
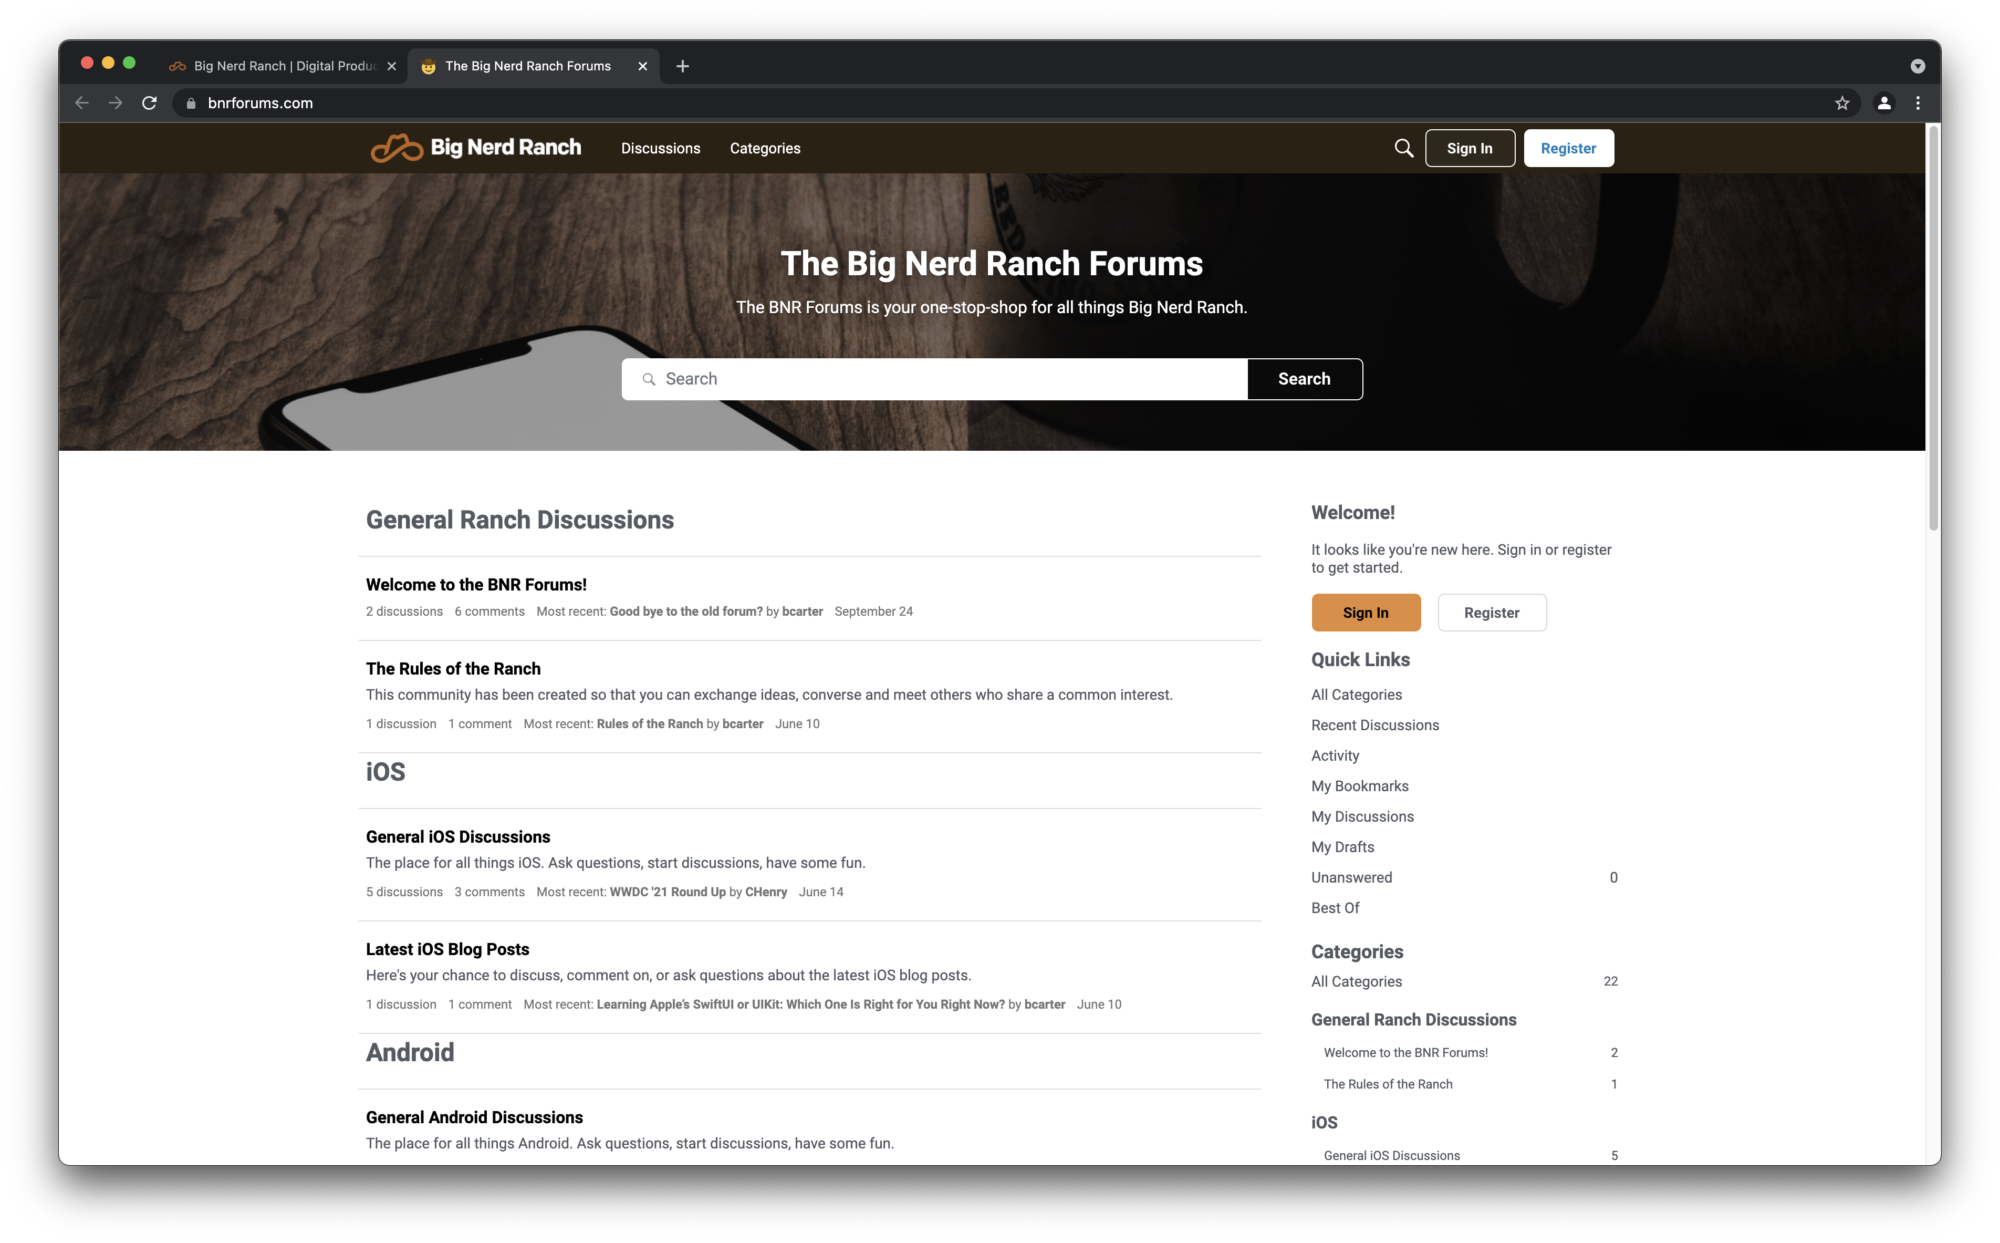
You’ll now have a new browser window open at chrome://welcome.
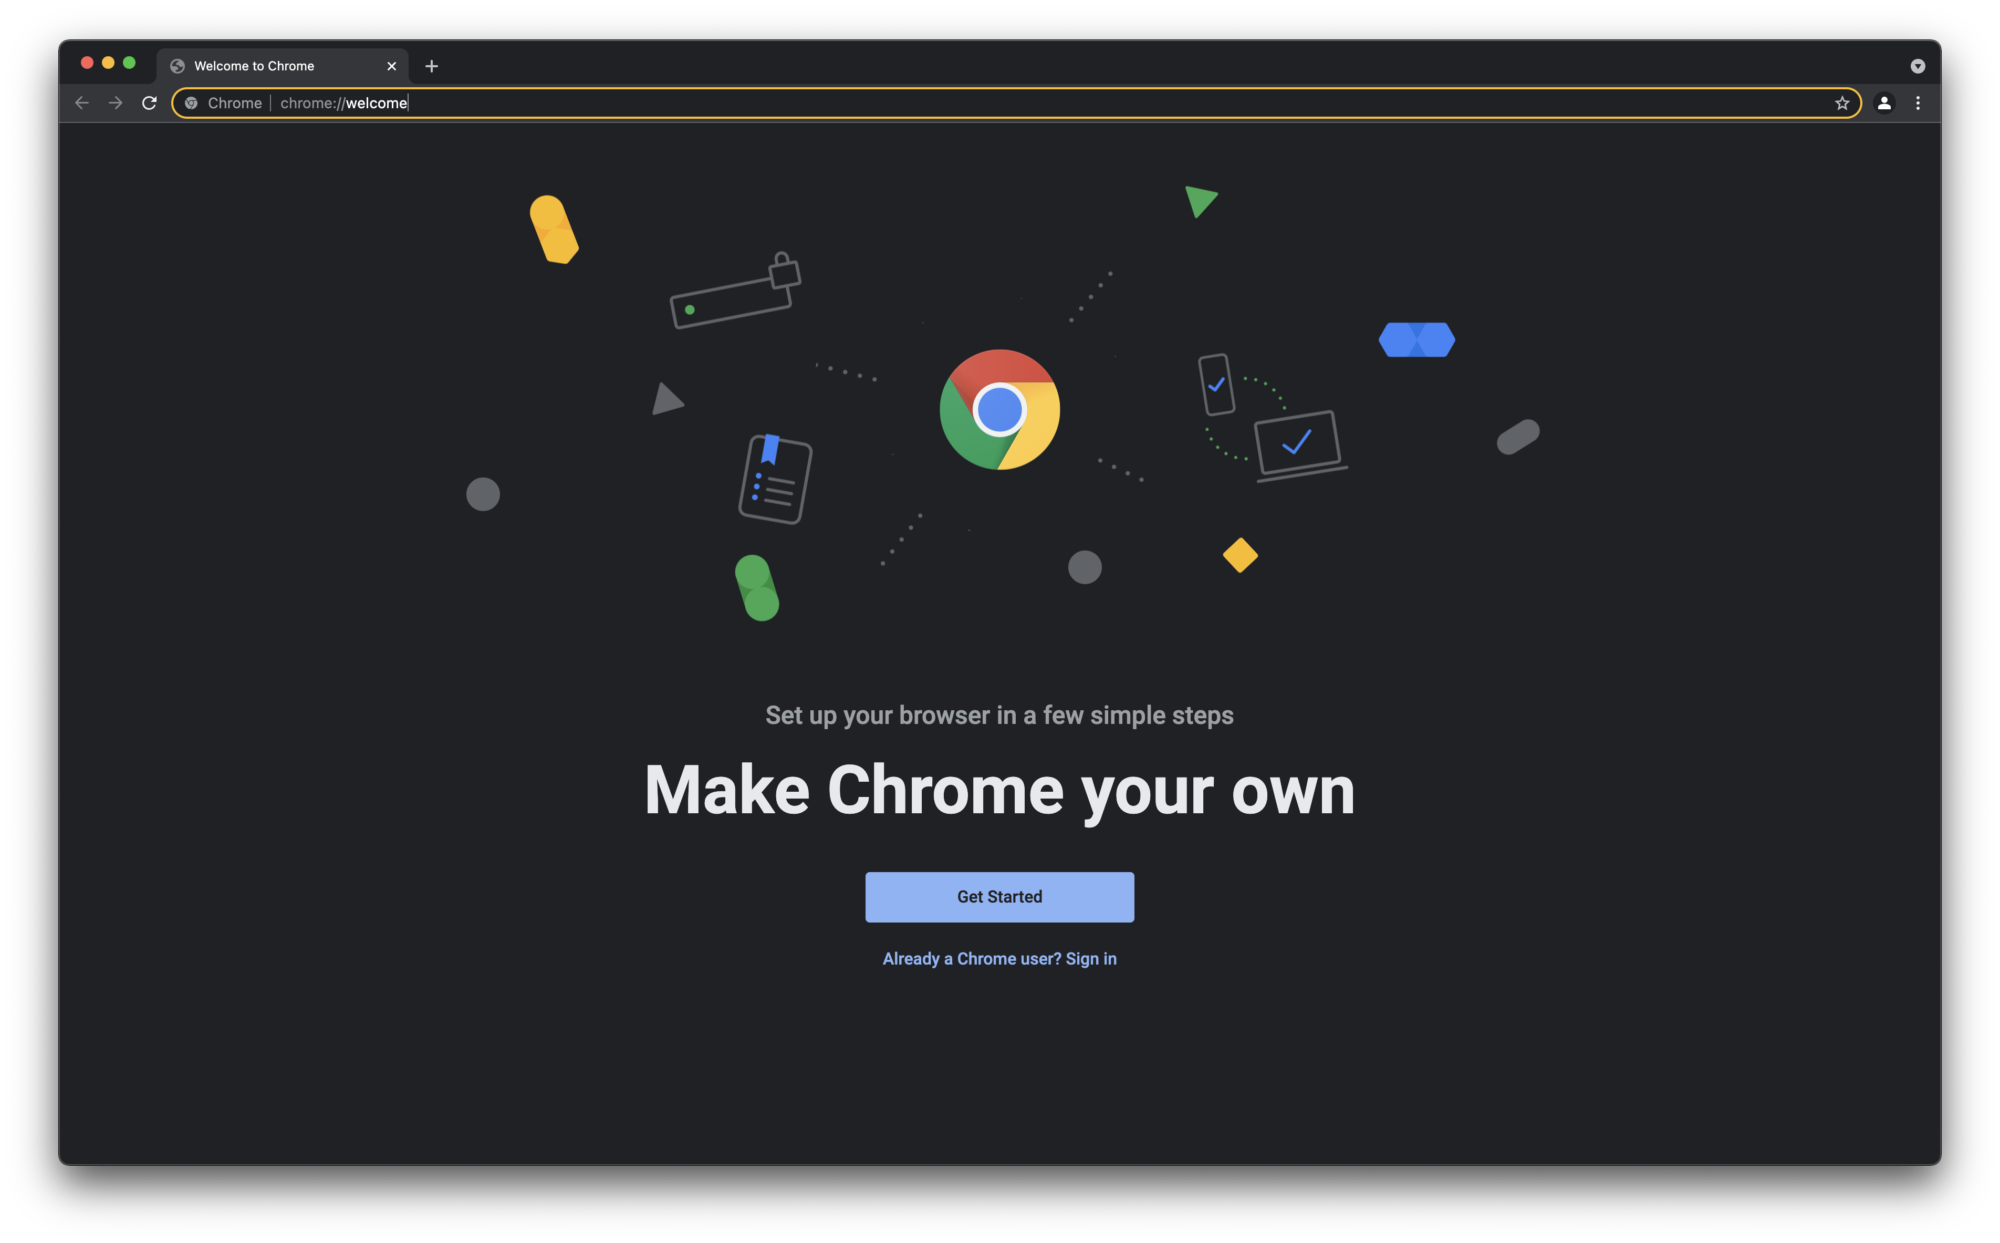
Since we are working on BNR at the moment, open a tab to our homepage and forums.
Close and restore your browser session
When you are done with your browser session you can quit Google Chrome from the menu Chrome > Quit Google Chrome or using the ⌘Q keyboard shortcut. You can also quit the broswer session with ^C from your terminal which is the approach I use.
^C
Google Chrome Session saved: BNR
Run rm -r ./BNR to permanently delete this session.
Re-run ./work-on.sh BNR to restore this session.
When you are ready to work on your BNR project again, use ./work-on.sh BNR to restore your browser session.
Google Chrome will pick up where you left off. If you used multiple browser windows in your session, they will all be restore. Your active tabs and scroll positions will also be restored.
Tab completion makes it easy to find and restore previous sessions
Since the only argument to the work-on.sh script is a directory name, you get tab completion out of the box. I suggest using meaningful prefixes to group directories together, this will complement tab completion well. For example, I have three different browser sessions for blog posts I’m working on. Each of these sessions is prefixed with Blog- followed by a hyphen separated project name.
Remove a project when you are done with it
When you are done with a project and you no longer need to restore it, you can remove the session by deleting the related directory name. In this example you can run rm -r ./BNR from your terminal to recursively remove the session directory.
Implementing for other browsers
Maybe you’d like to use a different browser or you aren’t working on a Mac. If that’s the case, then you’ll need to modifty the script to meet your needs. Research how to start your desired browser from the terminal and what command line options you’ll need. Modify the work-on.sh script to meet your needs accordingly. Happy scripting! 😊
Conclusion
Using this small shell script helps me stay focused and pick up where I left off. If you are new to shell scripting, I hope this example is a good introduction. I hope you found this workflow useful.
The post How I finally closed my Google Chrome browser windows on my Mac appeared first on Big Nerd Ranch.
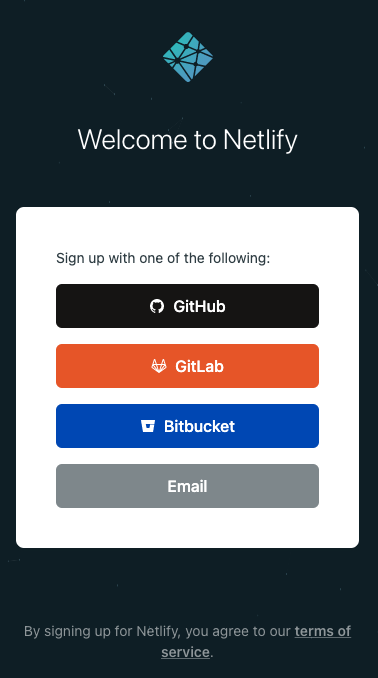
]]>The post Getting Started with Netlify: Creating your first Netlify Site appeared first on Big Nerd Ranch.
]]>git push? By the end of this blog post you will have a deployment pipeline integrated with GitHub and Netlify. Your deployment pipeline will be triggered by every git push to your main branch. Netlify will see your update in GitHub and trigger your build process. Once the build completes successfully your site will be live. If you need to roll back to a previous deploy, you’ll be able to do so through Netlify.
To follow along with this post please sign up for free GitHub and Netlify accounts or have your credentials ready. For detailed instructions on installing git see GitHub’s Set up Git documentation.
Create a GitHub repository for your project
To get started you need to create a new repository in GitHub.
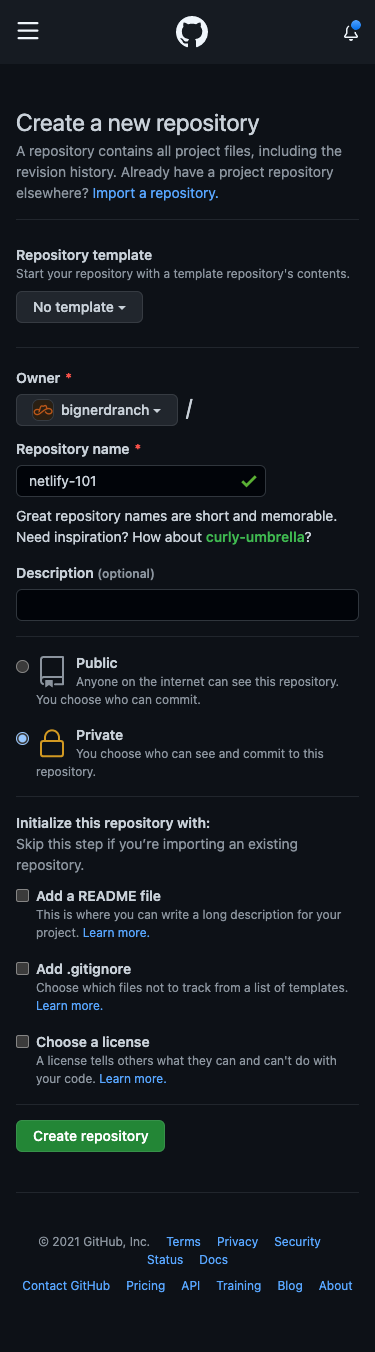
- Start by naming and creating an empty repository.
- Use
git cloneto clone your new repository to your local computer in your terminal. - Change into the new directory of your cloned repository.
The repository for this blog post can be found here. Reference this repository to compare your changes as you follow along.
For detailed instructions see GitHub’s Create a repo and Cloning a repository documentation.
Create a package.json file
In order to run a local development server, you’ll need to install netlify-cli. The following instructions will install netlify-cli locally, but you can install it globally if desired. Netlify CLI provides the netlify dev command. You’ll define netlify dev as your start command to run a local development server.
Create a new file in your empty repository called package.json and save the following content to it:
{
  "devDependencies": {
    "netlify-cli": "*"
  },
  "scripts": {
    "build": "mkdir -p dist && cp -R src/* dist/",
    "start": "netlify dev"
  }
}
In package.json you defined your development dependency on netlify-cli, configured the build script to copy files from src to dist, and defined the start script to run netlify dev. When using a framework, use the build command provided by your framework instead.
Create a netlify.toml file
Netlify uses a TOML configuration file define your build process and published content. Configure a netlify.toml file to define your build and dev settings.
Create a new file in the root of your repository called netlify.toml and save the following content to it:
[build]
command = "npm run build"
publish = "dist"

[dev]
publish = "src"
In package.json you implemented the build script to copy files from src to dist. The [build] section tells Netlify how to build your project. You can run your build by executing npm run build in your terminal. Since you want Netlify to run your build, you set command to npm run build. The value used in command can be replaced by the build step for the framework you are using. The publish setting defines where Netlify will serve static content from. You set publish to the output directory of your build command (dist).
The [dev] section tells Netlify how to run your project for local development. Just like in the [build] section, the publish setting defines where Netlify will serve static content from. This section also has a command setting that can be set to run the local development server for your framework. In this case you are only serving up static files and Netlify will handle that for you by default, so no command setting is needed.
Create a src directory with an index.html file
Since we configured Netlify to serve development content from the src directory you can create that directory with the mkdir src command in your terminal or through your code editor.
Next, create a new HTML document in src/index.html and save the following content to it:
<!DOCTYPE html>
<html>

<head>
  <meta charset="utf-8" />
  <meta name="viewport" content="width=device-width, initial-scale=1" />
  <title>Getting Started with Netlify: Creating your first Netlify Site</title>
</head>

<body>
  <h1>Getting Started with Netlify: Creating your first Netlify Site</h1>
  <p>Hello, world!</p>
</body>

</html>
In this step you’ve created a simple Hello, world! webpage that you can deploy to Netlify.
Create a .gitignore file
Before installing your dependencies you should create a .gitignore file in the root directory and save the following content to it:
node_modules
dist
This will prevent your node_modules, and dist directories from being included in your git commit next.
Git Commit and Git Push
You now have all the files you need to deploy to Netlify. Take a moment to add, commit, and push your changes to GitHub with the following commands in your terminal:
git add -A
git commit -m "My first Netlify Site"
git push origin main
Install your dependencies
Now you are ready to run npm install to install netlify-cli locally. This step will create the node_modules directory for your dependencies. Once npm install completes it will output a summary of the installation.
Start your local development server
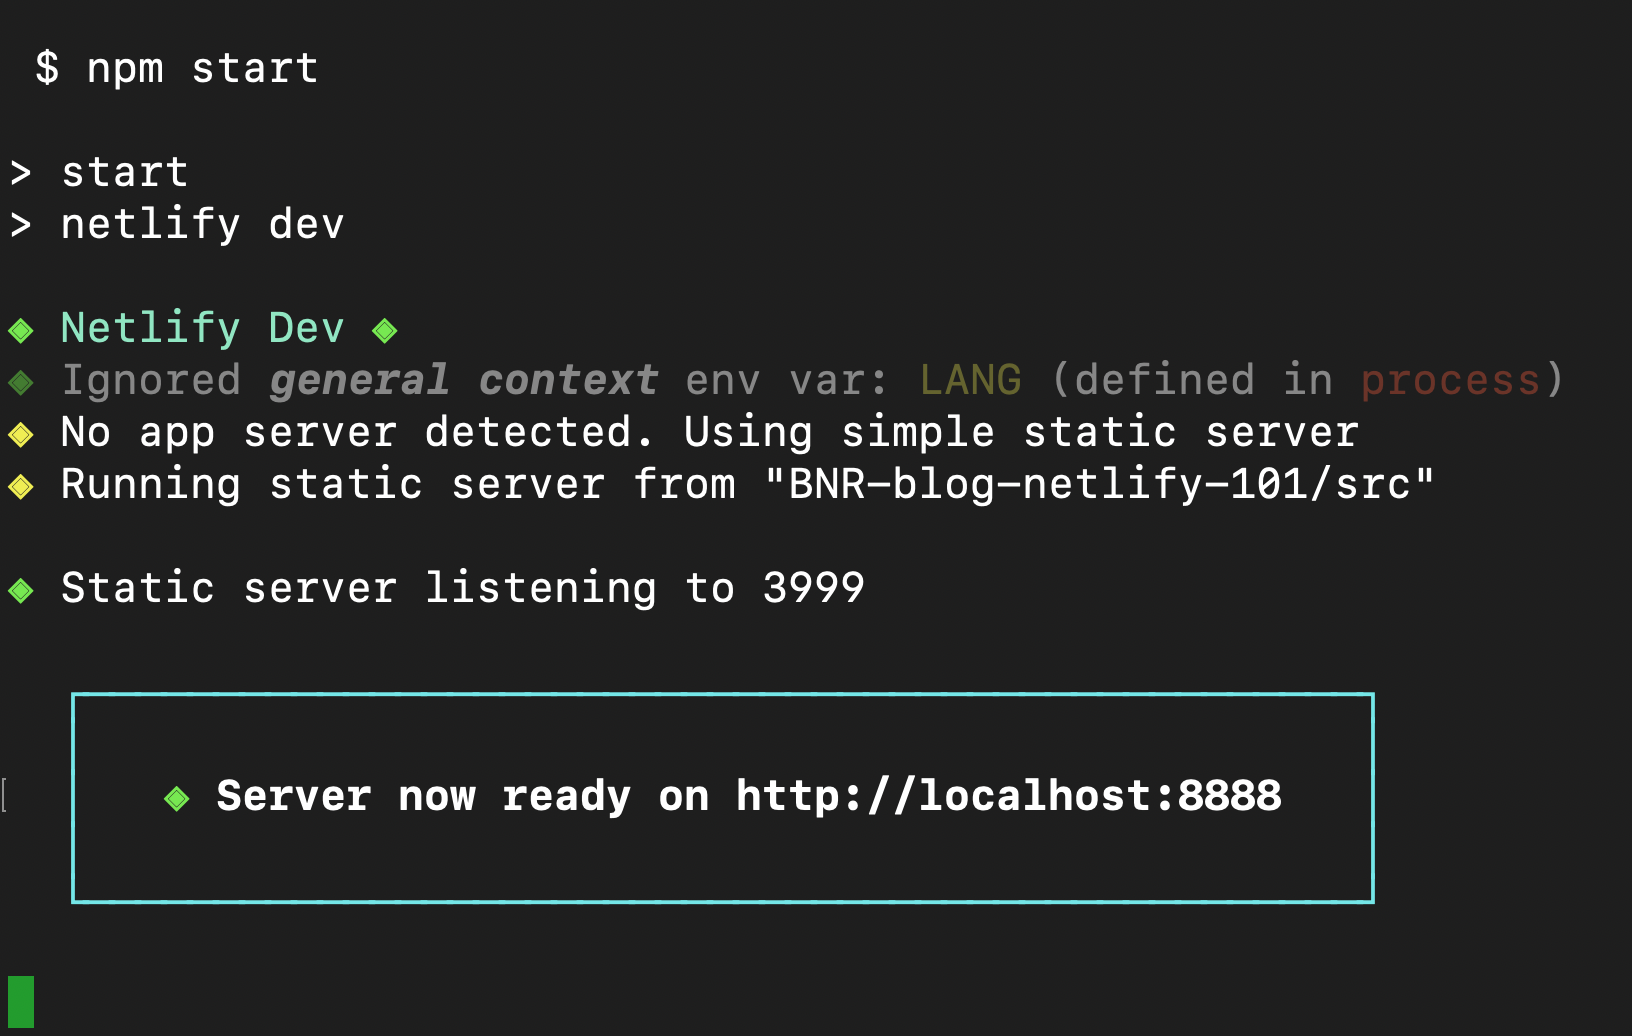
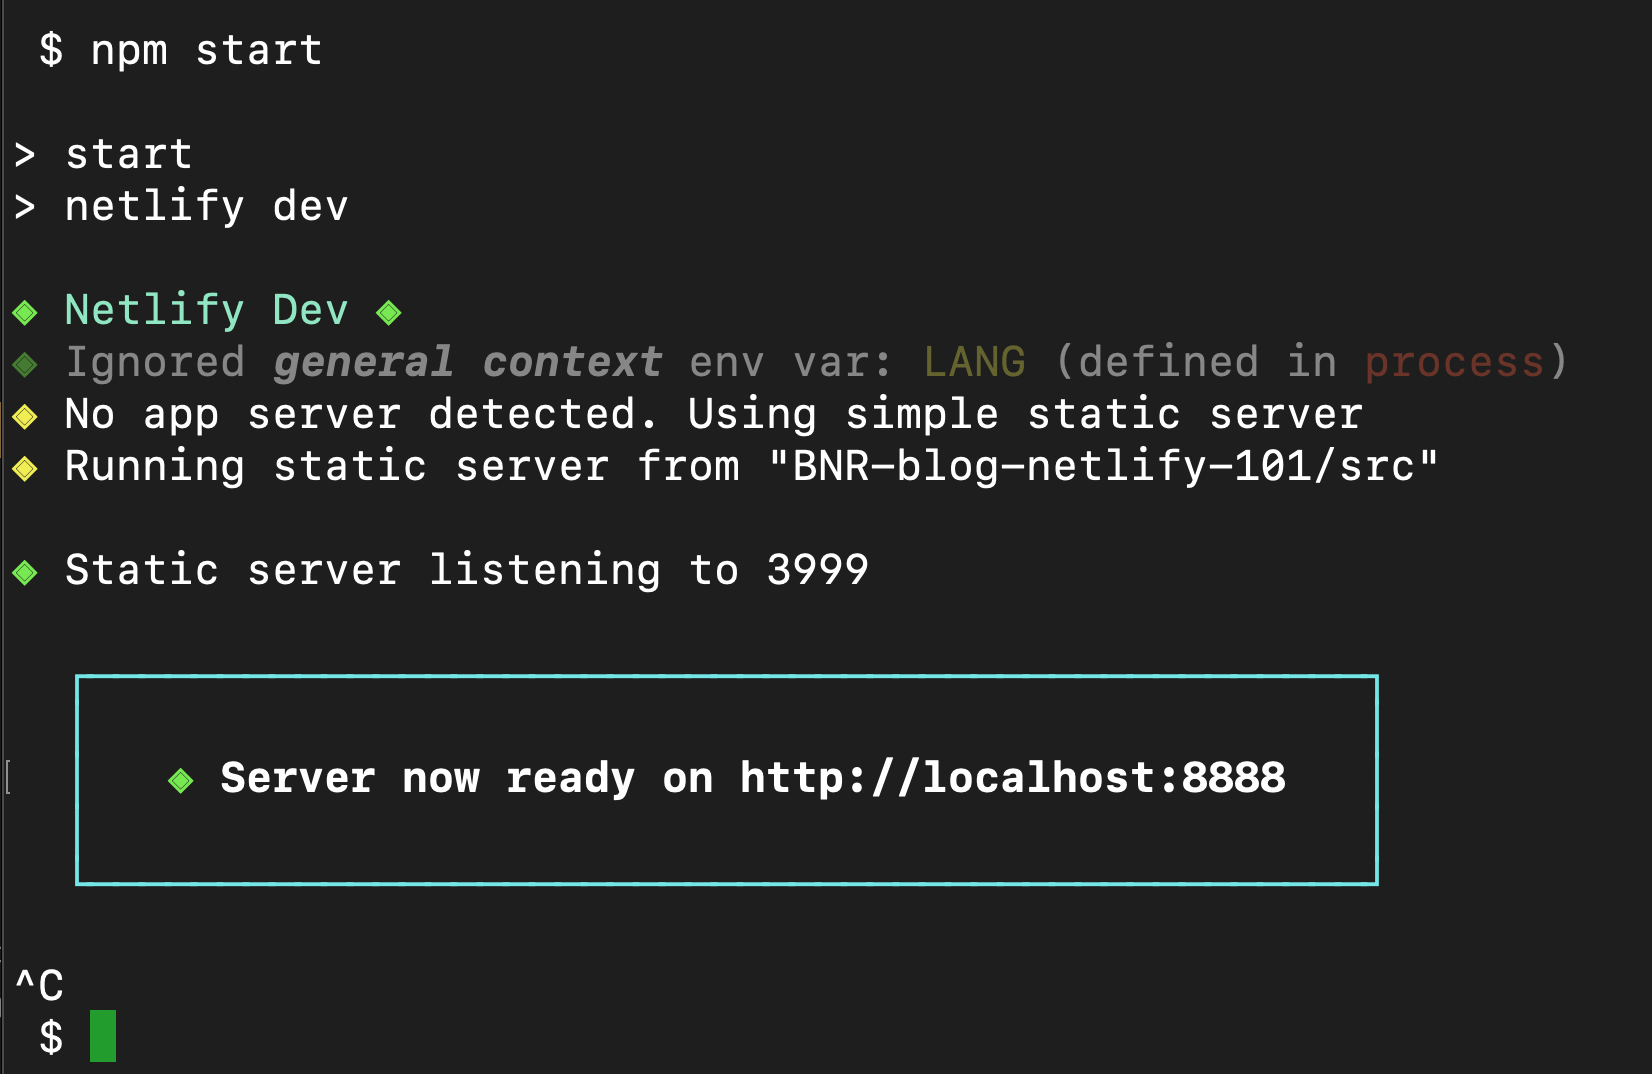
Run npm start in your terminal to start netlify dev as defined in package.json. Netlify Dev will detect that no framework was defined and serve static content from your publish directory which is src in this case. Netlify Dev will print out the local development URL, open your web browser with that URL, and continue running in your terminal. You should now see the rendered version of your index.html file in your browser with your “Hello, world!” message.

At this point you have a local development environment running, but have not yet connected your repository to Netlify. Terminate the local development server by holding the “control” key and pressing the “c” key (also referred to as ^C on a Mac).
Create the Netlify Site
From your Netlify Team Overview screen click New site from Git and follow the instructions.
-
-
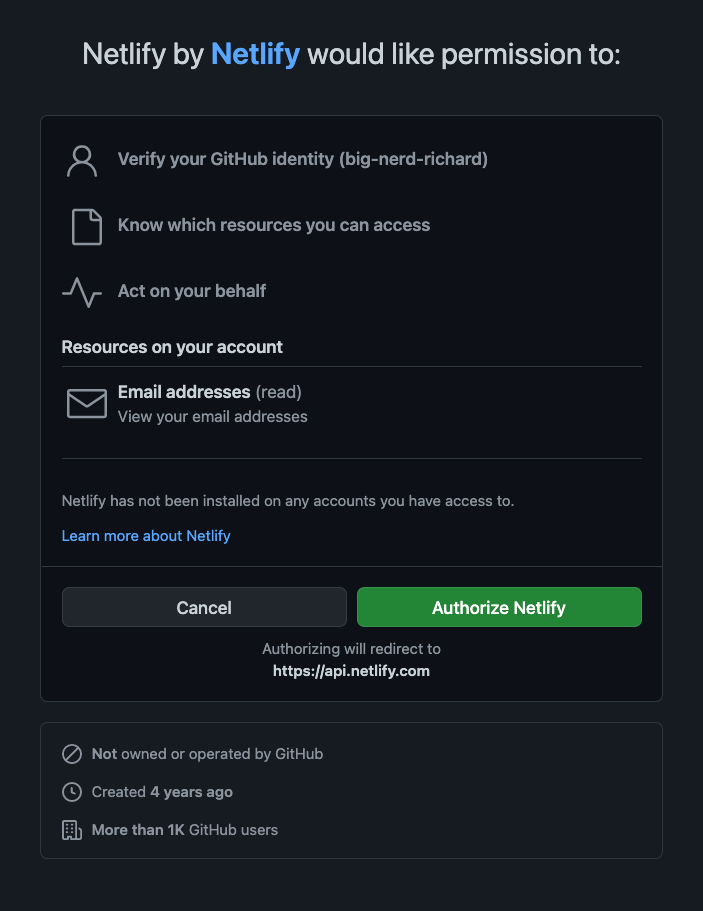
- First, you’ll be asked to “Connect to your Git provider”. Click the “GitHub” button. This will open a new window to authorize the connection between Netlify and GitHub.
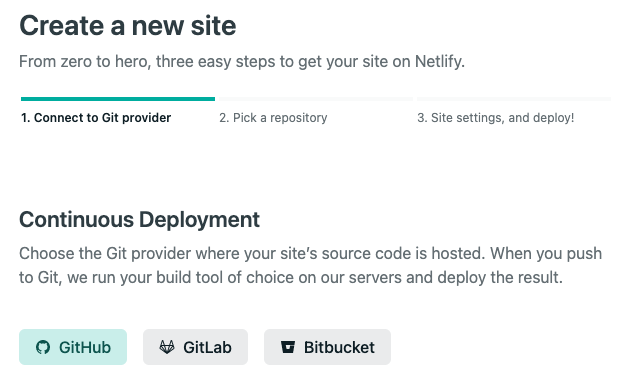
- When prompted select “Configure the Netlify app on GitHub” to authorize Netlify to read your repositories in GitHub.
- Once authorized, Netlify will ask you to “Pick a repository”. Find and select the repository you created for this project.

- Now you will be asked to configure the “Site settings, and deploy!”. Since you created a
netlify.tomlfile and pushed your changes to GitHub you’ll notice that this screen is already configured with your settings.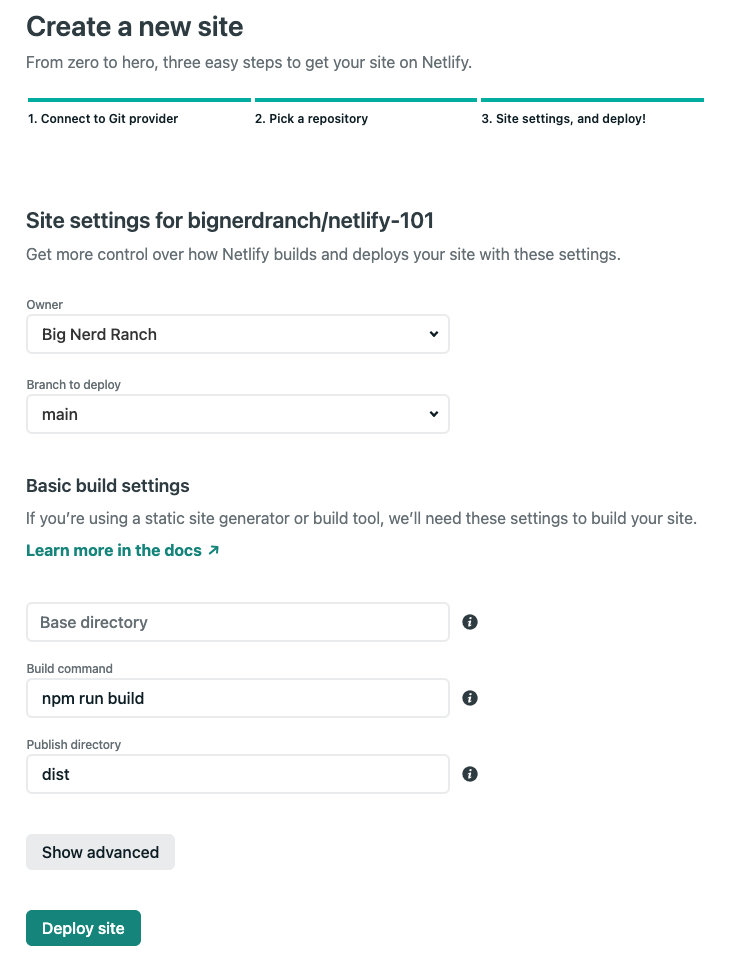
- Click the “Deploy site” button to trigger the first deploy of your new Netlify Site! This will bring you back to the Site overview and you’ll see a “Production deploys” section with your build
Starting Up. Click on your build from the “Production deploys” list which will take you to the Deploy log for that build.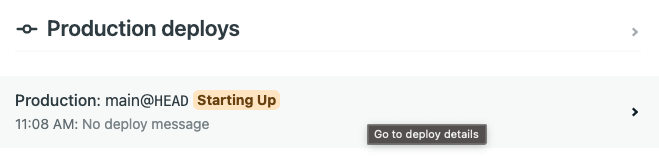
Here you can watch the build output as Netlify runs your build command.- If the build is successful, you’ll see “Site is live ✨” printed in the log and the deploy will be published.
- If there is an error, the deploy will fail and not be published. You can examine the log to determine the failure, make changes, and push those changes to GitHub to trigger a new build.
- Click the link to “< Deploys” near the top of the page. Here you will see that Netlify has generated a unique site name and URL for you in the “Deploys for” section.
- Click the link to your
https://<YOUR-SITE-NAME>.netlify.appsite on the Deploys page. This will open a new window where you will see the same “Hello, world!” page you saw in local development earlier now live in production on Netlify.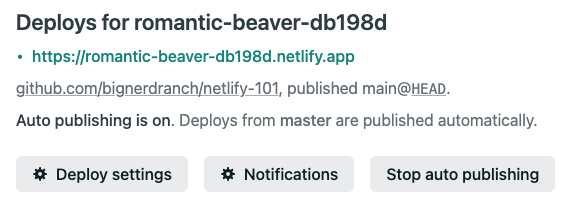
- Pat yourself on the back, you did it! 🎉
- First, you’ll be asked to “Connect to your Git provider”. Click the “GitHub” button. This will open a new window to authorize the connection between Netlify and GitHub.
Update your new Netlify Site
Well, you’d probably like to update your site, so go ahead and get the development server running again with
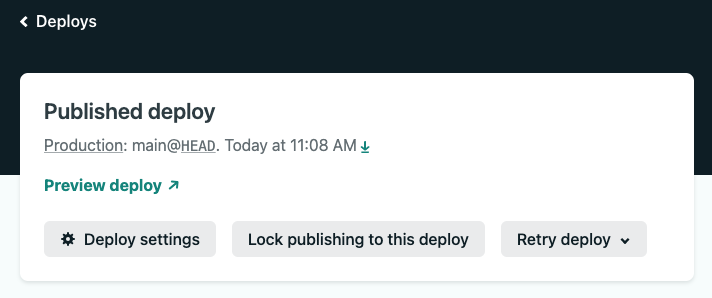
npm start. Now make some changes to yoursrc/index.htmland reload the page in your web browser. When you are satisfied with your changes in local development then add, commit, and push your changes to themainbranch to trigger a new deploy. Head over to Netlify to view the Deploy log. Once your site is live you can view the changes in production.Instant rollbacks
If you need to roll back to a previous version of the site for any reason, you can do so through Netlify. From the Deploys page, you’ll notice that the most recent deploy is at the top and is marked as
Published.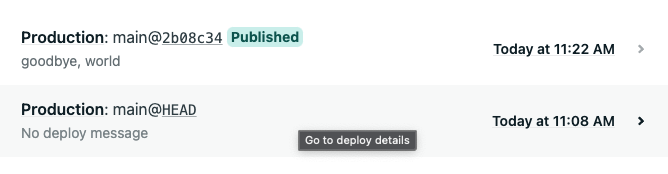
Click on a previous deploy. This will bring you to the deploy log where you will find a
Preview deploylink and aPublish deploybutton. Use thePreview deploylink to review the deploy and make sure it’s the one you want to roll back to. Use thePublish deploybutton to make that deploy the live deploy.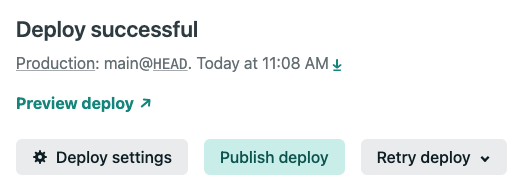
Head back to the Deploys page and notice that your previous deploy is now marked as
Published.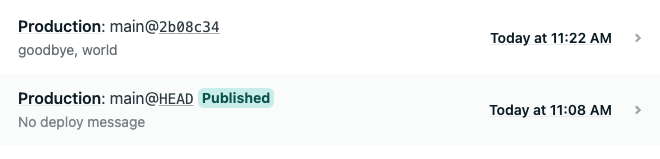
Congratulations!
You now can update your website with a
git pushand can instantly roll back to a previous deploy if you need to. There is a lot more Netlify has to offer. Stay tuned for more! 🙌 -

The post Getting Started with Netlify: Creating your first Netlify Site appeared first on Big Nerd Ranch.
]]>The post Extending FaunaDB with User-Defined Functions appeared first on Big Nerd Ranch.
]]>users collection from the Cloud Dashboard using built-in FQL functions. You can also extend FQL using User-Defined Functions. This post builds on the database from the previous post and demonstrates how to create a user-defined function, how to call it, and introduces strategies for using them. Just like built-in FQL functions, functions you create are composable with other FQL functions.
Get user by email address
In the previous post, you looked-up a user by email address using your users_by_email index with the following FQL:
Get(Match(Index("users_by_email"), "rflosi@bignerdranch.com"));
Which got the response:
{
  ref: Ref(Collection("users"), "272320354017346067"),
  ts: 1595963777460000,
  data: { name: "Richard", email: "rflosi@bignerdranch.com" }
}
This response object has three fields:
- A ref field whose value is a reference to the user document,
- a ts field with an integer timestamp value, and
- a data field whose value is an object containing the user name and email address.
This works well, but what if you want to reuse that logic elsewhere?
Adding GetUserByEmail() to FQL
With FaunaDB you can define your own function for retrieving a user. Using CreateFunction(), specify a name for your new function along with the body which defines the implementation. The body uses the Query() function to delay execution along with the Lambda function to define the inputs and outputs. Optionally you can include a JSON object in the data field to document your function with additional metadata. In the following example, you are encapsulating the FQL above into a new function called GetUserByEmail which takes a single email argument and returns the same response as above.
Remember to build on your database from the previous post. Use the Cloud Dashboard to execute the following FQL:
CreateFunction({
  name: "GetUserByEmail",
  body: Query(
    Lambda(["email"], Get(Match(Index("users_by_email"), Var("email"))))
  ),
  data: { description: "Look up a user by email address." },
});
 Running this CreateFunction call gives an object:
{
  ref: Ref(Ref("functions"), "GetUserByEmail"),
  ts: 1602861460300000,
  name: "GetUserByEmail",
  body: Query(
    Lambda(["email"], Get(Match(Index("users_by_email"), Var("email"))))
  ),
  data: {
    description: "Look up a user by email address."
  }
}
This object has five fields. Two fields are new with this response:
- A ref field whose value is a reference to the function,
- a ts field with an integer timestamp value,
while the other three repeat the value you used to create the function:
- a name field with the string name of the function,
- a body field whose value is the implementation of the function, and
- a data field whose value is the data object you provided.
Just like retrieving a document, you can retrieve the data returned from CreateFunction() by calling Get() on your function reference:
Get(Function("GetUserByEmail"));
 This response is the same as the one above from CreateFunction(). You might use this if you wanted to programmatically read metadata from the data field to produce documentation. CreateDatabase(), CreateCollection(), CreateIndex() and other functions also use this optional data field to attach metadata.
Function names must be unique within the scope of the enclosing database. FaunaDB will throw an error if you try to create a function with a name that already exists. You can, however, use Replace() to update an existing function.
Calling User-Defined Functions
Your new function can now replace the FQL you originally used. To call a user-defined function, use the Call(); function:
Call(Function("GetUserByEmail"), ["rflosi@bignerdranch.com"]);
 The first argument to Call() is the function reference. The second argument is the array of arguments.
As you’d expect, the result is the same as the inline FQL we started with:
{
  ref: Ref(Collection("users"), "272320354017346067"),
  ts: 1595963777460000,
  data: { name: "Richard", email: "rflosi@bignerdranch.com" }
}1
Strategies for using User-Defined Functions
Now that you know how to create custom functions, the next question is: why would you want to do so?
Often in software development, you’ll create a function to encapsulate logic that is used in multiple places in order to follow the Don’t Repeat Yourself (DRY) principle, which also applies when working with FQL. Typically you write APIs as a communication layer to a database and implement the Create, Read, Update, Delete (CRUD) pattern. With FaunaDB’s user-defined functions, you can implement CRUD within the database itself. For example, you can create the following functions to manage a user:
- Function(“UserCreate”) creates a new user validating user input.
- Function(“UserRead”) reads an existing user by token, id, or by email address as you did in this blog post.
- Function(“UserUpdate”) updates an existing user.
- Function(“UserDelete”) removes an existing user.
Implementing CRUD within the database removes that logic from the API. Each endpoint just Call()s the corresponding user-defined function. This strategy is particularly interesting because it follows the DRY principle by keeping the logic in one place, your database. Furthermore, this approach allows you to update a function in Fauna without needing to change the API code. As such, you’ll save a deploy cycle on the API, and you won’t have to worry about a client running obsolete API code since the change in Fauna will take effect immediately.
What are some ways you might reuse the Function(“GetUserByEmail”) you created in this post? In the CRUD example above you may use it as part of Function(“UserRead”) to look up the user by email address. You might even use Function(“UserRead”) in other CRUD methods like Function(“UserUpdate”) to read the current state of the user while applying a partial update like a RESTful PATCH operation. You can also reuse this function in user login and forgot password flows.
Limitations
- User-defined function names must be unique across the database they’re defined in.
- User-defined functions must be executed with the same number of parameters that they are defined to accept.
- User-defined functions must complete execution within a 30-second transaction timeout before the transaction is terminated.
- If a user-defined function exhausts available memory, the transaction is terminated.
- User-defined functions can implement recursion, but recursion is limited to a depth of 200 calls.
Summary
In this post, you encapsulated the logic of querying a user by email address in FQL into a user-defined function (UDF). You can now Call() your function from multiple places. The Function(“GetUserByEmail”) used in this example would most likely be used in user login and forgot password flows. You could generalize this to a Function(“UserRead”) that takes a single object as an argument and uses the built-in Contains() and Select() functions to detect and destructure an email or id value, then look up a user by token, id, or email address depending on what was provided.
Next Steps
Now that you’re are able to create databases, collections, documents, and functions with the help of this blog post and the Intro to FaunaDB and FQL post, you’ll probably want to learn a bit more about FQL followed by Fauna’s User-defined roles, Attribute-based access control (ABAC), and the fauna-shell for accessing the database as other users via the Login() function.
The post Extending FaunaDB with User-Defined Functions appeared first on Big Nerd Ranch.
]]>The post Intro to FaunaDB and FQL appeared first on Big Nerd Ranch.
]]>Getting Started
To get started with FaunaDB, sign up for a new account. Then, you will
- create your first database,
- create a collection in your database,
- add a document to your collection, and
- index the documents in the collection.
Sign Up
Sign Up for a free FaunaDB Account. As of September 2020, FaunaDB offers a generous free tier to get started with.

Create a Database
Visit the Cloud Dashboard. Click to Create a New Database. Name the database www. Do not check the box to “Pre-populate with demo data”; you will be adding your own data shortly.
 Querying the Database
Queries to FaunaDB are written in Fauna Query Language (FQL), a functional query language. Fauna offers client drivers in various languages allowing you to interact with FaunaDB from your codebase. But for this blog post, you’ll be writing all FQL in your browser using FaunaDB’s Web Shell which uses the JavaScript driver.
Open the Web Shell
Navigate to the Web Shell for your new database using the side navigation by clicking the >_ Shell link.
 Use the Web Shell to execute your FQL by entering each query into the black input console on the bottom of the Web Shell and clicking
 Run Query.
Create a Collection
A Collection is similar to a table in a relational database. It has a unique name, like “users,” and holds Documents, like the details of each user.
Create your first Collection called users from the Web Shell using the CreateCollection() function with the following FQL query:
CreateCollection({ name: "users" })

This response object contains four fields:
- A
reffield with a value ofCollection("users")which is used to create relationships with the collection, - a
tsfield with an integer value representing the timestamp in UTC with nanosecond precision, - a
history_daysfield defaulting to30days which is the number of days to retain document history, and - a
namefield with a value of"users"which you provided as the logical name for the collection.
{
  ref: Collection("users"),
  ts: 159846586441000,
  history_days: 30,
  name: "users"
}
Create a Document
A Document is like a row, and like the abstraction that is the “row,” a document can be used to model almost anything. Even your newly-created www database and users collection are Documents.
Add a user document to your "users" collection by passing the Collection’s name and the Document’s param_object with credentials and data fields to the Create() function:
Create("users", {
  credentials: { password: "F4un4I$Fun" },
  data: { name: "Richard", email: "rflosi@bignerdranch.com" }
})
The credentials object includes a password which is stored as a BCrypt hash in FaunaDB. Providing credentials with a password is one way to allow users to authenticate using the Login() function.
The data object is a schemaless JSON object for your document with name and email fields. You can provide any fields you like here.
 This response object has three fields:
- A
reffield whose value includes theCollection("users")ref and a unique document id, - a
tsfield with an integer timestamp value, and - a
datafield containing your document data which includes usernameandemailaddress fields.
{
  ref: Ref(Collection("users"), "274944144667836946"),
  ts: 1598466019230000,
  data: {
    name: "Richard",
    email: "rflosi@bignerdranch.com"
  }
}
NOTE: the credentials you provided will NOT be returned.
Create an Index
Indexes allow for the organization and retrieval of documents by attributes other than their references. When you create an index, you specify its source, which is one or more collections of documents. An Index allows you to define uniqueness constraints and facilitates efficient data lookup.
Create a unique Index of our users by email address using the CreateIndex() function:
CreateIndex({
  name: "users_by_email",
  source: Collection("users"),
  terms: [{ field: [ "data", "email" ] }],
  unique: true,
  permissions: {},
})

This response object has nine fields:
- A
reffield whose value isIndex("users_by_email")which you’ll use to query by email address, - a
tsfield with an integer timestamp value, - an
activefield with a value oftruewhich indicates if the index has completed building, - a
serializedfield with a value oftruewhich indicates writes are serialized with concurrent reads and writes, - a
namefield with the value"users_by_email", which you provided as the logical name for your index, - a
sourcefield with a value ofCollection("users")which defines which collection(s) to index, - a
termsfield whose value is an array with one object with a key offield.fieldis an array that defines the path to the data you want to index. In this case, you are indexing theemailfield under thedataobject, thus the path is["data", "email"], - a
uniquefield with a value oftruewhich ensures that the indexed terms will be unique to the collection, and - a
partitionsfield with a value of1which represents the number of sets defined bytermsused to improve index performance.
{
  ref: Index("users_by_email"),
  ts: 1598466147239300,
  active: true,
  serialized: true,
  name: "users_by_email",
  source: Collection("users"),
  terms: [
    {
      field: ["data", "email"]
    }
  ],
  unique: true,
  partitions: 1
}
Get user by email address
Lookup a user by email address using our users_by_email Index with the Match() function and use the Paginate() function to get the first page of results from the matched Set. Use the following query to retrieve the first page of user references:
Paginate(
  Match(Index("users_by_email"),  "rflosi@bignerdranch.com")
)
 This response object has one field:
- A
datafield with an array of references to the matched documents.
{
  data: [Ref(Collection("users"), "274944144667836946")]
}
A Ref() is similar to a foreign key in a relational database and is how relationships are represented in FaunaDB. Calling the Get() function on our Ref() object causes FaunaDB to return the referenced Document. Calling the Get() function on a Match() result will retrieve the first Document from that result set. Use the following query to retrieve the user document:
Get(
  Match(Index("users_by_email"), "rflosi@bignerdranch.com")
)
 This response object has 3 fields:
- A
reffield whose value is a reference to the user document, - a
tsfield with an integer timestamp value, and - a
datafield whose value is an object containing the usernameandemailaddress.
{
  ref: Ref(Collection("users"), "274944144667836946"),
  ts: 1598466019230000,
  data: {
    name: "Richard",
    email: "rflosi@bignerdranch.com"
  }
}
Summary
In this post, you created a new database called www, added a collection called users which acts as a table, added a document to the collection which acts as a row in the table thus creating an instance of a user, and created an index of users by their unique email addresses.
Next Steps
FaunaDB has a lot more to offer. Here are a few more highlights for further exploration.
User-defined functions
In addition to the built-in FQL functions, you can create your own User-defined functions to extend FQL or encapsulate logic.
Built-in User Authentication and Authorization
As mentioned, the password defined in credentials will allow you to authenticate using the Login() function.
You may have noticed the use of permissions: {} when you created your index. permissions indicates who is allowed to read the index. By default, everyone can read the index. Setting permissions to an empty object removes all permissions; a server key, all-powerful, is then required to access the index. However, configuring permissions in this way has been deprecated in favor of User-defined roles and Attribute-based access control (ABAC).
Comparison to other databases
If you are familiar with SQL databases, you might want to explore Fauna Query Language for SQL users to better understand how SQL queries translate to FQL queries.
If you are familiar with NoSQL databases, you might want to compare MongoDB and FaunaDB or DynamoDB and FaunaDB.
GraphQL Support
As an alternative to creating your collections and indexes with FQL, you can import a GraphQL schema which will be translated into the equivalent FaunaDB collections and indexes. Once a GraphQL schema is defined, you can query your database with GraphQL. FaunaDB’s GraphQL endpoint will translate your GraphQL queries into FQL and return results in JSON.
The post Intro to FaunaDB and FQL appeared first on Big Nerd Ranch.
]]>