

Swift Regex Deep Dive
iOS MacOur introductory guide to Swift Regex. Learn regular expressions in Swift including RegexBuilder examples and strongly-typed captures.
One of the most exciting parts of Swift being open-sourced is that it can be used as a more general purpose programming language.
Server side Swift is an especially appealing platform given the web’s ubiquity.
Recently, Apple began to support this initiative more formally by creating a working group dedicated to Swift on the server.
We at Big Nerd Ranch are very excited to see Swift on the server.
In this post, we’ll explore one popular project called Vapor.
We will create a small web app, see how to implement a few routes, connect to a database, perform some CRUD operations, and will deploy our app to Heroku.
The app that we’ll build will be a simple web API to save our friend information online.
It will allow us to save data to a database, which will be accessible via a few routes.
We’ll serve the data to clients via JSON.
Let’s get started.
The first thing you’ll need to get started with Swift on the server is Swift itself.
The easiest way to get Swift is to download Xcode from https://developer.apple.com.
You can download Xcode for free, and it comes with the latest version of Swift installed.
The next thing that you’ll need is Vapor.
You can download Vapor and its toolbox from the documentation online.
Follow the information in the “Install Toolbox” section to get both Vapor and the toolbox so that you can use the vapor command line tool in the terminal.
Type vapor version to ensure that you have the toolbox installed correctly.
I see Vapor Toolbox v1.0.3 logged to the console.
We’ll use Postgres as our database.
The easiest way to install Postgres is through Homebrew.
If you don’t have Homebrew installed already, you can download from the link provided.
After you install it, you can type brew install postgres in your terminal to download Postgres.
Type psql --version in the terminal to ensure that you have downloaded Postgres correctly, and you should see something like psql (PostgreSQL) 9.5.4.
Heroku is a popular platform as a service (PaaS) that makes it very easy to get an app running on the web in a short amount of time.
It also works nicely with Swift.
You will need to create an account on Heroku to deploy via this platform.
Don’t worry; you can use a free account for the purposes of this post.
After you sign up for Heroku, make sure to download the Heroku command line interface.
Let’s begin our project.
What we’re looking for is an app that will allow us to store our friends in a database.
We’ll expose an API that will allow us to create and read friends.
The Vapor toolbox can help you get started quickly.
Open up Terminal.app, and cd into a directory of your choosing.
Type vapor new Friends.
This will create a new Vapor project directory.
Your new Friends directory should look like this.
.
|--app.json
|--Config/
|--license
|--Localization/
|--Package.swift
|--Procfile
|--Public/
|--README.md
|--Resources/
|--Sources/
   |--App/
      |--Controllers/
      |--main.swift
      |--Models/
For the purposes of this tutorial, we’ll spend most of our time in Sources/App/main.swift and Package.swift.
One of the nice things about the Vapor toolbox is that we can easily create an Xcode project.
Type vapor xcode to create an Xcode project file that will allow us to use Xcode as our editor.
This command will fetch dependencies for the project, so it may take a little bit.
When the tool is finished fetching your project’s dependencies and generating your Xcode project, it will ask you if you’d like to open the project.
Type y in the console and hit enter to open the project.
With the project open, navigate to Sources/App/main.swift to view your app’s main point of entry.
You should see something like this:
import Vapor

let drop = Droplet()

drop.get { req in
    return try drop.view.make("welcome", [
        "message": drop.localization[req.lang, "welcome", "title"]
    ])
}

drop.resource("posts", PostController())

drop.run()
This file imports the Vapor framework, instantiates a Droplet, and adds a single route.
The instance of Droplet, drop, is responsible for running the server.
As you can see above, it’s what we use to register routes.
This route just gives a template greeting.
It’s time to set up our own routes.
Open main.swift and add a new route to GET some friends.
Make the route "friends" respond with a JSON object that is a dictionary that contains an array of the saved friends.
At this point, we don’t have a model type for our friend data or a database in place.
That means we will need to simply hardcode some JSON data and return that.
Your main.swift file should look like this now.
import Vapor

let drop = Droplet()

drop.get { req in
    return try drop.view.make("welcome", [
        "message": drop.localization[req.lang, "welcome", "title"]
    ])
}

drop.get("friends") { req in
    return try JSON(node: ["friends": [["name": "Sarah", "age": 33],
                                          ["name": "Steve", "age": 31],
                                          ["name": "Drew", "age": 35]]
    ])
}

drop.resource("posts", PostController())

drop.run()
This new route accepts GET requests and returns some made up friend data as JSON.
It’s time to test what we have and see our Vapor app in action.
To run the application from Xcode, you will need to make sure to select the app scheme.
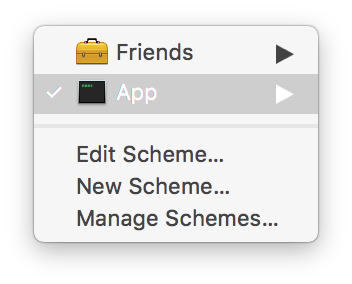
Now we can simply run the application from Xcode to get the app running on localhost on port 8080.
After building and running the application in Xcode, use your browser and navigate to “http://localhost:8080/friends”.
You should see the following response in your browser: {"friends":[{"age":33,"name":"Sarah"},{"age":31,"name":"Steve"},{"age":35,"name":"Drew"]}.
Friend ModelIt’d be better to have a Friend type; this would help us to avoid hard coding JSON instances.
Let’s add a Friend.swift file to Sources/App/Models.
struct Friend {
    let name: String
    let age: Int
    let email: String

    init(name: String, age: Int, email: String) {
        self.name = name
        self.age = age
        self.email = email
    }
}
(Note, that we have added an email property.)
Vapor provides a Model protocol that helps us to persist our model types.
Model also provides functionality that helps us to convert our models into JSON.
In order to have Friend conform to Model, we need to import the Vapor framework into our Friend.swift file.
Importing the Vapor framework will also import the Fluent framework.
Fluent is an object relational mapping (ORM) tool built for Swift that works with a variety of different databases.
We’ll be using it here to talk to our Postgres database.
If you’re seeing an error in Xcode that it doesn’t know about Vapor or Fluent, then go back to your Terminal and type vapor xcode to recreate the Xcode project.
After conforming to Model, your implementation of Friend should look like this:
import Foundation
import Vapor

struct Friend: Model {
    var exists: Bool = false
    var id: Node?
    let name: String
    let age: Int
    let email: String

    init(name: String, age: Int, email: String) {
        self.name = name
        self.age = age
        self.email = email
    }

    // NodeInitializable
    init(node: Node, in context: Context) throws {
        id = try node.extract("id")
        name = try node.extract("name")
        age = try node.extract("age")
        email = try node.extract("email")
    }

    // NodeRepresentable
    func makeNode(context: Context) throws -> Node {
        return try Node(node: ["id": id,
                                      "name": name,
                                      "age": age,
                                      "email": email])
    }

    // Preparation
    static func prepare(_ database: Database) throws {
        try database.create("friends") { friends in
            friends.id()
            friends.string("name")
            friends.int("age")
            friends.string("email")
        }
    }

    static func revert(_ database: Database) throws {
        try database.delete("friends")
    }
}
The first thing that we do is to conform to the Model protocol.
This means that we need to provide an id property that is of type Node?.
It will be nil until the model is saved to the database.
Friend also has a property called exists that defaults to false.
This property details whether or not the instance was retrieved from the database and should not be interacted with directly.
We also see that we need to conform to a series of other protocols.
The three protocols that are important are NodeInitializable, NodeRepresentable, and Preparation.
The first two protocols are needed because the Model protocol inherits from the Entity protocol, which itself inherits from the NodeInitializable and NodeRepresentable protocols.
The first helps us to know how to initialize our model from the database.
The second helps us to know how to save our model to the database.
The third helps us to create the database.
Let’s use this Model type instead of the dictionaries we provided to JSON in our "friends" route defined in main.swift.
Doing so put us in a good spot when we want to work with our Postgres database.
Your "friends" route should look like this now.
drop.get("friends") { req in
    let friends = [Friend(name: "Sarah", age: 33, email:"sarah@email.com"),
                       Friend(name: "Steve", age: 31, email:"steve@email.com"),
                       Friend(name: "Drew", age: 35, email:"drew@email.com")]
    let friendsNode = try friends.makeNode()
    let nodeDictionary = ["friends": friendsNode]
    return try JSON(node: nodeDictionary)
}
This time around we create an array called friends that contains the three instances of Friend we want to return for the GET request.
Next, we call makeNode() on this array to convert it to a Node.
Before we return anything, we make sure to properly format our response JSON to be a dictionary.
Last, we pass this nodeDictionary to JSON’s initializer and return the result.
Run your app again and visit “http://localhost:8080/friends”.
You should see something similar to what you had before, but this time you have a new email property.
We have now seen an example of setting up routes and creating model types in Vapor.
Before we add more routes, let’s connect to a database.
This will help our routes to be more useful as we won’t have to create and respond with arbitrary friend data.
Setting up Postgres involves a few steps.
Package.swift file.main.swift and use it with our Droplet.A good provider for Postgres in Vapor is postgres-provider.
Add this dependency to Package.swift.
import PackageDescription

let package = Package(
    name: "Friends",
    dependencies: [
        .Package(url: "https://github.com/vapor/vapor.git", majorVersion: 1, minor: 1),
        .Package(url: "https://github.com/vapor/postgresql-provider", majorVersion: 1, minor: 0)
    ],
    exclude: [
        "Config",
        "Database",
        "Localization",
        "Public",
        "Resources",
        "Tests",
    ]
)
Regenerate your Xcode project with vapor xcode to fetch the new dependency.
Make sure to type y in your console when it’s done so that you can open the new Xcode project.
Now, it’s time to use Postgres in your code.
Open main.swift and prepare the database for use.
import Vapor
import VaporPostgreSQL

let drop = Droplet()
drop.preparations.append(Friend.self)

do {
    try drop.addProvider(VaporPostgreSQL.Provider.self)
} catch {
    assertionFailure("Error adding provider: (error)")
}

drop.get { req in
    return try drop.view.make("welcome", [
        "message": drop.localization[req.lang, "welcome", "title"]
    ])
}

drop.get("friends") { req in
    let friends = [Friend(name: "Sarah", age: 33, email:"sarah@email.com"),
                       Friend(name: "Steve", age: 31, email:"steve@email.com"),
                       Friend(name: "Drew", age: 35, email:"drew@email.com")]
    let friendsNode = try friends.makeNode()
    let nodeDictionary = ["friends": friendsNode]
    return try JSON(node: nodeDictionary)
}

drop.resource("posts", PostController())

drop.run()
First, we import VaporPostgreSQL so that we can use the Postgres provider in our code.
We then add Friend.self to our Droplet’s preparations so that we can use our model with the database.
Last, drop.addProvider(VaporPostgreSQL.Provider.self) adds our provider to the droplet so that the database is available.
The rest of main.swift remains the same.
Our next step is to create a configuration file for Postgres.
The README.md for our provider has instructions that tell us that we need to create the following file: Config/secrets/postgresql.json.
The Config folder should already exist, but you may have to create the secrets folder.
The README.md also suggests what we should put in this file.
{
    "host": "127.0.0.1",
    "user": "DubbaDubs",
    "password": "",
    "database": "friends",
    "port": 5432
}
Use your own username for "user".
Notice that we name our database "friends".
We still need to create it.
We’ll do that below.
With Postgres set up, and our Friend struct conforming to Model, we are in a good spot to write some routes that get their data from the database.
Let’s add a route to main.swift that will POST a new Friend and save it to our database.
import Vapor
import VaporPostgreSQL

let drop = Droplet()
drop.preparations.append(Friend.self)

do {
    try drop.addProvider(VaporPostgreSQL.Provider.self)
} catch {
    print("Error adding provider: (error)")
}

drop.get { req in
    return try drop.view.make("welcome", [
        "message": drop.localization[req.lang, "welcome", "title"] ])
}

drop.get("friends") { req in
    let friends = [Friend(name: "Sarah", age: 33, email:"sarah@email.com"),
                       Friend(name: "Steve", age: 31, email:"steve@email.com"),
                       Friend(name: "Drew", age: 35, email:"drew@email.com")]
    let friendsNode = try friends.makeNode()
    let nodeDictionary = ["friends": friendsNode]
    return try JSON(node: nodeDictionary)
}

drop.post("friend") { req in
    var friend = try Friend(node: req.json)
    try friend.save()
    return try friend.makeJSON()
}

drop.resource("posts", PostController())

drop.run()
We now have a route to POST a Friend.
This route expects a body like this:
{
    "name": "Some Name",
    "age": 30,
    "email": "email@email.com"
}
We try to create an instance of our Friend model with the req.json that was passed up in the POST request.
The next step is to call friend.save() to save the instance to the database.
This helps to explain why friend needed to be a var: save() will modify the instance’s id property with the id Postgres hands back if the save succeeds.
We still need to create our database.
Type postgres -D /usr/local/var/postgres/ into Terminal to start the Postgres server running locally.
Once the server has started up, we can create the database.
In a new Terminal window, type createdb friends and hit enter.
Next, type psql and hit enter to start the Postgres command line interface.
Last, type l (backslash l) to see a list of databases.
You should see your friends database.
You can test this new route by building and running your app within Xcode as you did above and using curl or a tool like Postman.
You can use psql to verify that you are posting data to the database.
From inside the command line interface, type c friends to connect to your friends database.
Next, type SELECT * FROM friends; and hit enter.
You should see the information for the friend that you just POSTed to the "friend" route.
GET requests to our "friends" currently return hardcoded data.
But we can POST friends to our database now!
Go ahead and POST a few more friends to your database to fill it out a little more.
Back in main.swift, let’s update our "friends" route to return the data in our database.
That method should now look like this:
drop.get("friends") { req in
    let friends = try Friend.all().makeNode()
    let friendsDictionary = ["friends": friends]
    return try JSON(node: friendsDictionary)
}
Visit http://localhost:8080/friends in your browser or send a GET request via Postman and you should see your friends returned to you.
GETting by idAdd a new route to main.swift that will use a user’s id to find an entry in the database.
drop.get("friends", Int.self) { req, userID in
    guard let friend = try Friend.find(userID) else {
        throw Abort.notFound
    }
    return try friend.makeJSON()
}
The above will match a route that will end in something like, .../friends/1, where the integer at the end is the friend’s id.
Notice that we use Int.self as the second argument in the path.
This means that we can have type safe parameters in our routes!
In Vapor, there is no need to cast this parameter from a String to an Int.
We can express exactly what we need.
The userID parameter in the closure will match the integer passed at the end of the route.
Also, through the power of Fluent, we can simply find(_:) the instance of our model by its id.
Since this lookup can fail, we must try.
If we fail to find a Friend, we’ll throw the error Abort.notFound.
Otherwise, we makeJSON() from the friend we found and return.
Go ahead and try it out!
All that is left to do is to deploy to Heroku.
Vapor makes this process very easy.
Heroku works with Git, so you should make sure that you have that installed as well.
Create a Git repository and commit your files.
git init
git add .
git commit -m "Initial commit"
Now, all you need to do is create a Heroku instance and push to it.
vapor heroku init
The Heroku CLI will ask four questions:
Would you like to provide a custom Heroku app name?
Answer ‘n’ and hit enter if you don’t have a custom name.
Would you like to provide a custom Heroku buildpack?
Answer ‘n’ and hit enter if you would like to use the default buildpack that Heroku provides.
Are you using a custom Executable name?
Answer ‘n’ and hit enter here if you aren’t using a custom executable name.
Would you like to push to Heroku now?
Answer ‘n’ and hit enter.
We need to answer ‘no’ because we need to configure our database to work online.
We’ll do that below.
Before you plug the URL you see in your Terminal output into your browser of choice, we need to provision a Postgres add-on on Heroku.
Type the following in your Terminal to add Postgres to your app.
heroku addons:create heroku-postgresql:hobby-dev
Adding the database can take up to five minutes to provision.
Once it is ready, you can type heroku config in Terminal to see your database’s URL to confirm that the add-on was provisioned.
Now, we need to update our app’s Procfile, which was created via vapor heroku init, to use the DATABASE_URL environment variable that was created by Heroku.
Open the Procfile in your text editor and update it so that looks like the below.
web: App --env=production --workdir="./"
web: App --env=production --workdir=./ --config:servers.default.port=$PORT --config:postgresql.url=$DATABASE_URL
Notice that we added a new configuration so that Heroku knows to use our database’s URL on the web and not the instance we have been running locally: --config:postgresql.url=$DATABASE_URL.
Save the Procfile and type git push heroku master in Terminal to deploy your app.
Deploying will take a few minutes.
Heroku needs to build your application, install Swift on your Heroku instance, and so on. After some time, your app will be live on the web.
Note that we didn’t push up the data from the local database to the remote database. You will have to exercise your app’s API to add some data to your database on Heroku.
Making changes is easy!
Simply write your code, commit the changes, and push them up to Heroku.
git commit -am "Adds new code"
git push heroku master
This post covered a lot of ground: We downloaded a number of tools.
Introduced Vapor.
Wrote a small web app.
Developed an API to read and write some data to Postgres.
Finally, we deployed the app to Heroku.
This post is intended to you get started with server-side Swift. To that end, we introduced Vapor and explored some of its features. But this introduction just scratches the surface; there is a lot more to Vapor. What’s exciting is that server-side Swift is moving fast! Stay tuned here for more posts on the subject.
If you’re looking for more to do on your own, try your hand at these extra challenges.
DELETE a friend from the database.PATCH a friend on the database.Our introductory guide to Swift Regex. Learn regular expressions in Swift including RegexBuilder examples and strongly-typed captures.
The Combine framework in Swift is a powerful declarative API for the asynchronous processing of values over time. It takes full advantage of Swift...
SwiftUI has changed a great many things about how developers create applications for iOS, and not just in the way we lay out our...