


Four Key Reasons to Learn Markdown
Back-End Leveling UpWriting documentation is fun—really, really fun. I know some engineers may disagree with me, but as a technical writer, creating quality documentation that will...
We have begun to use PostCSS plugins in almost all of our web projects to lint our CSS, support variables and mixins, transpile future CSS syntax, inline images and more. For example, we’ve been using Autoprefixer to add our vendor prefixes for us, and stylelint for linting our stylesheets.
So we’ve started to ask the question: If PostCSS is always going to be a project dependency, do we still need to use Sass in our projects?
As it turns out, we can actually get most of the functionality of Sass from a single PostCSS plugin.
PreCSS is a tool that allows you to use Sass-like markup in your CSS files. It lets you enjoy a familiar syntax with variables, mixins, conditionals and other goodies.
PreCSS is actually just made up of a number of smaller PostCSS plugins. You could simply use each of the individual plugins, but then you’d need to manage the order that the plugins process your stylesheets, so it is much easier to use PreCSS.
PreCSS alone will give us most of what we’d need to replace Sass, but there are plenty of additional PostCSS plugins to choose from. Let’s check out a few more!
cssnext is a PostCSS plugin that helps you to use the latest CSS syntax today. It transforms new CSS specs into more compatible CSS so you don’t need to wait for browser support.
cssnext provides a long list of features.
Here’s an example using the custom properties & var() features.
// out with the old
$color: blue;

.selector {
  color: $color;
}

// in with the new
:root {
  --color: blue;
}

.selector {
  color: var(--color);
}
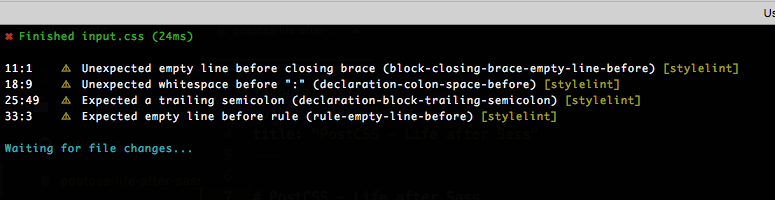
Stylelint is a mighty, modern CSS linter that helps you enforce consistent conventions and avoid errors in your stylesheets.
Stylelint’s linting rules are completely configurable. You can write a completely custom config, but it is common practice to start with the stylelint-config-standard, and then override individual rules as required by the needs of your project.
Stylelint will gently remind you when you make mistakes.
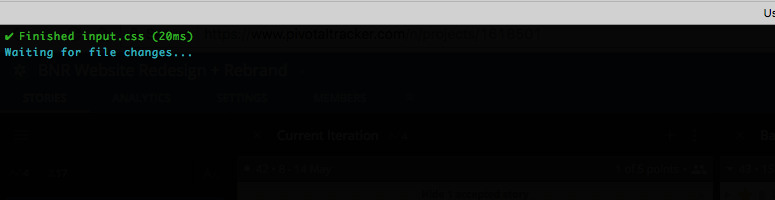
Or high five you when you get it right!
cssnano takes your nicely formatted CSS and runs it through many focused optimisations, ensuring that the final result is as small as possible for a production environment.
cssnano will perform a number of useful optimizations on your stylesheets including minification, adding vendor prefixes and compressing inline SVG definitions.
PostCSS doesn’t do anything by itself, it only processes an array of PostCSS plugins. We can use any of the popular build tools like Webpack, Gulp or Grunt to power PostCSS. For this simple example, we are just going to use an npm script.
So we’ll need to globally install the PostCSS CLI.
npm install -g postcss-cli
Let’s set up a simple project so we can test it out!
First let’s create a new project, and create a new package.json file.
mkdir postcss-example && cd postcss-example && npm init
Next let’s install all of our PostCSS plugins, and save them to our package.json file.
npm install postcss-cli stylelint stylelint-config-standard postcss-cssnext precss postcss-cssnext cssnano --save-dev
Then we’ll add the following to the scripts section of the package.json file.
"scripts": {
  "styles": "postcss input.css --config postcss.config.js --output output.min.css --watch"
},
Here we are telling PostCSS to --watch for changes to the input.css file. When a change occurs, we want PostCSS to look at our --config file (we’ll be creating that shortly) and based off of that config, write to our output.min.css file.
So, let’s create our postcss.config.js file.
touch postcss.config.js
Our config should look like this:
module.exports = () => ({
  plugins: {
    'stylelint': {
      "extends": "stylelint-config-standard",
      "rules": {
        "max-empty-lines": 2
      }
    },
    'precss': {},
    'postcss-cssnext': {},
    'cssnano': {
      'autoprefixer': false
    }
  }
});
There are many more config options available, but for our simple example, this will get the job done. (If you want to add additional plugins, just remember that the order that the plugins are entered into the config matters.)
So, here we are linting, then compiling our Sass(like) syntaxes, then our cssnext syntaxes, then finally we are minifying with cssnano.
For our stylelint plugin, we are telling stylelint to extend the default linting rules from the stylelint-config-standard package, and then to override the max-empty-lines rule with the rules object. Here we are setting the max number of empty lines to 2.
You’ll also notice that we are setting autoprefixer to false inside of the cssnano object. Autoprefixer is actually built into both the cssnext and cssnano plugins. We don’t want to run Autoprefixer twice, so make sure to turn it off in cssnano.
Ok, now that we’ve finally gotten everything into place, let’s test this thing out!
Create a new stylesheet.
touch input.css
Start watching for changes.
npm run styles
Now, when we make edits to input.css, we should be seeing a minified, compiled version in output.min.css.
If you want to see your changes in the browser, you can create a simple index.html file and link to the output.min.css file.
Be sure to not only test out the PreCSS syntax, but also to take a look at cssnext!
I really do like the idea of moving away from using Sass. In the ever-expanding world of front-end development, it is always a good feeling when I can remove dependencies from my projects. I especially like that PostCSS allows developers to write in a ‘future-proof’ syntax.
However, in my brief experimentation, I did notice a few issues.
The biggest hurdle was the learning curve that the new syntax introduces. It isn’t necessarily complicated or hard to understand, but I did myself seeking out the documentation quite a bit. For example, developers familiar with Sass will expect a mixin to look something like this:
// defining the mixin
@mixin thing($bg-color, $color) {
    background: $bg-color;
    color: $color;
}

// using the mixin
.selector {
    @include thing(red, blue);
}
A PreCSS mixin looks like this:
// defining the mixin
@define-mixin thing $bg-color, $color {
  background: $bg-color;
  color: $color;
}

// using the mixin
.selector {
  @mixin thing red, blue;
}
Again, one of the main goals of PreCSS is to provide a W3C friendly future-syntax. So becoming familiar with the syntax now isn’t necessarily a bad thing.
Another minor disappointment from PreCSS is a lack of custom functions. In my Sass projects, I often write custom functions to handle repetitive tasks for me.
For example, I might write something like this:
// - - span-columns - - spans x number of columns
@function span-columns($columns) {
  @return (1068 / 12 * $columns * 1px);
}

.avatar {
    width: span-columns(3); // width: 267px;
}
To be fair, this functionality doesn’t come built into PreCSS, but you can add custom functions using the postcss-functions plugin.
Overall, I really enjoyed using PostCSS. I have no doubt that PostCSS will be in my workflow for quite some time!
Want to learn more? This blog post barely scratches the surface. There are so many useful plugins. And if you’re in Atlanta, keep an eye out for an upcoming talk at the Atlanta Sass Meetup.
Writing documentation is fun—really, really fun. I know some engineers may disagree with me, but as a technical writer, creating quality documentation that will...
Humanity has come a long way in its technological journey. We have reached the cusp of an age in which the concepts we have...

Go 1.18 has finally landed, and with it comes its own flavor of generics. In a previous post, we went over the accepted proposal and dove...