
Swift Regex Deep Dive
iOS MacOur introductory guide to Swift Regex. Learn regular expressions in Swift including RegexBuilder examples and strongly-typed captures.
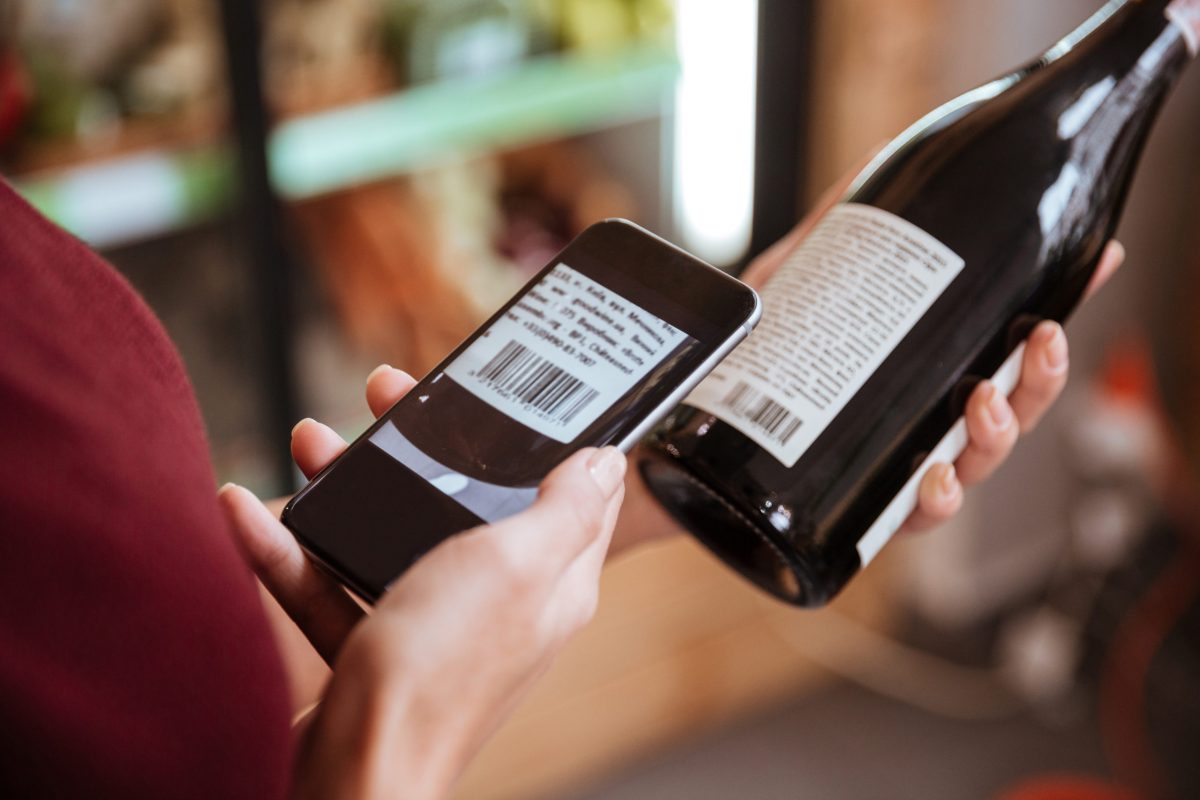
When using AVFoundation you might come by the need to capture multiple types of output from the cameras. You could be collecting in-depth data while also needing to watch for barcodes. In our case, we needed to watch and read barcodes while still returning the camera output for processing in a Core ML model.
Queue AVCaptureDataOutputSynchronizer. This mouthful of an object is just what we need to sync up and capture multiple types of output from the camera. First, let’s get the framework of our camera setup and we can go into more detail on how to use this class. Next, we will set up some variables we will need. The synchronizer and the two outputs we are wanting to collect. If you are wanting to detect barcodes you can use AVCaptueMetadataOutput.
var outputSynch: AVCaptureDataOutputSynchronizer!
    var videoOutput: AVCaptureVideoDataOutput!
    var metadataOutput: AVCaptureMetadataOutput!
Fired off by a method call in viewDidLoad, we need to configure our session we do this by calling beginConfiguration. The code below is pretty easy to reason through so we won’t spend to much time breaking it down. The main thing to know is this code setups what camera we are wanting to use, what mode it should be in, and adds it as an input to the capture session. There is a lot that can go wrong during this process so we make use of guards and catches anywhere we need too.
func setupCamera() {
        videoView.backgroundColor = UIColor.black
        captureSession = AVCaptureSession()
        captureSession.beginConfiguration()

        guard let videoCaptureDevice = AVCaptureDevice.default(.builtInWideAngleCamera, for: .video, position: .back) else { return }
        let videoInput: AVCaptureDeviceInput

        do {
            videoInput = try AVCaptureDeviceInput(device: videoCaptureDevice)
        } catch {
            return
        }

        if (captureSession.canAddInput(videoInput)) {
            captureSession.addInput(videoInput)
        } else {
            failed()
            return
        }
Starting off with our first output, we will set up our AVCaptureVideoDataOutput. This is how we will get a raw video frame from the camera in the form of CVPixelBuffer. The settings might look a bit cryptic if you are new to video processing. We need to tell AVFoundation what kind of format we want our data to be in. The interesting thing to note here is we are returning BGRA instead of the normal RGBA that you are used to seeing with screen color.
Everything else is pretty standard, except the attribute alwaysDiscardsLateVideoFrames. Normally this is set to true. When true, the output discards frames while it processes existing frames. When false it will keep frames around longer, the downside to this is more memory is allocated. The reason we set this to false is to avoid dropped frames when using the synchronizer. We do a lot of checks during that time and do not want to risk losing a good frame because it was dropped. This does not guarantee the frame won’t be dropped but lowers the chances.
let settings: [String : Any] = [
          kCVPixelBufferPixelFormatTypeKey as String: NSNumber(value: kCVPixelFormatType_32BGRA),
        ]

        videoOutput = AVCaptureVideoDataOutput()

        videoOutput.videoSettings = settings
        videoOutput.alwaysDiscardsLateVideoFrames = false
        videoOutput.setSampleBufferDelegate(self, queue: .main)
The video output is now taken care of, let us set up our barcode detector. We’ll also add both of our outputs to the capture session. Note: setting up metadata object detector is not hard, you just need to assign a delegate and inform what kinds of objects you want it to be looking for.
metadataOutput = AVCaptureMetadataOutput()

        if (captureSession.canAddOutput(metadataOutput)) {
            captureSession.addOutput(videoOutput)
            captureSession.addOutput(metadataOutput)

            metadataOutput.setMetadataObjectsDelegate(self, queue: DispatchQueue.main)
            metadataOutput.metadataObjectTypes = [.qr, .aztec, .datamatrix]
        } else {
            failed()
            return
        }
With both our outputs defined we will initialize our synchronizer by passing in a list of outputs we would like to be synchronized. Although we are using two outputs here we are not limited to just two outputs. With every output added we do add overhead to memory usage so make sure to keep an eye on your usage when debugging the application in Xcode. The final bits of code just add the preview to the screen for us.
outputSynch = AVCaptureDataOutputSynchronizer(dataOutputs: [videoOutput, metadataOutput])
        outputSynch.setDelegate(self, queue: .main)

        previewLayer = AVCaptureVideoPreviewLayer(session: captureSession)
        previewLayer.frame = videoView.layer.bounds
        previewLayer.videoGravity = .resizeAspectFill
        videoView.layer.addSublayer(previewLayer)
Finally, to finish out the function we will commit our configuration and start running the camera.
captureSession.commitConfiguration()
        captureSession.startRunning()
Now with the camera setup and running, we need to tell the application how we want it to process the frames as they come in. To keep our ViewController clean we are going to make a new file and extend the camera controller so our processing code is cleanly in its own place. You’ll see in this new file we not only deal with the synchronizer delegate but also the delegates for the video output and metadata object. While we will only be using a method given to us from the synchronizer delegate we still need to assign delegates for the other two outputs. So to keep things neat we add the following to our new file.
extension CameraViewController: AVCaptureDataOutputSynchronizerDelegate, AVCaptureVideoDataOutputSampleBufferDelegate, AVCaptureMetadataOutputObjectsDelegate {
The only method from the synchronizer delegate we need to implement is the dataOutputSynchronizer. This method fires every time a new object is created in any of the outputs. In our case with the video output, we should get a new item with every frame that comes in. So setting the camera into a high frame rate can trigger this method often. This is why the very first thing we do is a check if our main condition is met before moving forward and if not we move on.
While we put in a AVCaptureMetadataOutput into the synchronizer it gets wrapped into a new object called AVCaptureSynchronizedMetadataObjectData. This is true for any output object you put into the synchronizer. The AVCaptureSynchronizer will add methods we need to pull data from the timestamps.
To know if a barcode was found we call synchronizedData(for:) with passing in our metadata object. This will query the current synchronized frame that is currently being processed and return the wrapped object if one is found. If it is not found we will get back null and in our case, we will just go back to processing the next frame.
func dataOutputSynchronizer(_ synchronizer: AVCaptureDataOutputSynchronizer, didOutput synchronizedDataCollection: AVCaptureSynchronizedDataCollection) {

        guard let syncedMetadata: AVCaptureSynchronizedMetadataObjectData = synchronizedDataCollection.synchronizedData(for: metadataOutput) as? AVCaptureSynchronizedMetadataObjectData
            else { resumeVideo(); return }
Making it this far we now know there is some kind of object detected that matched the types of barcode we have requested. We will want the metadata object from the synchronized data. A synchronized object holds it objects data in a list. In our case metadataObjects will be the name of the list. We will just grab the first object, and check to make sure it is not null. Finally, for our example, we are going to make sure the metadata was a machine-readable code and then grab both the code and the bounding box location of the object.
 if let metadataObject = syncedMetadata.metadataObjects.first {
            // was an object found and we have the data for it?
            guard let readableObject = metadataObject as? AVMetadataMachineReadableCodeObject else { return }
            guard let stringValue = readableObject.stringValue else { return }
            guard let bounds = previewLayer?.transformedMetadataObject(for: readableObject)?.bounds else { return }
Great, now we have our all the data we are looking for from the metadata object. We just need to grab the pixel buffer and we should be all set. As expected our sample buffer object is wrapped in a synchronized object called AVCaptureSynchronizedSampleBufferData. Like with any synchronized object you’ll want to check to make sure the object does exist at this moment in time. So we again call the method synchronizedData(for:) and this time pass in our videoOutput so we can get the proper object back. If we do not have this frame, for our purposes we must return as we need both QR and video frame.
// Can we still pull the video frame from the synchronization buffer?
            guard let syncedBuffer: AVCaptureSynchronizedSampleBufferData = synchronizedDataCollection.synchronizedData(for: videoOutput) as? AVCaptureSynchronizedSampleBufferData else { resumeVideo(); return }
Unlike the metadata object, we are not worried about an object being detected. We simply want to make sure it exist and if so return it. As mentioned prior in regards to the attribute videoOutput.alwaysDiscardsLateVideoFrames we should have the frame in memory, but we need to make sure it was not dropped. This can be done by an attribute inside the synchronized sample buffer wrapper sampleBufferWasDropped. If this is false then it was not dropped and we can create our pixel buffer from the sample buffer. This is done simply as shown below. The CMSampleBufferGetImageBuffer returns an optional so we do this inside our guard call to catch any null values and return cleanly if so.
// Make sure nothing was dropped
            guard !syncedBuffer.sampleBufferWasDropped, let pixelBuffer: CVPixelBuffer = CMSampleBufferGetImageBuffer(syncedBuffer.sampleBuffer) else {
                resumeVideo(); return
            }
            // All is good send it over for processing!
            ourCustomResultsHandler(code: stringValue, bounds: bounds, buffer: pixelBuffer)
        }
Finally, if we have made it past this final guard then we know that we have all the metadata object information we were looking for. We also know we have our video frame represented as a CVPixelBuffer object. With all this information done, we can return to our method ourCustomResultsHandler. To keep our code clean we have our business logic of what happens next in its own function away from this delegate function. AVFoundation is a tricky library to use and wanting to capture complex video data that takes a lot of different information can be tricky. Luckily Apple has provided us with this overall easy tool to keep our outputs in sync.
Our introductory guide to Swift Regex. Learn regular expressions in Swift including RegexBuilder examples and strongly-typed captures.

The Combine framework in Swift is a powerful declarative API for the asynchronous processing of values over time. It takes full advantage of Swift...

SwiftUI has changed a great many things about how developers create applications for iOS, and not just in the way we lay out our...