

How to Effectively Manage Your Client-Partner Relationships
Clients Project StrategyClients leave when they feel that their needs aren’t being met. The strength of your client-partner relationship relies on a deep understanding of your client’s...
Editor’s note: This is the fifth post in our series on developing Alexa skills.
If you are reading this post, it is likely that you have finished writing a shiny new Alexa skill and you are ready to submit it to Amazon for review and publication. In this post, we’ll guide you through the submission process and help you get your skill published as quickly as possible.
Haven’t written your skill yet? Read on to learn about Amazon’s guidelines so that you can have a rapid and successful skill review.
If you want to have your own skill available to Alexa users, you will need to submit your skill to the Alexa Team for certification.
That means that you, as a skill developer, need to follow Amazon’s content and security policies if you wish to have your skill certified for distribution. Amazon offers an official checklist for skill submission, along with policy guidelines and security requirements.
As you might expect, skills with obscene, offensive or illegal content or purposes are terminally frowned upon. What you might not expect is that the content policies do not allow skills targeted to children, as they may compromise a child’s online safety. This is a less evident restriction you should consider when a new skill idea hits you.
Security for the server-side part of your skill is also an important consideration, and it may be tricky if you decide to host the skill yourself outside of AWS Lambda. In that case, your server will need to comply with Amazon’s security requirements. As an example, any certificates for your skill service need to be issued by an Amazon-approved certificate authority.
The good news is that if you host your skill services as Amazon Web Services Lambda functions as we have done in the Developing Alexa Skills blog series, all major security requirements are automatically satisfied.
The steps described from this point on assume that you have fully tested and debugged your skill, and that you will use an AWS Lambda function to deploy it.
If you need help in getting to this point, be sure to check out Josh Skeen’s posts on developing an Alexa Skill. In the series, we built a skill called Airport Info, which keeps users informed about airport delays and conditions. We’ll use Airport Info to go through the steps involved in submitting a skill for Amazon certification.
The first steps in getting your skill ready for the public are making sure your skill name is available, and getting a unique identifier for it from Amazon.
Log into your Amazon Developer account and open your skills list. Now click on the “Add a New Skill” button on the upper right corner of the page. On the Create New Skill page, set the “Skill Type” radio button to “Custom Interaction Model”. Set the “Name” to whatever name you wish users to see (in this case it will be “Airport Info”), and the “Invocation Name” to the name users will say to Alexa in order to invoke your skill. For us, it will be “airport info.”

When you are done entering information, click on the “Save” button on the lower left of the page. If all necessary fields have been completed, you will get a green checkmark beside the “Skill Information” cell on the table to the left of the page, and you will get an application ID as well. Copy this ID and save it somewhere for future use. The ID begins with the prefix “amzn1.echo-sdk-ams.app”.
As mentioned before, the easiest way to meet the Amazon security requirements for the server-side component of your skill is to deploy it using AWS Lambda.
To get started, go to the Amazon Web Services console at and click on the “Lambda” button. On the next page, click on the blue “Get Started Now” button, which will take you to a page with a series of blueprints to create different services. Just click on the gray “Skip” button at the bottom of the page to continue.
On the resulting page, enter a name for your Lambda function. In this case it will be “airportinfo”. The “Description” field can have any information that can help you remember what this function does. The runtime selects the language and version used for your skill service. Amazon recommends that you use Node.js 4.3.

The next step involves submitting your code. A convenient option is to create an archive with all of the files you created during your local development, and uploading this archive to the Lambda console. Begin by compressing you skill’s files into a .zip archive, and don’t forget to include the node_modules folder.

After creating your archive, select the “Upload a .zip File” radio button on the Lambda console, click on the “Upload” button and select your archive.

Next, ensure your Handler is set to the default value of “index.handler”.
Lastly, let’s set up your IAM (Identity and Access Management) Role, which allows you to control access to various services and features within AWS. In this scenario, we need to give your Lambda function permission to read and write data to the DynamoDB you’ve set up. To enable this, select “Basic with DynamoDB” from the “Role” dropdown below the default “Handler” field. This will open a new tab, where you should select “Create a new IAM Role” from the “IAM Role” dropdown. Enter a desired name for this new role, such as “lambda_dynamo”, and click “Allow” in the bottom right corner to continue.
If everything went through, you will now see the newly created role in the “Role” field of your Lambda function’s configuration.

Leave all other settings with their default values and click on the “Next” blue button at the bottom of the page. Note that if you have chosen to use Java, you should enter a value of at least 512 in the “Memory (MB)” field so that the Java runtime stays loaded.
You will see a review page where you can click the blue “Create function” button.

Now you need to instruct AWS that your Lambda function will be used as an Alexa skill. This is part of the security configuration, specifying that your function should not be accessed for purposes other than Alexa events. Click on the “Event Sources” tab for your Lambda function and click on the “Add event source” link. Select “Alexa Skills Kit” from the dialog that appears on the screen, and then click on the “Submit” button.
Please note that the “Alexa Skills Kit” option will be available only if you have the correct server location selected. It must be “US East (N. Virginia)”. This setting can be changed on the upper right-hand corner of the Lambda console, beside your login name.

On the upper right corner of the page, you should find a unique identifier for your function, beginning with “arn:aws:lambda:”. Make a note of this identifier, as you will need it soon.
You have now completed the first step required to configure your skill in the Amazon Developer Console. Next we’ll complete the Interaction Model for your skill.
Go back to the skills list on your Amazon Developer Console and select the skill you are deploying. In the table on the left of the page, select “Interaction Model” and enter the Intent Schema. The best place to obtain the intent schema is from the local development test page, as described in our post on implementing an intent in an Alexa skill.

If your skill uses any custom slots, you need to list all the possible values that can be accepted. Do this by clicking on the “Add Slot Type” button, then entering the Type and the values.
In the case of Airport Info, the custom slots correspond to all the three-letter FAA airport codes. Within the skill code they are identified as “FAACODES”.

Next, you must enter sample utterances for your skill. These are the phrases that your skill can recognize from the user to provide a response. After entering the utterances, click the “Next” button. The best place to obtain these utterances is from the web interface available when you test your skill locally with alexa-app and alexa-app-server.

The next step is to configure your skill so that it is linked to the Lambda function you created earlier.
The “Configuration” page on the Amazon Developer Console lets you do that. To complete this step, you will need the ARN (Amazon Resource Name) you copied from the AWS console when creating the AWS Lambda function.
Select “Lambda ARN” for the “Endpoint” field and enter the ARN code. Select whether your users may link the skill to another type of account (e.g., Twitter), then click the “Next” button. Amazon has more info on linking skills to other accounts if you need it.

The next step involves providing information that will be used to produce a skill description for users.
The first field is a short skill description (under 160 characters) that will be used for the main list of skills in the Alexa app.
The second field is a longer description, where you should try to convince people to use your skill. Users can read this description when looking at the skill details card on the Alexa App.
Next there are three fields to enter three example phrases to interact with your skill. These must be frequent and useful phrases, and they must be 100% correct. Amazon indicates that incorrect phrases are a sure way to have your skill submission rejected. If your skill uses slots, make sure to provide valid values. Each phrase must begin with an explicit “Alexa, …” and each must directly match one of the sample utterances specified earlier.

In the next field, you will see a popup where you can select the skill’s category. For Airport Info, the best category is “Travel”, but you should find the best match for your skill.
The “Keywords” field lets you type words, separated by commas or whitespace, that will increase the chances of finding your skill when a user launches a search on the Alexa App. Be generous here—you want users to discover your skill.
Your skill also needs some attractive icons. You will need two versions: 108 x 108 pixels and 512 x 512 pixels. These icons can have transparency and they can be PNG or JPG files. Click on the image wells to upload the files.
Finally, the “Testing Instructions” field allows you to pass any useful testing information to the Amazon skill testers. This information is meant to help the skill certification team properly exercise your skill and test every function. You may want to provide some examples, possible slot values and any other information that may be useful.

Click on the “Next” button at the bottom right of the page to move to the final step.
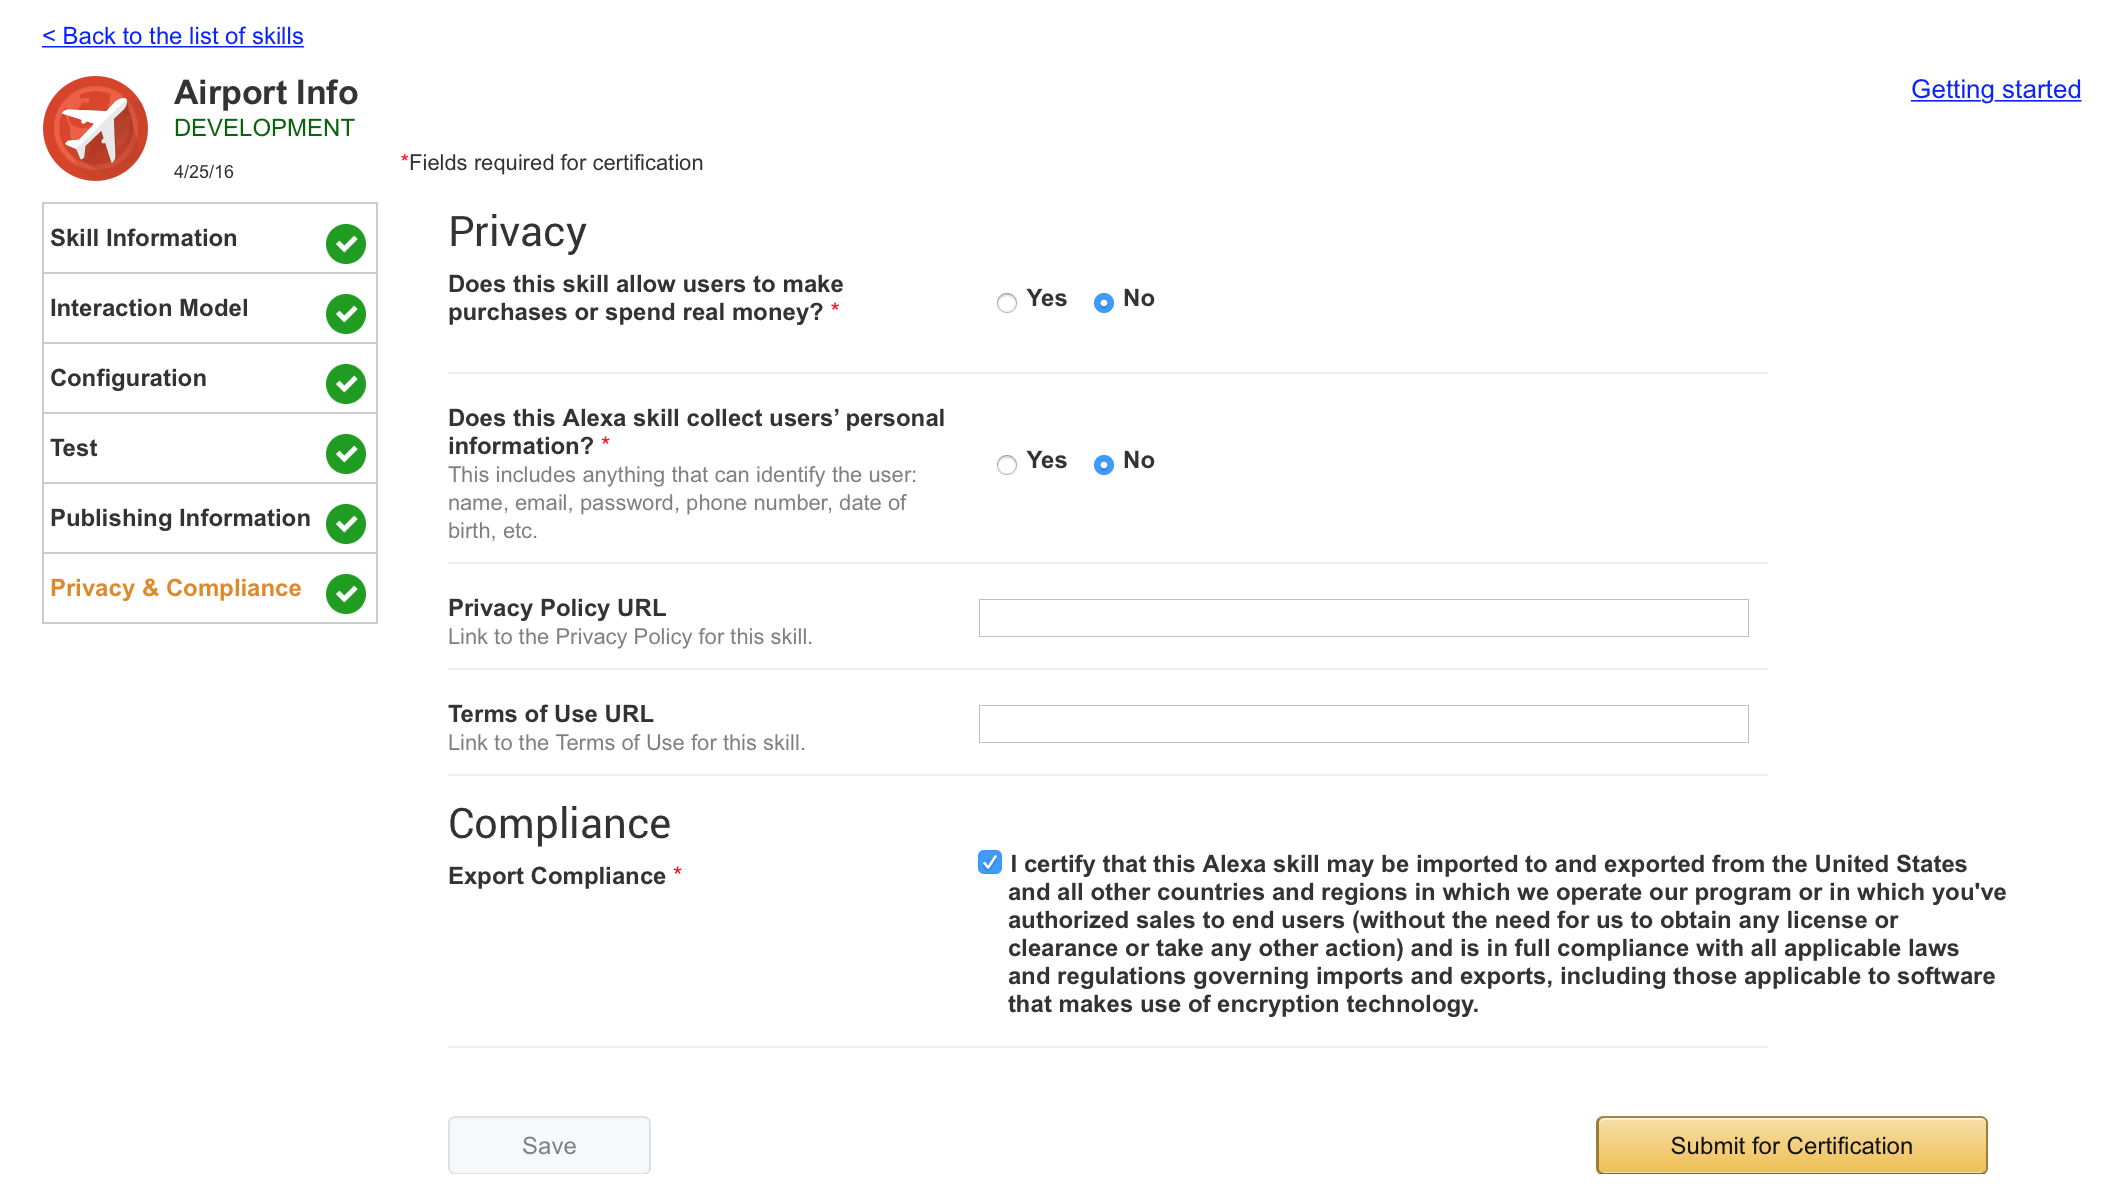
The final step for the skill submission asks whether your skill allows users to make purchases or spend money with your skill. Unless your skill is an extension of a service or product that already has a payment system established, you should choose “No”.
You are also asked if your skill collects a user’s personal information or passwords. (This may be the case if you skill is linked to other accounts.) Depending upon your answers, you may need to provide URLs for Privacy Policy and Terms of Use information.
The final field asks you to certify that your Alexa skill may be imported to or exported to other countries. You must click the checkbox to submit your skill.
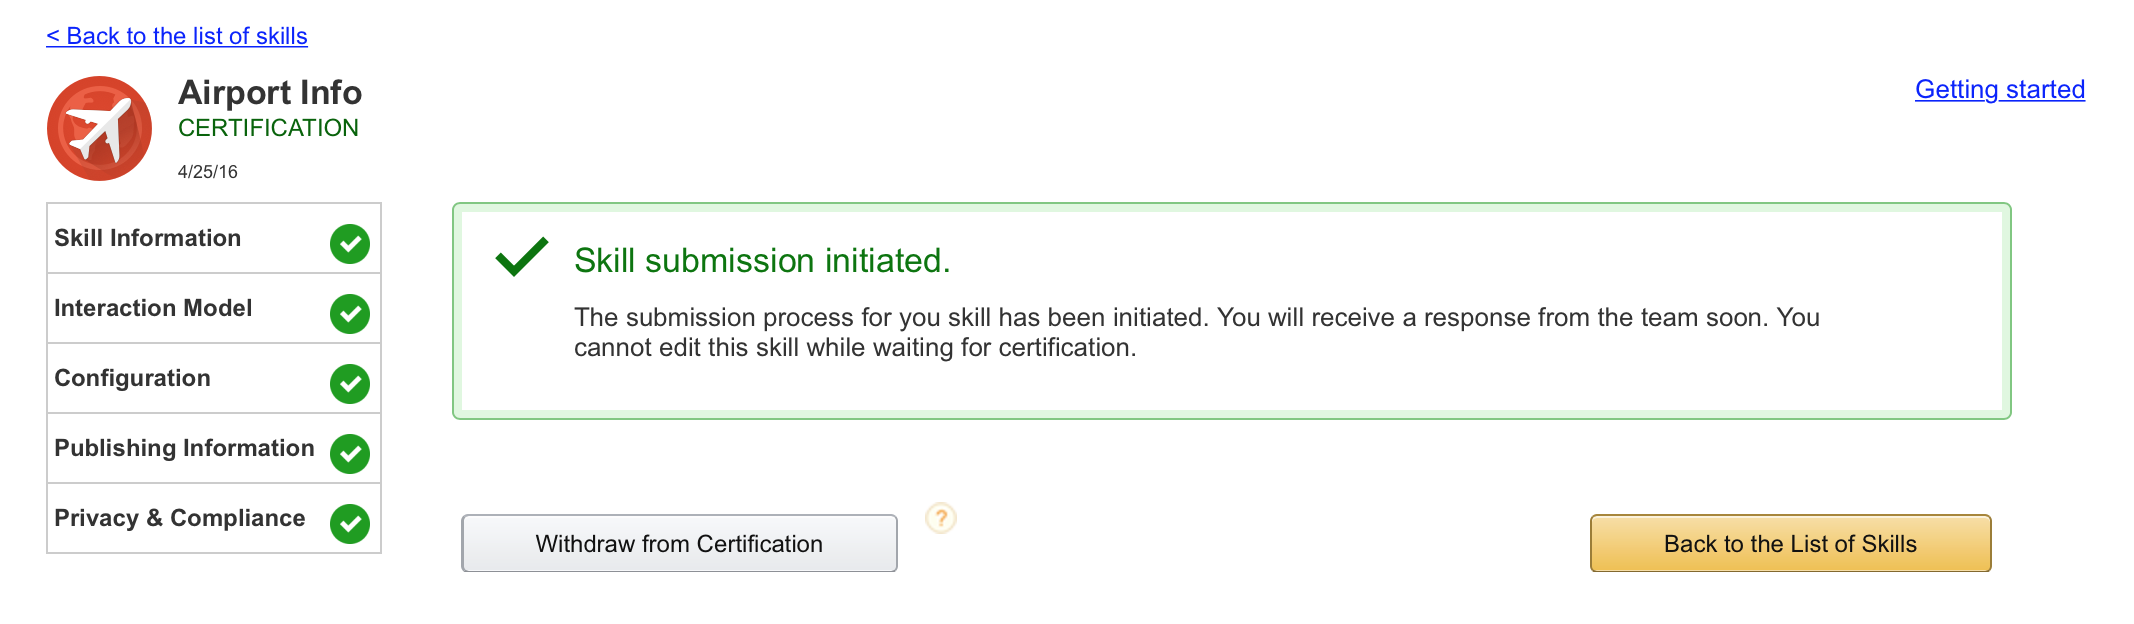
Finally, you may click on the “Submit for Certification” button. You will see the following page to confirm that the skill certification has been started.
At this point, you cannot make any changes to your skill, but you may withdraw it if you change your mind or discover serious problems.
You will also get an email from the Alexa Skills Team confirming your submission. The current turnaround time is seven days. If you have questions in the meantime, you can reach out to Amazon.
After submitting the Airport Info Skill for review, it was rejected—but that’s good news for you and this tutorial, as we learned a lot about the process. The Amazon Alexa team sent an email indicating the areas that needed attention.
Particular issues that were pointed out:
The solution to the first issue included extending the code-generated list of utterances. In the index.js file of the Airport Info skill, the utterances were generated with:
app.intent('airportInfo', {
    'slots': {
      'AIRPORTCODE': 'FAACODES'
    },
    'utterances': ['{|flight|airport} {|delay|status} {|info} {|for} {-|AIRPORTCODE}']
  },

// ...
The code had to be updated to:
app.intent('airportInfo', {
    'slots': {
      'AIRPORTCODE': 'FAACODES'
    },
    'utterances': ['{|flight|airport} {|delay|status} {|info|information} {|for|at} {-|AIRPORTCODE}']
  },

// ...
The second issue required a slight change to the airportInfo intent:
function(request, response) {
    var airportCode = request.slot('AIRPORTCODE');
    var reprompt = 'Tell me an airport code to get delay information.';
    if (_.isEmpty(airportCode)) {
      var prompt = 'I didn't hear an airport code. Tell me an airport code.';
      response.say(prompt).reprompt(reprompt).shouldEndSession(false);
      return true;
    } else {
      var faaHelper = new FAADataHelper();
      faaHelper.requestAirportStatus(airportCode).then(function(airportStatus) {
        response.say(faaHelper.formatAirportStatus(airportStatus)).send();
      }).catch(function(err) {
        var prompt = 'I didn't have data for an airport code of ' + airportCode;
        response.say(prompt).reprompt(reprompt).shouldEndSession(false).send();
      });
      return false;
    }
  }
Note how the session is ended now with shouldEndSession(true):
function(request, response) {
    var airportCode = request.slot('AIRPORTCODE');
    var reprompt = 'Tell me an airport code to get delay information.';
    if (_.isEmpty(airportCode)) {
      var prompt = 'I didn't hear an airport code. Tell me an airport code.';
      response.say(prompt).reprompt(reprompt).shouldEndSession(false);
      return false;
    } else {
      var faaHelper = new FAADataHelper();
      faaHelper.requestAirportStatus(airportCode).then(function(airportStatus) {
        response.say(faaHelper.formatAirportStatus(airportStatus)).shouldEndSession(true).send();
      }).catch(function(err) {
        var prompt = 'I didn't have data for an airport code of ' + airportCode;
        response.say(prompt).reprompt(reprompt).shouldEndSession(true).send();
      });
      return false;
    }
  }
The third issue required the implementation of stop and cancel intents (Amazon has more information on built-in intents):
var exitFunction = function(request, response) {
  var speechOutput = 'Goodbye!';
  response.say(speechOutput);
};

app.intent('AMAZON.StopIntent', exitFunction);
app.intent('AMAZON.CancelIntent', exitFunction);
Finally, a help intent was added to resolve the fourth issue (more information about the help intent can be found in the Amazon docs):
app.intent('AMAZON.HelpIntent', function(request, response) {
  var speechOutput = 'To request information on an airport, request it by it's status code.' +
    'For example, to get information about atlanta hartsfield airport, say airport status for ATL';
  response.say(speechOutput);
});
The Amazon Skills Team’s thorough review allowed us to quickly fix these issues. After we updated the code and uploaded it again to the AWS Lambda function, the skill was once more ready to submit for certification.
Now you’re ready to submit your own skill for certification. Using these tips, it should be a speedy and successful review. Best of luck with your submission!
Clients leave when they feel that their needs aren’t being met. The strength of your client-partner relationship relies on a deep understanding of your client’s...

Responding to change is a key tenant of Agile Software Development. Predicting change is difficult, but software can be developed in a manner that...

A lot of this confusion surfaces around the scope of machine learning. While there is a lot of hype around deep learning, it is...