The post ARKit 2: Bringing richer experiences through collaboration, enhanced detection, and greater realism appeared first on Big Nerd Ranch.
]]>At WWDC 2018, Apple continued to push the envelope with ARKit by releasing ARKit 2. Late in 2017, Apple released ARKit 1, which allowed users to place 3D objects in the real world. This technology was showcased by companies like Ikea who allowed users to try out furniture in their homes. A few months later, Apple released ARKit 1.5. This release gave users the ability to detect not only horizontal planes like the floor of their homes, but also their walls. In addition to vertical plane detection, Apple added Image Recognition, which allowed users to detect images and paintings just by pointing their phones at them. At WWDC 2018, Apple introduced enhancements to face tracking, as well as the following new features: saving and loading maps, environmental texturing, image tracking, and object detection.
Saving and Loading Maps
The first, and probably the most exciting feature, is Saving and Loading Maps. Apple added a new object to the ARKit API called an ARWorldMap. This object, which includes a mutable array of ARAnchors and raw feature points and extent, allows the developer to save and share the mapping of a 3D space. This becomes very exciting when you realize that this gives users two key features: persistence and shared experiences. Persistence allows the user to pause their AR experience and return to it at a later time, without losing any of their previous experience. This contrasts to previous versions of ARKit, which forced users to restart their ARKit experiences when the app entered the background. In addition, using local sharing like AirDrop or Bluetooth, users can share their AR experiences with one another as well as experience them at the same time. This means that two or more people can now play the same AR game or watch the same AR educational experience at the exact same time, seeing the exact same scene. This isn’t like two people watching the same movie at the same time, instead, it would be like two people creating the same movie together or playing the same game of Monopoly, each seeing the other’s moves and changes in realtime.
Saving and loading the world map is simple. Once you have obtained a reference to an ARWorldMap object by using the getCurrentWorldMap(completionHandler:) and have saved it, you can assign it to a configuration’s initialWorldMap property, which loads in all of the same data and feature points recorded previously.
Environmental Texturing
In previous versions of ARKit, 3D objects placed in the real world didn’t have the ability to gather much information about the world around them. This left objects looking unrealistic and out of place. Now, with environmental texturing, objects can reflect the world around them, giving them a greater sense of realism and place. When the user scans the scene, ARKit records and maps the environment onto a cube map. This cube map is then placed over the 3D object allowing it to reflect back the environment around it. What’s even cooler about this is that Apple is using machine learning to generate parts of the cube map that can’t be recorded by the camera, such as overhead lights or other aspects of the scene around it. This means that even if a user isn’t able to scan the entire scene, the object will still look as if it exists in that space because it can reflect objects that aren’t even directly in the scene.
To enable environmental texturing, we simply set the configuration’s environmentalTexturing property to .automatic.
Image Tracking
Next, not only can ARKit detect images, but it can now track images. Images no longer need to be static for ARKit to place objects in 3D space using detected images. Now, when ARKit detects an image, that image can move freely in the real world while still retaining its ARAnchor. This can be done for multiple images at the same time. Each image is tracked simultaneously at 60fps.
Much like ARWorldTrackingConfiguration, which can detect images in the real world, Apple has provided an ARImageTrackingConfiguration. While both can detect images in the real world, the main difference is that instead of tracking everything in the AR world, ARImageTrackingConfiguration just tracks the images, allowing the user to anchor 3D objects to the moving images. To set the number of images to be tracked, set the trackingImages property of the configuration. If the camera detects more images than that specified, the image will be detected and given an anchor but will not be tracked.
Object Detection

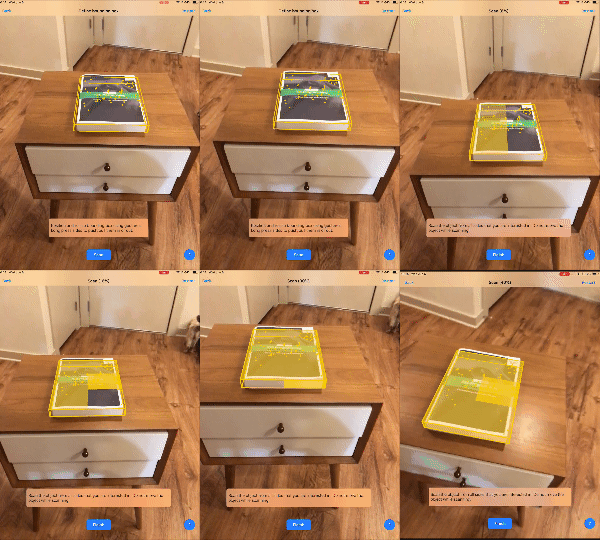
The new ARKit gives you the ability to scan 3D objects in the real world, creating a map of the scanned object that can be loaded when the object comes into view in the camera. Similar to the ARWorldMap object, ARKit creates a savable ARReferenceObject that can be saved and loaded during another session.
To load a scanned reference object, the detectionObjects property, of the ARWorldTrackingConfiguration needs to be set to the reference object(s) needed.
Apple has created a project that can be used to scan 3D objects, and can be downloaded here.
Face Tracking Enhancements
Lastly, Apple has improved its face tracking capabilities by adding two features: gaze tracking and tongue detection. Both of these features allow for more immersive and expressive Animojis and Memojis.
Apple has put a lot of time and effort into improving ARKit, clearly shown by this year’s updates. I encourage you to go to Apple’s developer website, download the betas and sample projects, and try each of these for yourself.
The post ARKit 2: Bringing richer experiences through collaboration, enhanced detection, and greater realism appeared first on Big Nerd Ranch.
]]>The post WWDC 2017: Implementing Apple’s Drag and Drop appeared first on Big Nerd Ranch.
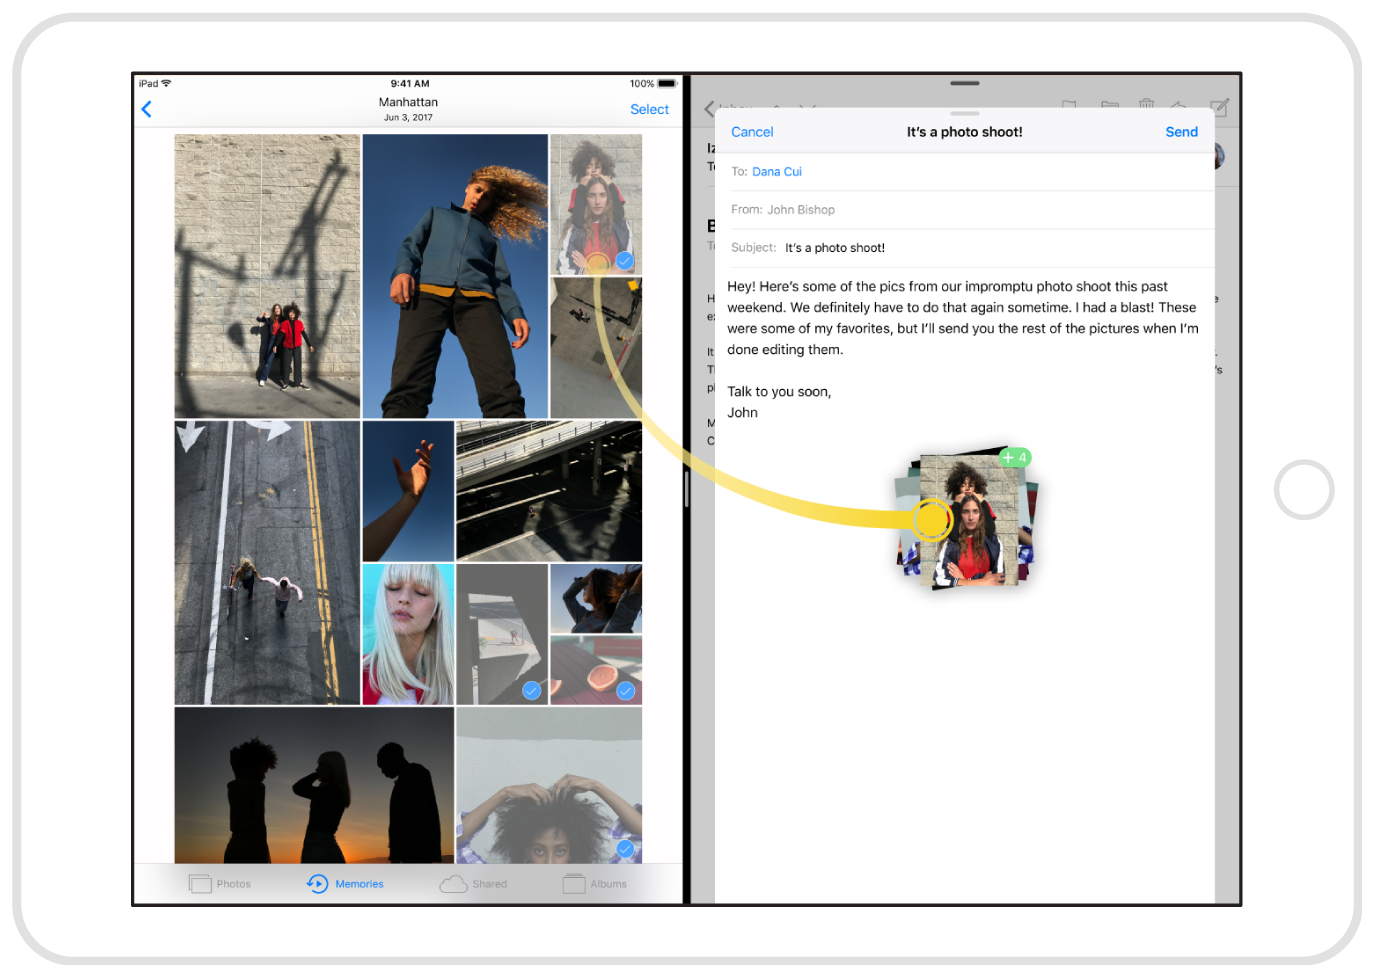
]]>Drag and Drop makes it easier to get work done on an iPad by allowing you to drag links, text, images and documents between apps in a way that was never possible. For example, creating a note in the Notes app with text and photos from a website was a tedious task composed of copying and pasting each item. With Drag and Drop, I am able to grab multiple types of items at once from the webpage and drop them all at once in my note.
Drag and Drop drags content from a source and drops it on a target. A view becomes a drag source by implementing the UIDragInteractionDelegate protocol. A view becomes a drop target by implementing the UIDropInteractionDelegate protocol.
And the good news is, it’s easy to implement.

Implementing Drag
- First, your drag source view needs to conform to the
UIDragInteractionDelegate. - Create a
UIDragInteractioninstance and add it to your view. - Create a drag item by implementing the
dragInteraction(_:itemsForBeginning:)method in the delegate.
let dragInteraction = UIDragInteraction(delegate: self)
view.addInteraction(dragInteraction)


func dragInteraction(_ interaction: UIDragInteraction, itemsForBeginning session: UIDragSession) -> [UIDragItem] {
     guard let image = imageView.image else { return [] }

     let provider = NSItemProvider(object: image)
     let item = UIDragItem(itemProvider: provider)
     item.localObject = image

     return [item]
}
That’s it! You can now drag your item around your view and across views. Next, you need to implement Drop.
Implementing Drop
- Like Drag, you need to first conform to the
UIDropInteractionDelegateon the view you want to accept drops. - You need to create a
UIDropInteraction. - Decide what types of drag items you want to accept by implementing the
dropInteraction(_ interaction:, canHandle session:) -> Boolmethod. - Tell the delegate how you want to consume the drag item with the
dropInteraction(_ interaction:, sessionDidUpdate session:) -> UIDropProposalmethod (copy, move, etc.). - Finally, after you lift your finger, request the data for the drag item with
dropInteraction(_ interaction:, performDrop session:).
 let dropInteraction = UIDropInteraction(delegate:self)
 view.addInteraction(dropInteraction)

 func dropInteraction(_ interaction: UIDropInteraction, canHandle session: UIDropSession) -> Bool {
      return session.canLoadObjects(ofClass: [UIImage.self])
 }

 func dropInteraction(_ interaction: UIDropInteraction, sessionDidUpdate session: UIDropSession) -> UIDropProposal {
     return UIDropProposal(operation: .copy)
 }

 func dropInteraction(_ interaction: UIDropInteraction, performDrop session: UIDropSession) {
     session.loadObjects(ofClass: UIImage.self) { imageItems in
         let images = imageItems as! [UIImage]
         self.imageView.image = images.first
     }
 }
To allow your apps to send or receive data from other apps, implement the designated delegate protocol and follow the steps above for that protocol. There are many more methods that can be implemented to give greater customization to the drag and drop workflow in Apple’s documentation.
What about iPhone?
With all of the talk about iPad, you may be wondering if this feature is available on the iPhone. The answer is yes and no. While the full API is available on the iPhone, it only works within individual apps. You cannot drag items from one app to another, but you can, for example, drag a file from one folder in your app to another folder in another part your app.
Conclusion
In 2015, Apple took iPad to a whole other level with multitasking. Now, with Drag and Drop, Apple continues to push iPad further. You now know how easy it is to implement this powerful feature into your apps. As an iPad user, I can’t wait to see what you and the rest of developers come up with using Drag and Drop.
Learn more about why you should update your apps for iOS 11 before launch day, or download our ebook for a deeper look into how the changes affect your business.
The post WWDC 2017: Implementing Apple’s Drag and Drop appeared first on Big Nerd Ranch.
]]>