The post Bluetooth Low Energy on Android, Part 3 appeared first on Big Nerd Ranch.
]]>
In Part 2 we were able to successfully send a message from the Client to the Server and have the Server echo it back. In this final installment, we will dive into Descriptors. We will discuss their usage and how to set one up to handle the Server pushing Characteristic updates to the Client.
What are Descriptors?
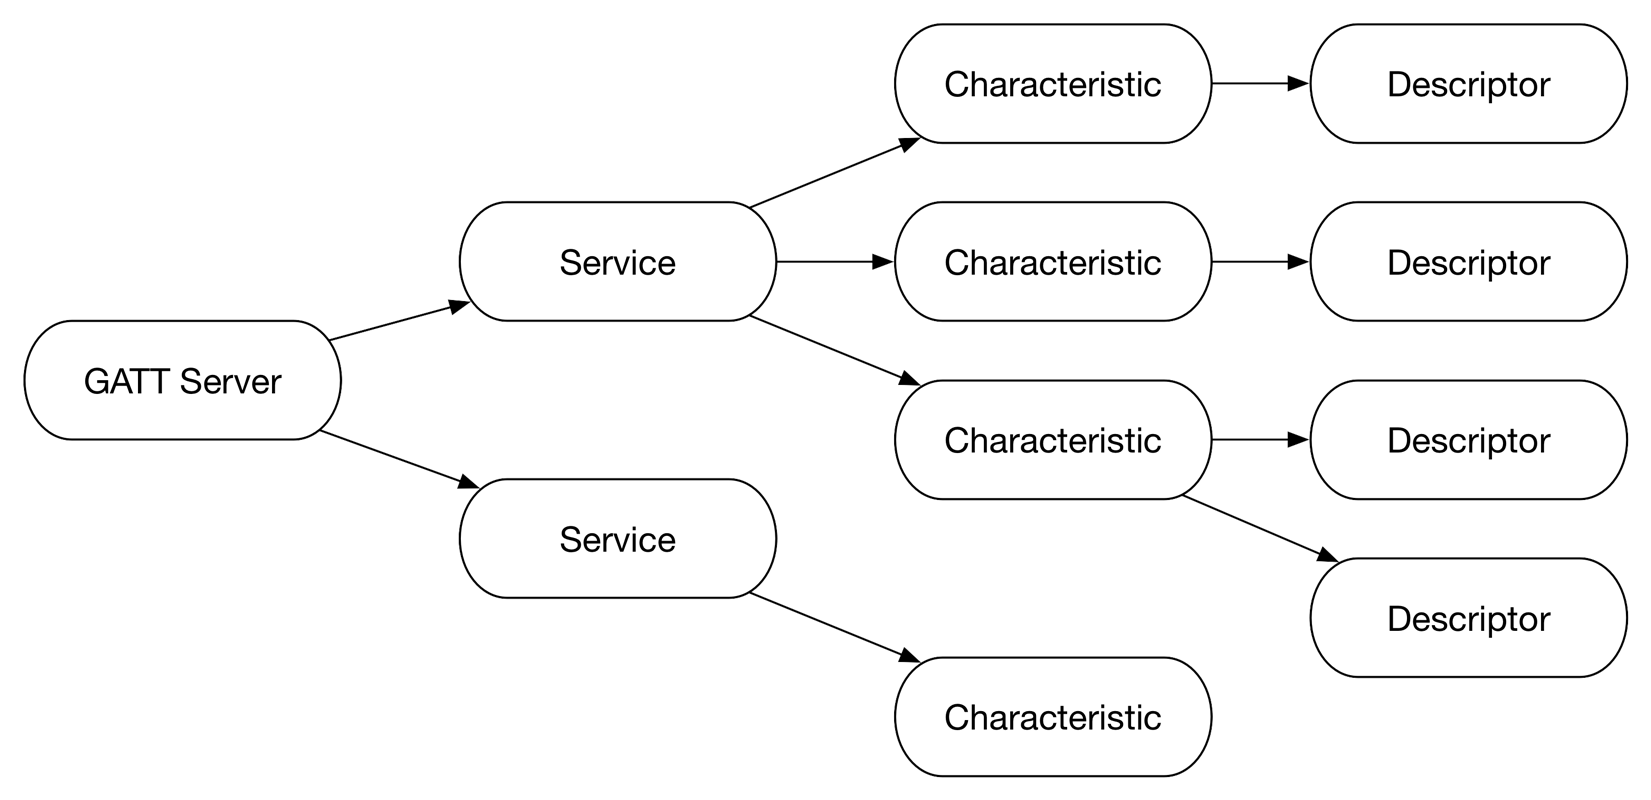
Characteristic Descriptors are defined attributes that describe a characteristic or its value. While there are a lot of descriptors, the most commonly used is the Client Characteristic Configuration Descriptor. This Descriptor specifies how the parent Characteristic can be configured by a client device. In this case, we’ll be using it to control notifications. As a reminder, here is an overview of the GATT structure.
 But you may ask “Why use a Descriptor to control Characteristic notifications? We already set those up in part 2.” That’s true! Essentially, this is an extra step that ensures the Server doesn’t send a notification to a Client that is in the incorrect state to read values from the Characteristic. Depending on the application, this may not mean anything more than a dropped message but could be important to the protocol to delay notifications until the Client has finished setup. Note: In the time since part 2 was released, Android now has full support for Kotlin. The app has been converted to take advantage of all the new bells and whistles.
Add New Characteristic
Let’s start by adding a button to send a timestamp from the Server to the Client.
override fun onCreate(savedInstanceState: Bundle?) {
    ...
    with(binding) {
        sendTimestampButton.setOnClickListener { sendTimestamp() }
    }
}
Then, create the Client Configuration Descriptor for sending the timestamp, and add to a new Characteristic.
private fun setupServer() {
    ...
    val writeCharacteristic = BluetoothGattCharacteristic(...)
    val clientConfigurationDescriptor = BluetoothGattDescriptor(
            CLIENT_CONFIGURATION_DESCRIPTOR_UUID,
            BluetoothGattDescriptor.PERMISSION_READ or BluetoothGattDescriptor.PERMISSION_WRITE).apply {
        value = BluetoothGattDescriptor.DISABLE_NOTIFICATION_VALUE
    }
    val notifyCharacteristic = BluetoothGattCharacteristic(
            CHARACTERISTIC_TIME_UUID,
            properties = 0,
            permissions = 0)
    notifyCharacteristic.addDescriptor(clientConfigurationDescriptor)
    ...
}
As a reminder, the Characteristic UUIDs are created from a string of the format XXXXXXXX-XXXX-XXXX-XXXX-XXXXXXXXXXXX and can be any unique string you choose. However, the Client Configuration Descriptor has a 16 bit “short UUID” of 0x2902 and is masked against a Base UUID of 0000xxxx-0000-1000-8000-00805F9B34FB to create full 128 bit UUID. The Bluetooth® Service Discovery Protocol (SDP) specification defines a way to represent a range of UUIDs (which are nominally 128 bits) in a shorter form.
Now that we have our Characteristic with Descriptor, add it to the gattServer like usual.
private fun setupServer() {
    ...
    val notifyCharacteristic = BluetoothGattCharacteristic(...).apply{...}
    gattServer!!.addService(
        BluetoothGattService(SERVICE_UUID,
                BluetoothGattService.SERVICE_TYPE_PRIMARY).apply {
            addCharacteristic(writeCharacteristic)
            addCharacteristic(notifyCharacteristic)
        }
    )
}
Find Characteristic & Setup Client Configuration Descriptor
Switching to our Client, let’s have it look for our new Characteristic and enable notifications once we’ve discovered services.
override fun onServicesDiscovered(gatt: BluetoothGatt, status: Int) {
    ...
    gatt.services.find { it.uuid == SERVICE_UUID }
            ?.characteristics?.find { it.uuid == CHARACTERISTIC_TIME_UUID }
            ?.let {
                if (gatt.setCharacteristicNotification(it, true)) {
                    enableCharacteristicConfigurationDescriptor(gatt, it)
                }
            }
}
This step is similar to how we set the write type for the Echo Characteristc, but now we also enable the Client Configuration Descriptor. To find it we can either look for the short UUID, or the full 128 bit UUID created by masking the short UUID with the Base UUID.
private fun enableCharacteristicConfigurationDescriptor(gatt: BluetoothGatt, characteristic: BluetoothGattCharacteristic) {
    characteristic.descriptors.find { it.uuid.toString().substring(4, 8) == CLIENT_CONFIGURATION_DESCRIPTOR_ID }
            ?.apply {
                value = BluetoothGattDescriptor.ENABLE_NOTIFICATION_VALUE
                gatt.writeDescriptor(this)
            }
}
If we wanted to check if the Descriptor was enabled correctly, we could implement onDescriptorWrite to check if we received a GATT_SUCCESS for the status.
Notify Connected Devices
Now in our Server, we need to add the Clients that are listening to the Configuration Descriptor to our clientConfigurations map. This signifies that the Client is connected and has correctly configured the Descriptor for use, which we will check when notifying them.
override fun onDescriptorWriteRequest(device: BluetoothDevice,
                                      requestId: Int,
                                      descriptor: BluetoothGattDescriptor,
                                      preparedWrite: Boolean,
                                      responseNeeded: Boolean,
                                      offset: Int,
                                      value: ByteArray) {
    super.onDescriptorWriteRequest(device, requestId, descriptor, preparedWrite, responseNeeded, offset, value)
    if (CLIENT_CONFIGURATION_DESCRIPTOR_UUID == descriptor.uuid) {
        clientConfigurations[device.address] = value
        sendResponse(device, requestId, BluetoothGatt.GATT_SUCCESS, 0, null)
    }
}
Next, we build a simple timestamp string, convert it to bytes, and send it to notifyCharacteristic.
private val timestampBytes: ByteArray
    get() {
        @SuppressLint("SimpleDateFormat")
        val dateFormat = SimpleDateFormat("yyyy-MM-dd HH:mm:ss")
        val timestamp = dateFormat.format(Date())
        return timestamp.toByteArray()
    }
private fun sendTimestamp() =
    notifyCharacteristic(timestampBytes, CHARACTERISTIC_TIME_UUID)
Since we now have multiple Characteristics (one for echoing a reversed message and the new one to send a timestamp) to notify, let’s extract the logic and make it reusable. First, we find the Service then Characteristic and set its value. Then, check if the Characteristic needs confirmation by checking its properties. Note: Indications require confirmation, notifications do not.
private fun notifyCharacteristic(value: ByteArray, uuid: UUID) {
    handler.post {
        gattServer?.getService(SERVICE_UUID)
                ?.getCharacteristic(uuid)?.let {
                it.value = value
                val confirm = it.properties and BluetoothGattCharacteristic.PROPERTY_INDICATE == BluetoothGattCharacteristic.PROPERTY_INDICATE
                devices.forEach { device ->
                    if (clientEnabledNotifications(device, it)) {
                        gattServer!!.notifyCharacteristicChanged(device, it, confirm)
                    }
                }
            }
        }
    }
}
Finally, check that each connected device has enabled notifications before sending them. We first check if there is a Client Configuration Descriptor. If there isn’t one, we consider the Characteristic correctly set up and notify the device. Otherwise, we must check that we have a saved configuration for this device’s address. If it is not found or not enabled, we will not notify the device.
private fun clientEnabledNotifications(device: BluetoothDevice, characteristic: BluetoothGattCharacteristic): Boolean {
    val descriptorList = characteristic.descriptors
    val descriptor = descriptorList.find { isClientConfigurationDescriptor(descriptorList) }
            ?: // There is no client configuration descriptor, treat as true
            return true
    val deviceAddress = device.address
    val clientConfiguration = clientConfigurations[deviceAddress]
            ?: // Descriptor has not been set
            return false
    return Arrays.equals(clientConfiguration, BluetoothGattDescriptor.ENABLE_NOTIFICATION_VALUE)
}

private fun isClientConfigurationDescriptor(descriptor: BluetoothGattDescriptor?) =
        descriptor?.let {
            it.uuid.toString().substring(4, 8) == CLIENT_CONFIGURATION_DESCRIPTOR_ID
        } ?: false
The timestamp should now be ready to read from the Characteristic! At the end of part 2, the Client should already be logging all characteristic changes in onCharacteristicChanged.
Closing Thoughts
I hope this blog series was able to demystify some of the Bluetooth Low Energy usage on Android. In this post, we added to our Server a Characteristic with a Client Configuration Descriptor that controlled its notifications. We were able to register for notifications from the Client and receive a timestamp using that Chraracteristic. For the sake of this example, our usage was relatively simple. The Server could save the configurations across connections to allow Clients a quicker setup or use the Indications. Each bluetooth server’s usage of the Client Characteristic Configuration Descriptor can be different, and it will be important to read the defined specifications to understand the handshake. As always, the full source is on a branch in the GitHub repo. Happy coding!
The post Bluetooth Low Energy on Android, Part 3 appeared first on Big Nerd Ranch.
]]>The post Bluetooth Low Energy on Android, Part 2 appeared first on Big Nerd Ranch.
]]>In Part 1 of Bluetooth Low Energy on Android, we set up a BLE Server and Client and established a connection between them. In this second part, it’s time to take a look at how to work with GATT Characteristics to send and receive data.
Characteristics have various attributes, including a UUID, Properties, Permissions, and Value. Properties describe what can be done with the Characteristic, such as read, write, and notify. Permissions describe what should be allowed, e.g. read and write. As you will see, not all of these attributes are needed to achieve the functionality we want.
Let’s add a Characteristic that will allow Clients to send a message to the Server. The Server will reverse the message and send it back using a BLE Notification. Notifications allow the Client to know that a Characteristic’s value has changed. Add the Characteristic to our Server setup with write capabilities:
private void setupServer() {
    BluetoothGattService service = new BluetoothGattService(SERVICE_UUID,
        BluetoothGattService.SERVICE_TYPE_PRIMARY);
    BluetoothGattCharacteristic writeCharacteristic = new BluetoothGattCharacteristic(
            CHARACTERISTIC_UUID,
            BluetoothGattCharacteristic.PROPERTY_WRITE,
            BluetoothGattCharacteristic.PERMISSION_WRITE);
    service.addCharacteristic(writeCharacteristic);
    mGattServer.addService(service);
}
We now have a Characteristic setup that has write Properties and Permissions, with no read or notify. Let’s switch to the Client and try to find the Characteristic.
Discover Services
Back in our BluetoothGattCallback, once the Client connects and we receive a GATT_SUCCESS and STATE_CONNECTED, we now must discover the services of the GATT Server.
public void onConnectionStateChange(BluetoothGatt gatt, int status, int newState) {
    ...
    if (newState == BluetoothProfile.STATE_CONNECTED) {
        mConnected = true;
        gatt.discoverServices();
    } else if (newState == BluetoothProfile.STATE_DISCONNECTED) {
        ...
This will bring us to the next callback we must implement, onServicesDiscovered.
public void onServicesDiscovered(BluetoothGatt gatt, int status) {
    super.onServicesDiscovered(gatt, status);
    if (status != BluetoothGatt.GATT_SUCCESS) {
        return;
    }
}
Just as you did before, check the status and return if it is not successful. If the discovery services was successful, we can now look for our Characteristic. Since we know the full UUID of both the Service and the Characteristic, we can access them directly.
public void onServicesDiscovered(BluetoothGatt gatt, int status) {
        ...
        return;
    }
    BluetoothGattService service = gatt.getService(SERVICE_UUID);
    BluetoothGattCharacteristic characteristic = service.getCharacteristic(CHARACTERISTIC_UUID);
}
Now that we have found our Characteristic, we need to set the write type and enable notifications.
public void onServicesDiscovered(BluetoothGatt gatt, int status) {
    ...
    BluetoothGattCharacteristic characteristic = service.getCharacteristic(CHARACTERISTIC_UUID);
    characteristic.setWriteType(BluetoothGattCharacteristic.WRITE_TYPE_DEFAULT);
    mInitialized = gatt.setCharacteristicNotification(characteristic, true);
}
mInitialized is used to signify that our Characteristic is fully ready for use.
Without reaching this point, the Characteristic would not have the correct write type or notify us when there is a change. Make sure to set this to false when disconnecting from the GATT server. If you have added logs into each step, you should now be able to connect to the Server and see that the Client has initialized our Characteristic.
Characteristic Requests
Our Server now has a write Characteristic, the Client is connected, has found the Characteristic, and has signed up for notifications. However, the Server now needs to know what to do when a write request is received. Let’s take a look at BluetoothGattServerCallback.onCharacteristicWriteRequest:
public void onCharacteristicWriteRequest(BluetoothDevice device,
                                         int requestId,
                                         BluetoothGattCharacteristic characteristic,
                                         boolean preparedWrite,
                                         boolean responseNeeded,
                                         int offset,
                                         byte[] value) {
    super.onCharacteristicWriteRequest(device,
            requestId,
            characteristic,
            preparedWrite,
            responseNeeded,
            offset,
            value);
    if (characteristic.getUuid().equals(CHARACTERISTIC_UUID)) {
        mGattServer.sendResponse(device, requestId, BluetoothGatt.GATT_SUCCESS, 0, null);
    }
}
First, we check to see if the UUID matches our Characteristic. Next, we send a Success response letting the Client know that the write request was received. Note that we do not need to check the Characteristic’s permissions, because the GATT server has already done so. Now let’s reverse the value of the Characteristic to differentiate the response from the request.
public void onCharacteristicWriteRequest(BluetoothDevice device, ...) {
        ...
        mGattServer.sendResponse(device, requestId, BluetoothGatt.GATT_SUCCESS, 0, null);
        int length = value.length;
        byte[] reversed = new byte[length];
        for (int i = 0; i < length; i++) {
            reversed[i] = value[length - (i + 1)];
        }
    }
}
After setting the Characteristic’s new value, we tell mGattServer to notify all connected devices for this characteristic.
public void onCharacteristicWriteRequest(BluetoothDevice device, ...) {
            ...
            reversed[i] = value[length - (i + 1)];
        }
        characteristic.setValue(reversed);
        for (BluetoothDevice device : mDevices) {
            mGattServer.notifyCharacteristicChanged(device, characteristic, false);
        }
    }
}
The final parameter is used to require confirmation of notification receipt.
This is used for Indications, but not for Notifications so we pass false.
Note: Since our Characteristic does not have read Permission, we do not have to implement
onCharacteristicReadRequest, but it would be handled similarly toonCharacteristicWriteRequest.
Sending Data
Now that the Server is ready to handle our write request, let’s send a message! First wire up an EditText for user input and a Button to send the data. Before doing anything, make sure we are connected and our Characteristic is initialized. Then find our Characteristic and send the message.
private void sendMessage() {
    if (!mConnected || !mEchoInitialized) {
        return;
    }
    BluetoothGattService service = gatt.getService(SERVICE_UUID);
    BluetoothGattCharacteristic characteristic = service.getCharacteristic(CHARACTERISTIC_UUID);
    String message = mBinding.messageEditText.getText().toString();
}
In order to send the data we must first convert our String to byte[].
private void sendMessage() {
    ...
    String message = mBinding.messageEditText.getText().toString();
    byte[] messageBytes = new byte[0];
    try {
        messageBytes = message.getBytes("UTF-8");
    } catch (UnsupportedEncodingException e) {
        Log.e(TAG, "Failed to convert message string to byte array");
    }
}
Now set the value on the Characteristic and our message will be sent!
private void sendMessage() {
        ...
        Log.e(TAG, "Failed to convert message string to byte array");
    }
    characteristic.setValue(messageBytes);
    boolean success = mGatt.writeCharacteristic(characteristic);
}
Optionally, we could implement BluetoothGattCallback.onCharacteristicWrite and add a log to see if the write was successful.
Reading Data
At this point the Server has our message, will reverse the bytes and send back a notification. The client needs to handle that in BluetoothGattCallback.onCharacteristicChanged. Start by getting the value from the Characteristic, then convert it to a String and log it out.
public void onCharacteristicChanged(BluetoothGatt gatt, BluetoothGattCharacteristic characteristic) {
    super.onCharacteristicChanged(gatt, characteristic);
    byte[] messageBytes = characteristic.getValue();
    String messageString = null;
    try {
        messageString = new String(bytes, "UTF-8");
    } catch (UnsupportedEncodingException e) {
        Log.e(TAG, "Unable to convert message bytes to string");
    }
    Log.d("Received message: " + messageString);
}
And voila, we have successfully sent a message between our BLE Server and Client!
Wrap
If you have tried sending a very long message, you may have noticed that it gets truncated. Characteristics have a Maximum Transmission Unit (MTU) of 20 bytes, thus anything more is silently dropped. You must either loop through the data to send in parts or the Client may requestMtu of a larger size if the GATT Server supports it.
As before, you can find the full source for this post on my public GitHub repository. Stay tuned… Next time, we will go into a more advanced BLE attribute: Descriptors. The GATT server must handle their use manually, and can quickly become complicated.
The post Bluetooth Low Energy on Android, Part 2 appeared first on Big Nerd Ranch.
]]>The post Bluetooth Low Energy on Android, Part 1 appeared first on Big Nerd Ranch.
]]>There are many resources available on Bluetooth on Android, but unfortunately many are incomplete snippets, use out-of-date concepts, or only explain half of the puzzle! In this series, we will learn how to set up both a Bluetooth Low Energy (BLE) Client and Server and demystify the Generic Attribute Profile (GATT) communication process.
Part 1 will focus on Server and Client setup and establishing a BLE connection. Let’s jump right in and begin building our app.
Prerequisites
To best understand BLE’s inner workings, you will need two phones. One will act as the Server, and the other as a Client.
Note: The Server will need to support BLE Peripheral Advertising. We will programmatically check for this, but device specifications may not list this functionality. The more recent the device, the better chance it will support advertising.
Since BLE support was added in Jelly Bean 4.3, we’ll use that as our minimum. Now add the necessary permissions to the manifest:
If the device is running Marshmallow or later, the user must also grant permissions at runtime.
Scanning
The first thing we need to be able to do is perform a basic Bluetooth scan. Create a ClientActivity and begin by checking if the device is BLE capable.
protected void onResume() {
    ...
    if (!getPackageManager().hasSystemFeature(PackageManager.FEATURE_BLUETOOTH_LE)) {
        finish();
    }
}
Bluetooth is very fickle, so be very strict when checking device capabilities to avoid complications.
For the previous and following requirements, its best to finish the activity or block the action if any are unmet. Now let’s get ahold of the BluetoothAdapter, which will allow us to perform basic BLE operations like our scan.
protected void onCreate(Bundle savedInstanceState) {
    ...
    BluetoothManager bluetoothManager = (BluetoothManager) getSystemService(BLUETOOTH_SERVICE);
    mBluetoothAdapter = bluetoothManager.getAdapter();
}
Add a few scan control buttons and attach listeners to our startScan and stopScan.
startScan is a good place to ensure that:
- we are not already scanning;
- Bluetooth is enabled; and
- we have access to fine location.
With a little extraction and organization, that looks something like this:
private void startScan() {
    if (!hasPermissions() || mScanning) {
        return;
    }
    // TODO start the scan
}
private boolean hasPermissions() {
    if (mBluetoothAdapter == null || !mBluetoothAdapter.isEnabled()) {
        requestBluetoothEnable();
        return false;
    } else if (!hasLocationPermissions()) {
        requestLocationPermission();
        return false;
    }
    return true;
}
private void requestBluetoothEnable() {
    Intent enableBtIntent = new Intent(BluetoothAdapter.ACTION_REQUEST_ENABLE);
    startActivityForResult(enableBtIntent, REQUEST_ENABLE_BT);
    Log.d(TAG, "Requested user enables Bluetooth. Try starting the scan again.");
}
private boolean hasLocationPermissions() {
    return checkSelfPermission(Manifest.permission.ACCESS_FINE_LOCATION) == PackageManager.PERMISSION_GRANTED;
}
private void requestLocationPermission() {
    requestPermissions(new String[]{Manifest.permission.ACCESS_FINE_LOCATION}, REQUEST_FINE_LOCATION);
}
We will need to fill out our startScan method by configuring ScanFilters, ScanSettings, and a ScanCallback.
For now, we will not filter anything from our scan.
This will return all broadcasting Bluetooth devices in the area, but will show the scan was successful.
Because this is a BLE application, set the scan mode to low power.
private void startScan() {
    ...
    List<ScanFilter> filters = new ArrayList<>();
    ScanSettings settings = new ScanSettings.Builder()
        .setScanMode(ScanSettings.SCAN_MODE_LOW_POWER)
        .build();
}
Create a ScanCallback to handle the results, and add a a map to store the results.
private void startScan() {
        ...
        .build();
    mScanResults = new HashMap<>();
    mScanCallback = new BtleScanCallback(mScanResults);
}
private class BtleScanCallback extends ScanCallback {
    @Override
    public void onScanResult(int callbackType, ScanResult result) {
        addScanResult(result);
    }
    @Override
    public void onBatchScanResults(List<ScanResult> results) {
        for (ScanResult result : results) {
            addScanResult(result);
        }
    }
    @Override
    public void onScanFailed(int errorCode) {
        Log.e(TAG, "BLE Scan Failed with code " + errorCode);
    }
    private void addScanResult(ScanResult result) {
        BluetoothDevice device = result.getDevice();
        String deviceAddress = device.getAddress();
        mScanResults.put(deviceAddress, device);
    }
};
Now grab hold of the BluetoothLeScanner to start the scan, and set our scanning boolean to true.
private void startScan() {
    ...
    mScanCallback = new BtleScanCallback(mScanResults);
    mBluetoothLeScanner = mBluetoothAdapter.getBluetoothLeScanner();
    mBluetoothLeScanner.startScan(filters, settings, mScanCallback);
    mScanning = true;
}
At this point, we have a Bluetooth scan that will save all ScanResults into a map.
These hold various useful pieces of information:
- BluetoothDevice: Name and address
- RSSI: Received signal strength indication
- Timestamp
- ScanRecord
- Advertisement Flags: Discoverable mode and cababilities of the device
- Manufacturer Specific Data: Info useful when filtering
- GATT Service UUIDs
So how long is the scan?
Currently it will run forever, so add a Handler to stop it after a specified time (in milliseconds).
private void startScan() {
    ...
    mScanning = true;
    mHandler = new Handler();
    mHandler.postDelayed(this::stopScan, SCAN_PERIOD);
}
To stop a scan, we use the same ScanCallback we used earlier.
It’s also good practice to avoid unneccessary calls, so protect the call with a few safety checks.
Now is also a good time to clean up any scan related variables.
private void stopScan() {
    if (mScanning && mBluetoothAdapter != null && mBluetoothAdapter.isEnabled() && mBluetoothLeScanner != null) {
        mBluetoothLeScanner.stopScan(mScanCallback);
        scanComplete();
    }

    mScanCallback = null;
    mScanning = false;
    mHandler = null;
}
scanComplete will perform any actions using the results, for now we can simply log out the devices found during the scan.
private void scanComplete() {
    if (mScanResults.isEmpty()) {
        return;
    }
    for (String deviceAddress : mScanResults.keySet()) {
        Log.d(TAG, "Found device: " + deviceAddress);
    }
}
Advertising
Now that we have a working BLE scanner, let’s create a GATT server for it to find.
The GATT describes how BLE devices communicate.
It has Services, which can have Charactacteristics, which can have Descriptors.
The GATT Server will broadcast its Services, which can be filtered by UUID.
Characteristics can then be accessed, again by UUID.
This is where we can read and write values, so let’s create a ServerActivity start configuring it.
Much like our Client, the device must have Bluetooth enabled and support low energy functionality.
protected void onCreate(Bundle savedInstanceState) {
    ...
    mBluetoothManager = (BluetoothManager) getSystemService(BLUETOOTH_SERVICE);
    mBluetoothAdapter = mBluetoothManager.getAdapter();
}
protected void onResume() {
    if (mBluetoothAdapter == null || !mBluetoothAdapter.isEnabled()) {
        Intent enableBtIntent = new Intent(BluetoothAdapter.ACTION_REQUEST_ENABLE);
        startActivity(enableBtIntent);
        finish();
        return;
    }
    if (!getPackageManager().hasSystemFeature(PackageManager.FEATURE_BLUETOOTH_LE)) {
        finish();
        return;
    }
}
We check these in onResume to ensure the user has not disabled BLE while the app was paused.
Last, we need to check that advertising is hardware supported before accessing the BluetoothLeAdvertiser.
protected void onResume() {
        ...
        return;
    }
    if (!mBluetoothAdapter.isMultipleAdvertisementSupported()) {
            finish();
            return;
        }
    mBluetoothLeAdvertiser = mBluetoothAdapter.getBluetoothLeAdvertiser();
}
Now create an empty GattServerCallback to extend BluetoothGattServerCallback and open the server.
We’ll fill it in later when after the server is setup.
protected void onResume() {
    ...
    mBluetoothLeAdvertiser = mBluetoothAdapter.getBluetoothLeAdvertiser();
    GattServerCallback gattServerCallback = new GattServerCallback();
    mGattServer = mBluetoothManager.openGattServer(this, gattServerCallback);
}
private class GattServerCallback extends BluetoothGattServerCallback {}
In the previous diagram, we now have the first piece in place.
Next, we need to add a Service to the server.
protected void onResume() {
    ...
    mGattServer = mBluetoothManager.openGattServer(this, gattServerCallback);
    setupServer();
}
private void setupServer() {
    BluetoothGattService service = new BluetoothGattService(SERVICE_UUID,
                    BluetoothGattService.SERVICE_TYPE_PRIMARY);
    mGattServer.addService(service);
}
The SERVICE_UUID is a unique identifier of your choosing that will ensure we are connecting to the correct GATT Server. We will add a Characteristic later, but we don’t need it at the moment.
Now we need to advertise the GATT server. First we will configure the AdvertiseSettings.
protected void onResume() {
    ...
    setupServer();
    startAdvertising();
}
private void startAdvertising() {
    if (mBluetoothLeAdvertiser == null) {
        return;
    }
    AdvertiseSettings settings = new AdvertiseSettings.Builder()
            .setAdvertiseMode(AdvertiseSettings.ADVERTISE_MODE_BALANCED)
            .setConnectable(true)
            .setTimeout(0)
            .setTxPowerLevel(AdvertiseSettings.ADVERTISE_TX_POWER_LOW)
            .build();
}
We will use a Balanced advertising mode, so that it will be quickly discoverable but not consume as much energy as Low Latency.
Connectable is true, because we want to pass data back and forth unlike a beacon.
Set Timeout to 0 to advertise forever, and use the Low Power Level setting since we are using BLE.
Note:
AdvertiseModerefers to how frequently the server will send out an advertising packet. Higher frequency will consume more energy, and low frequency will use less.TxPowerLeveldeals with the broadcast range, so a higher level will have a larger area in which devices will be able to find it.
For the AdvertiseData, we will need to parcel and set the Service UUID.
private void startAdvertising() {
            ...
            .build();
    ParcelUuid parcelUuid = new ParcelUuid(SERVICE_UUID);
    AdvertiseData data = new AdvertiseData.Builder()
            .setIncludeDeviceName(true)
            .addServiceUuid(parcelUuid)
            .build();
}
Including the Device Name is optional, but can be a quick and easy way to identify the server.
This could be the phone name or device number; it varies across devices.
We also need an AdvertiseCallback, but there is not much to do with it.
Its primary responsibility is to report if the server successfully started advertising.
It is also required to stop advertising, much like the ScanCallback.
Finally, let’s begin advertising.
private void startAdvertising() {
            ...
            .build();
    mBluetoothLeAdvertiser.startAdvertising(settings, data, mAdvertiseCallback);
}
private AdvertiseCallback mAdvertiseCallback = new AdvertiseCallback() {
    @Override
    public void onStartSuccess(AdvertiseSettings settingsInEffect) {
        Log.d(TAG, "Peripheral advertising started.");
    }

    @Override
    public void onStartFailure(int errorCode) {
        Log.d(TAG, "Peripheral advertising failed: " + errorCode);
    }
};
Thats all!
We now have a discoverable GATT server up and running.
But what if we wanted to stop it?
For several reasons (battery life is a primary concern), we should stop the server when our app is backgrounded.
protected void onPause() {
    super.onPause();
    stopAdvertising();
    stopServer();
}
private void stopServer() {
    if (mGattServer != null) {
        mGattServer.close();
    }
}
private void stopAdvertising() {
    if (mBluetoothLeAdvertiser != null) {
        mBluetoothLeAdvertiser.stopAdvertising(mAdvertiseCallback);
    }
}
Connect to GATT Server
Back in the ClientActivity, we can now add a filter for our GATT server’s Service UUID.
private void startScan() {
    ...
    List<ScanFilter> filters = new ArrayList<>();
    ScanFilter scanFilter = new ScanFilter.Builder()
            .setServiceUuid(new ParcelUuid(SERVICE_UUID))
            .build();
    filters.add(scanFilter);
    ScanSettings settings = new ScanSettings.Builder()
    ...
}
Now we should only have a single ScanResult.
We can then pull out the BluetoothDevice and connect to it.
private class BtleScanCallback extends ScanCallback {
    ...
    private void addScanResult(ScanResult result) {
        stopScan();
        BluetoothDevice bluetoothDevice = scanResult.getDevice();
        connectDevice(bluetoothDevice);
    }
}
private void connectDevice(BluetoothDevice device) {
    GattClientCallback gattClientCallback = new GattClientCallback();
    mGatt = device.connectGatt(this, false, gattClientCallback);
}
private class GattClientCallback extends BluetoothGattCallback { }
We pass in a Context, false for autoconnect and a BluetoothGattCallback.
Be careful when using autoconnect, as it could run rampant.
An active BLE interface with uncontrolled connection attempts will drain the battery and choke up the CPU, so its best to handle reconnections manually.
In our bluetoothGattCallback, let’s implement onConnectionStateChange so we can see the results of the connection.
This callback will have a GATT client, the connection status and the new connection state.
private class GattClientCallback extends BluetoothGattCallback {
    @Override
    public void onConnectionStateChange(BluetoothGatt gatt, int status, int newState) {
        super.onConnectionStateChange(gatt, status, newState);
        if (status == BluetoothGatt.GATT_FAILURE) {
            disconnectGattServer();
            return;
        } else if (status != BluetoothGatt.GATT_SUCCESS) {
            disconnectGattServer();
            return;
        }
        if (newState == BluetoothProfile.STATE_CONNECTED) {
            mConnected = true;
        } else if (newState == BluetoothProfile.STATE_DISCONNECTED) {
            disconnectGattServer();
        }
    }
}
If the status is Success, great!
We have successfully managed to not run into any issues while connecting, avoiding the various error states.
Update mConnected to match the newState, and disconnect if appropriate.
Any other status should be handled as an error and the client should be disconnected.
public void disconnectGattServer() {
    mConnected = false;
    if (mGatt != null) {
        mGatt.disconnect();
        mGatt.close();
    }
}
On our Server, we need to implement onConnectionStateChange in our BluetoothGattServerCallback to keep track of the connected devices.
private class GattServerCallback extends BluetoothGattServerCallback {
    @Override
    public void onConnectionStateChange(BluetoothDevice device, int status, int newState) {
        super.onConnectionStateChange(device, status, newState);
        if (newState == BluetoothProfile.STATE_CONNECTED) {
            mDevices.add(device));
        } else if (newState == BluetoothProfile.STATE_DISCONNECTED) {
            mDevices.remove(device));
        }
    }
}
Here we are simply adding and removing devices from a list based on the newState.
What’s Next
Congratulations!
We now have a BLE Server and Client that can connect.
You can find the full source for this post on my public GitHub repository. And now, a few words of advice if you are having problems getting your Server and Client setup.
Due to the asynchronous nature of callbacks, I recommend adding logs everywhere.
The BLE callbacks have very little tolerance for delay, and stepping through with debugger will cause problems.
This is why it’s important to do as little work in the callback as possible.
Consider using a Handler to send all variables to a listener interface.
Remember to treat almost everything other than Success as a failure.
Always disconnect when:
- Status is failure
- Status is not success
- State is disconnected
And finally, if you run into a problem with either Server or Client not connecting or displaying any other weirdness, you should simply power cycle. Many times the device’s Bluetooth will reach an unrecoverable state and need to be disabled and re-enabled.
In Part 2 of this series, we will add the ability to send data between the Client and Server, so look out for that post soon. Happy coding!
The post Bluetooth Low Energy on Android, Part 1 appeared first on Big Nerd Ranch.
]]>Google has graciously provided us with a `MapFragment` that can easily be added to any Activity, but what if you don't want a full `Fragment`, or want to add a `MapView` to a `RecyclerView`?
The post Embedding Custom Views with MapView V2 appeared first on Big Nerd Ranch.
]]>MapView! You can see a GoogleMap inside of it! Find your location! Pan! Zoom! Unzoom! There are too many amazing features to talk about. We should add one to our app like… now.
Google has graciously provided us with a MapFragment that can easily be added to any Activity, but what if you don’t want a full Fragment, or you want to add a MapView to a RecyclerView?
The Easy Way
First add the maps dependency:
compile 'com.google.android.gms:play-services-maps:6.5.87'
And add this fragment into your activity layout:
<fragment xmlns:android="http://schemas.android.com/apk/res/android"
          android:id="@+id/activity_fragment_mapview"
          android:layout_width="match_parent"
          android:layout_height="match_parent"
          android:name="com.google.android.gms.maps.MapFragment"/>
You’ll end up with this:

You’re welcome. Post over, right?
No! You should yearn for more.
You now have a Fragment that wraps an instance of a MapView. That’s neat and all, but what can you do with it? Anything you want! As long as you enjoy using Activities, everything is fine and dandy.
Fragments 4 Evar!
But here at the Ranch, Fragments are all the rage, and we prefer to have the majority of the controller and view logic in the Fragment when possible. If you use support fragments like we do, you will want to use SupportMapFragment instead of MapFragment. It gives you the exact same result, but subclasses the support Fragment class instead.
At this point, you now have a full screen MapView, but not many options for customizing the view. Adding additional views around the <fragment> tag gets messy. What if you only want a MapView, not a whole Fragment? Why not just use it directly?
DIY MapViews
The docs will tell you that the MapView resides in the com.google.android.gms.maps package. Let’s create a simple layout for your host fragment.
<LinearLayout xmlns:android="http://schemas.android.com/apk/res/android"
              android:layout_width="match_parent"
              android:layout_height="match_parent"
              android:orientation="vertical">

    <TextView
        android:layout_width="match_parent"
        android:layout_height="0dp"
        android:layout_weight="1"
        android:text="@string/header"
        style="@style/LargeTextViewCentered"/>

    <!-- Note: We use a reverse DNS naming style
          ie: fragment (layout type)
              + embedded_map_view (name)
              + (optional view name if only one)
              + mapview (view object type) -->
    <com.google.android.gms.maps.MapView
        android:id="@+id/fragment_embedded_map_view_mapview"
        android:layout_width="match_parent"
        android:layout_height="0dp"
        android:layout_weight="1"/>

    <TextView
        android:layout_width="match_parent"
        android:layout_height="0dp"
        android:layout_weight="1"
        android:text="@string/footer"
        style="@style/LargeTextViewCentered"/>

</LinearLayout>
Running the app, you get… Nothing?

Double checking the XML, it looks like there should be a map between the header and footer TextViews. Consult the docs again and… Oh. It looks like the MapView needs to have the Activity / Fragment lifecycle methods sent to it.
The docs suggest sending onCreate, onResume, onPause, onDestroy, onSaveInstanceState and onLowMemory. Let’s try wiring those up.
protected MapView mMapView;

@Override
public void onResume() {
    super.onResume();
    if (mMapView != null) {
        mMapView.onResume();
    }
}

@Override
public void onPause() {
    if (mMapView != null) {
        mMapView.onPause();
    }
    super.onPause();
}

@Override
public void onDestroy() {
    if (mMapView != null) {
        try {
            mMapView.onDestroy();
        } catch (NullPointerException e) {
            Log.e(TAG, "Error while attempting MapView.onDestroy(), ignoring exception", e);
        }
    }
    super.onDestroy();
}

@Override
public void onLowMemory() {
    super.onLowMemory();
    if (mMapView != null) {
        mMapView.onLowMemory();
    }
}

@Override
public void onSaveInstanceState(Bundle outState) {
    super.onSaveInstanceState(outState);
    if (mMapView != null) {
        mMapView.onSaveInstanceState(outState);
    }
}
In onDestroy, we add a try/catch because sometimes the GoogleMap inside of the MapView is null, causing an exception. It’s unpredictable, so we can only guard against it. Since we are calling mMapView.onDestroy to allow it to clean up its possibly null GoogleMap, then our job is done and we can safely ignore the resulting exception.
All that’s left is to pass onCreate to mMapView. It doesn’t quite yet exist in the Fragment.onCreate, so let’s put it in the onCreateView.
@Override
public View onCreateView(LayoutInflater inflater, ViewGroup parent, Bundle savedInstanceState) {
    View view = inflater.inflate(R.layout.fragment_embedded_map_view, parent, false);
    mMapView = (MapView) view.findViewById(R.id.fragment_embedded_map_view_mapview);
    mMapView.onCreate(savedInstanceState);
    return view;
}
Success! We now have a MapView in our Fragment.

Man, that thing looks great! The best part is that you can now rearrange and access it just like any other View. Now call mMapView.getMapAsync(OnMapReadyCallback callback) and have fun with the map!
Get Fancy
So what else can you do with a MapView?
On a recent project, the client wanted maps in a RecyclerView. The tricky part here is that the MapView list item view will be created, reused and possibly destroyed at the RecyclerView’s discretion. Its lifecycle will be out of sync from the hosting Fragment. Let’s see what we can do to get this working.
First, create the view and setup the RecyclerView.
@Override
public View onCreateView(LayoutInflater inflater, ViewGroup parent, Bundle savedInstanceState) {
    View view = inflater.inflate(R.layout.fragment_recycler_view, parent, false);
    mRecyclerView = (RecyclerView) view.findViewById(R.id.fragment_recycler_view_recyclerview);
    mRecyclerView.setLayoutManager(new LinearLayoutManager(getActivity()));
    RecyclerViewMapViewAdapter recyclerViewAdapter = new RecyclerViewMapViewAdapter();
    mRecyclerView.setAdapter(recyclerViewAdapter);
    return view;
}
Now the Adapter:
private class RecyclerViewMapViewAdapter extends RecyclerView.Adapter<RecyclerView.ViewHolder> {

    @Override
    public int getItemCount() {
        return 10;
    }

    @Override
    public RecyclerView.ViewHolder onCreateViewHolder(ViewGroup parent, int viewType) {
        MapViewListItemView mapViewListItemView = new MapViewListItemView(getActivity());
        return new MapViewHolder(mapViewListItemView);
    }

    @Override
    public void onBindViewHolder(RecyclerView.ViewHolder holder, int position) {}
}
The MapViewHolder only holds onto our custom MapViewListItemView:
public class MapViewHolder extends RecyclerView.ViewHolder {

    private MapViewListItemView mMapViewListItemView;

    public MapViewHolder(MapViewListItemView mapViewListItemView) {
        super(mapViewListItemView);
        mMapViewListItemView = mapViewListItemView;
    }
}
And now the MapViewListItemView:
public class MapViewListItemView extends LinearLayout {

    protected MapView mMapView;

    public MapViewListItemView(Context context) {
        this(context, null);
    }

    public MapViewListItemView(Context context, AttributeSet attrs) {
        super(context, attrs);
        View view = LayoutInflater.from(getContext()).inflate(R.layout.list_item_map_view, this);
        mMapView = (MapView) view.findViewById(R.id.list_item_map_view_mapview);
        setOrientation(VERTICAL);
    }
}
The MapViewListItemView also contains a TextView as a simple divider, and to help you know where the MapView should be. Just to see what is working so far, let’s build and launch.

There should be MapViews underneath each of those “Text”s. So just like before, lifecycle events need to be forwarded from the hosting fragment to each MapViewListItemView. Start by giving MapViewListItemView a few methods to pass each event on to its MapView.
public void mapViewOnCreate(Bundle savedInstanceState) {
    if (mMapView != null) {
        mMapView.onCreate(savedInstanceState);
    }
}
public void mapViewOnResume() {
    if (mMapView != null) {
        mMapView.onResume();
    }
}
...
You get the idea. Now, when should these be called? We create each MapViewListItemView in onCreateViewHolder where we stored it into a MapViewHolder. We need to call MapView.onCreate here, but it needs a savedInstanceState. It will probably be used to save map settings like zoom and pan, but let’s not worry about that just yet and attempt to pass null.
public RecyclerView.ViewHolder onCreateViewHolder(ViewGroup parent, int viewType) {
    MapViewListItemView mapViewListItemView = new MapViewListItemView(getActivity());
    mapViewListItemView.mapViewOnCreate(null);
    return new MapViewHolder(mapViewListItemView);
}
Great! Now the MapView needs to know when to resume.
onBind is when the view is setup after a recycle, but we need to call through the MapViewHolder.
public void mapViewListItemViewOnResume() {
    if (mMapViewListItemView != null) {
        mMapViewListItemView.mapViewOnResume();
    }
}
And now use it:
public void onBindViewHolder(RecyclerView.ViewHolder holder, int position) {
    MapViewHolder mapViewHolder = (MapViewHolder) holder;
    mapViewHolder.mapViewListItemViewOnResume();
}
Let’s see if there is a map or two.

Excellent! What of the other lifecycle methods? Surely those are needed as well? They may be unnecessary, but the docs recommend it.
In order to do this, add the MapViewListItemView to a List in onCreateViewHolder. Then on each Fragment lifecycle event we attempt to call into all views. Bear in mind that although this is a very rudimentary approach, it complies with the docs.
@Override
public void onResume() {
    super.onResume();
    for (MapViewListItemView view : mMapViewListItemViews) {
        view.mapViewOnResume();
    }
}

@Override
public void onPause() {
    for (MapViewListItemView view : mMapViewListItemViews) {
        view.mapViewOnPause();
    }
    super.onPause();
}

@Override
public void onDestroy() {
    for (MapViewListItemView view : mMapViewListItemViews) {
        view.mapViewOnDestroy();
    }
    super.onDestroy();
}

@Override
public void onLowMemory() {
    super.onLowMemory();
    for (MapViewListItemView view : mMapViewListItemViews) {
        view.mapViewOnLowMemory();
    }
}

@Override
public void onSaveInstanceState(Bundle outState) {
    super.onSaveInstanceState(outState);
    for (MapViewListItemView view : mMapViewListItemViews) {
        view.mapViewOnSaveInstanceState(outState);
    }
}
Gotchas
You may notice that sometimes the GoogleMap has not started by the time you need it. This is a common problem, and it can be fixed by adding MapsInitializer.initialize to your Fragment.onCreate. This will ensure the Google Maps Android API has been started in time for your maps. It will also set up map-related classes and allow you to access them before the GoogleMap is finished initializing. You may be wondering why we passed null into our mapViewListItemView.mapViewOnCreate, because this gives the MapView nowhere to save any customizations.
Customizations will be lost during low memory or orientation changes. These include map markers, camera location, zoom levels, etc. To avoid this undesired behavior, you will need a rather complex system of Bundle management. Each Adapter item position will need its own Bundle, not just every view or holder. The MapView’s state will need to be saved each time the view is detached and recycled, and also during Fragment.onSaveInstanceState for the ones that are still visible.
If, for some reason, you choose to pass the host Fragments savedInstanceState to the MapView, be warned that there could be issues. If any non-MapView related data is saved by you, a library, or even a Google view class (i.e., RecyclerView) into the Bundle, it will need to be “sanitized.” It would seem that the MapView attempts to walk through all the information in the savedInstanceState and instantiate it, which can manifest as a ClassNotFoundException or BadParcelableException. If this happens, you will need to remove the data from the Bundle before passing it on to the MapView.onCreate.
The post Embedding Custom Views with MapView V2 appeared first on Big Nerd Ranch.
]]>As the Android community grows, so does the vast offering of available third-party libraries. Utilizing them allows developers to quickly and easily expand the capabilities of an app. We love it, users love it, until suddenly: the mysterious compile error.
The post I Like Big Apps and I Cannot Lie: Using ProGuard to Avoid the Dalvik Method Limit appeared first on Big Nerd Ranch.
]]>As the Android community grows, so does the vast offering of available third-party libraries. Utilizing them allows developers to quickly and easily expand the capabilities of an app. We love it, users love it, until suddenly: the mysterious compile error.
Unable to execute dex: method ID not in [0, 0xffff]: 65536
Conversion to Dalvik format failed: Unable to execute dex: method ID not in [0, 0xffff]: 65536
Or the new version:
trouble writing output:
Too many field references: 131000; max is 65536.
You may try using --multi-dex option.
The usual clean-and-build approach doesnt work, nor does restarting the ever-stable Android Studio. After a quick search, you will have probably found that you’ve hit quite the wall. You have encountered the infamous Dalvik method limit. As seen above, that limit is 65,536 methods. This count includes not just your code, but each third-party method you call upon.
So how do you know exactly what is eating into that number? One of my favorite tools is dex-method-counts. It runs on the APK from your application, so unfortunately you may need to undo the previous work that pushed you over the limit. Running it on my current project reports the number of methods in each package.
Processing app-dev-debug-0.1-debug.apk
Read in 63286 method IDs.
<root>: 63286
    : 6
    android: 17005
        support: 13532
    butterknife: 182
    com: 33637
        bignerdranch: 625
        facebook: 3318
        google: 12464
            android: 10592
                gms: 10592
            gson: 964
            maps: 402
        jumio: 2421
        mobileapptracker: 565
        mobsandgeeks: 211
            saripaar: 211
        newrelic: 3100
        myproject: 8315
        squareup: 2198
            okhttp: 1625
            picasso: 536
    dagger: 268
    de: 186
        greenrobot: 186
    io: 569
        branch: 569
    java: 1562
    javax: 134
    jumiomobile: 3047
    okio: 461
    org: 5256
        joda: 4711
        json: 66
    retrofit: 494
Overall method count: 63286
Before you try to count all of these, know that the output has been trimmed to just the higher levels in order to save space. However, you can still see we are using quite a few libraries and are about to go over the Dalvik limit. If development is to continue, what can we do?
ProGuard to the Rescue!
Short of removing libraries and their related features (lol) or combining methods (gross, no), we are left with ProGuard. Now you might say “Hey! What about the fancy new Multidex option?” You could use Multidex, but it’s more of a band-aid than a magic solution. While it has its own support library for pre-Lollipop Android, there are a few known issues. These can include applications not starting or responding, random out of memory crashes, or library incompatibilities with a secondary dex file. These all sound like an unpleasant experience for our users!
So what does ProGuard do exactly? The Android Developers page sums it up best:
The ProGuard tool shrinks, optimizes, and obfuscates your code by removing unused code and renaming classes, fields, and methods with semantically obscure names.
That sounds exactly like what we need; awesome! When using Gradle, we can turn it on by adding the example code into our build type in the app build.gradle:
minifyEnabled true
proguardFiles getDefaultProguardFile('proguard-android.txt'), 'proguard-rules.pro'
Build and ship! …Right? Sadly, no.
Warning:butterknife.internal.ButterKnifeProcessor: can't find superclass or interface javax.annotation.processing.AbstractProcessor
Warning:retrofit.RxSupport$1: can't find superclass or interface rx.Observable$OnSubscribe
Warning:library class dagger.internal.codegen.GraphAnalysisErrorHandler extends or implements program class dagger.internal.Linker$ErrorHandler
Warning:library class dagger.internal.codegen.GraphAnalysisInjectBinding extends or implements program class dagger.internal.Binding
    - trimmed 3 more similar lines -
Warning:butterknife.internal.ButterKnifeProcessor: can't find referenced class javax.annotation.processing.AbstractProcessor
    - trimmed 34 more similar lines -
Warning:butterknife.internal.ButterKnifeProcessor: can't find referenced field 'javax.annotation.processing.ProcessingEnvironment processingEnv' in program class butterknife.internal.ButterKnifeProcessor
Warning:butterknife.internal.ButterKnifeProcessor: can't find referenced class javax.annotation.processing.ProcessingEnvironment
    - trimmed 100 more similar lines -
Warning:com.squareup.okhttp.internal.huc.HttpsURLConnectionImpl: can't find referenced method 'long getContentLengthLong()' in program class com.squareup.okhttp.internal.huc.HttpURLConnectionImpl
Warning:com.squareup.okhttp.internal.huc.HttpsURLConnectionImpl: can't find referenced method 'long getHeaderFieldLong(java.lang.String,long)' in program class com.squareup.okhttp.internal.huc.HttpURLConnectionImpl
Warning:okio.DeflaterSink: can't find referenced class org.codehaus.mojo.animal_sniffer.IgnoreJRERequirement
Warning:okio.Okio: can't find referenced class java.nio.file.Files
    - trimmed 10 more similar lines -
Warning:retrofit.RestMethodInfo$RxSupport: can't find referenced class rx.Observable
    - trimmed 15 more similar lines -
Warning:retrofit.appengine.UrlFetchClient: can't find referenced class com.google.appengine.api.urlfetch.HTTPMethod
    - trimmed 36 more similar lines -
Warning:there were 266 unresolved references to classes or interfaces.
         You may need to add missing library jars or update their versions.
         If your code works fine without the missing classes, you can suppress
         the warnings with '-dontwarn' options.
         (http://proguard.sourceforge.net/manual/troubleshooting.html#unresolvedclass)
Warning:there were 7 instances of library classes depending on program classes.
         You must avoid such dependencies, since the program classes will
         be processed, while the library classes will remain unchanged.
         (http://proguard.sourceforge.net/manual/troubleshooting.html#dependency)
Warning:there were 3 unresolved references to program class members.
         Your input classes appear to be inconsistent.
         You may need to recompile the code.
         (http://proguard.sourceforge.net/manual/troubleshooting.html#unresolvedprogramclassmember)
:app:proguardDevDebug FAILED
Error:Execution failed for task ':app:proguardDevDebug'.
> java.io.IOException: Please correct the above warnings first.
Information:BUILD FAILED
Information:Total time: 20.137 secs
Information:1 error
Information:207 warnings
Now what do we do? The obvious answer is to crawl the web, but let’s see if we can decipher some of these messages. It would seem that we ProGuard’d a little too hard, and it has removed many files/methods that our app still needs. If you remember, we told ProGuard to use proguard-rules.pro. This file can be used to protect files, packages, fields, annotations and all sorts of things from being removed during the shrinking process. It can also be used to quiet warnings we know to be false.
We can see that there are a lot of problems related to Butter Knife, so let’s tackle that one first. We know that Butter Knife uses annotations, so we need to keep those.
-keepattributes *Annotation*
And we should probably keep the library intact by not removing anything that is in the butterknife package.
-keep class butterknife.** { *; }
If you have read up on how Butter Knife internals work or poked around in your output files, you would have found out that it generates classes that it accesses via reflection in order to connect your views. ProGuard cannot figure this out, so we must tell it to keep the classes named MyClass$$ViewInjector.
-keep class **$$ViewInjector { *; }
These next two are not as straightforward, but related to the previous reflection process. We need to keep all fields and methods that Butter Knife may use to access the generated injection class.
-keepclasseswithmembernames class * {
    @butterknife.* <fields>;
}
-keepclasseswithmembernames class * {
    @butterknife.* <methods>;
}
And finally, you will notice lots of repeated internal errors:
Warning:butterknife.internal.ButterKnifeProcessor: can't find referenced class javax.lang.model.type.DeclaredType
Warning:butterknife.internal.ButterKnifeProcessor: can't find referenced class javax.lang.model.element.TypeElement
Warning:butterknife.internal.ButterKnifeProcessor: can't find referenced class javax.lang.model.type.TypeMirror
Warning:butterknife.internal.ButterKnifeProcessor: can't find referenced class javax.lang.model.SourceVersion
Warning:butterknife.internal.ButterKnifeProcessor: can't find referenced class javax.lang.model.element.Element
According to ProGuard documentation:
If the missing class is referenced from a pre-compiled third-party library, and your original code runs fine without it, then the missing dependency doesn’t seem to hurt.
Unfortunately, this isn’t an answer with much logic. We now have two options: assume we need the missing class and keep it, or gamble. Since the goal is to remove unused code in order to pull us back from the Dalvik limit, I always attempt to ignore the warning first. This method requires thorough testing to be sure that nothing is broken and should be used with caution.
-dontwarn butterknife.internal.**
Building with these new rules will give us the following:
Warning:retrofit.RxSupport$1: can't find superclass or interface rx.Observable$OnSubscribe
Warning:library class dagger.internal.codegen.GraphAnalysisErrorHandler extends or implements program class dagger.internal.Linker$ErrorHandler
    - trimmed 5 more similar lines -
Warning:com.squareup.okhttp.internal.huc.HttpsURLConnectionImpl: can't find referenced method 'long getContentLengthLong()' in program class com.squareup.okhttp.internal.huc.HttpURLConnectionImpl
Warning:com.squareup.okhttp.internal.huc.HttpsURLConnectionImpl: can't find referenced method 'long getHeaderFieldLong(java.lang.String,long)' in program class com.squareup.okhttp.internal.huc.HttpURLConnectionImpl
Warning:okio.DeflaterSink: can't find referenced class org.codehaus.mojo.animal_sniffer.IgnoreJRERequirement
Warning:okio.Okio: can't find referenced class java.nio.file.Files
    - trimmed 10 more similar lines -
Warning:retrofit.RestMethodInfo$RxSupport: can't find referenced class rx.Observable
    - trimmed 15 more similar lines -
Warning:retrofit.appengine.UrlFetchClient: can't find referenced class com.google.appengine.api.urlfetch.HTTPMethod
    - trimmed 36 more similar lines -
Warning:there were 93 unresolved references to classes or interfaces.
         You may need to add missing library jars or update their versions.
         If your code works fine without the missing classes, you can suppress
         the warnings with '-dontwarn' options.
         (http://proguard.sourceforge.net/manual/troubleshooting.html#unresolvedclass)
Warning:there were 7 instances of library classes depending on program classes.
         You must avoid such dependencies, since the program classes will
         be processed, while the library classes will remain unchanged.
         (http://proguard.sourceforge.net/manual/troubleshooting.html#dependency)
Warning:there were 2 unresolved references to program class members.
         Your input classes appear to be inconsistent.
         You may need to recompile the code.
         (http://proguard.sourceforge.net/manual/troubleshooting.html#unresolvedprogramclassmember)
:app:proguardDevDebug FAILED
Error:Execution failed for task ':app:proguardDevDebug'.
> java.io.IOException: Please correct the above warnings first.
Information:BUILD FAILED
Information:Total time: 24.352 secs
Information:1 error
Information:75 warnings
We’ve gone from 207 warnings down to 75; much better! But we still need to sort out the rest of the issues. Let’s try addressing the Retrofit issues, and start by keeping the library.
-keep class retrofit.** { *; }
Retrofit also uses annotated methods, but we have already added that rule for Butter Knife. But these methods could be removed by ProGuard because they have no obvious uses.
-keepclasseswithmembers class * {
    @retrofit.http.* <methods>;
}
Retrofit utilizes Gson for serialization, and it needs the generic type information to be kept.
-keepattributes Signature
-keep class com.google.gson.** { *; }
Now add some rules for OkHttp.
-keep class com.squareup.okhttp.** { *; }
-keep interface com.squareup.okhttp.** { *; }
Much like Butter Knife, we have lots of duplicate warnings.
Warning:okio.Okio: can't find referenced class java.nio.file.OpenOption
Warning:okio.Okio: can't find referenced class org.codehaus.mojo.animal_sniffer.IgnoreJRERequirement
Warning:retrofit.RxSupport$1: can't find referenced class rx.Observable$OnSubscribe
Warning:retrofit.RxSupport$2: can't find referenced class rx.Subscriber
Warning:retrofit.appengine.UrlFetchClient: can't find referenced class com.google.appengine.api.urlfetch.HTTPMethod
Warning:retrofit.appengine.UrlFetchClient: can't find referenced class com.google.appengine.api.urlfetch.URLFetchServiceFactory
These look to be internal or third party library warnings, so let’s try ignoring them.
-dontwarn com.squareup.okhttp.internal.huc.**
-dontwarn retrofit.appengine.UrlFetchClient
-dontwarn rx.**
-dontwarn okio.**
Let’s try running it now.
Warning:library class dagger.internal.codegen.GraphAnalysisErrorHandler extends or implements program class dagger.internal.Linker$ErrorHandler
    - trimmed 5 more similar lines -
Warning:there were 7 instances of library classes depending on program classes.
         You must avoid such dependencies, since the program classes will
         be processed, while the library classes will remain unchanged.
         (http://proguard.sourceforge.net/manual/troubleshooting.html#dependency)
:app:proguardDevDebug FAILED
Error:Execution failed for task ':app:proguardDevDebug'.
> java.io.IOException: Please correct the above warnings first.
Information:BUILD FAILED
Information:Total time: 7.491 secs
Information:1 error
Information:8 warnings
Only eight warnings left! Dagger seems to be the last library having problems. To resolve them, we’ll begin with adding the Dagger library and the methods it will use.
-keep class dagger.** { *; }
-keepclassmembers,allowobfuscation class * {
    @javax.inject.* *;
    @dagger.* *;
    <init>();
}
And also the generated classes it uses for reflection.
-keep class **$$ModuleAdapter
-keep class **$$InjectAdapter
-keep class **$$StaticInjection
If you noticed above, we kept javax.inject.* related methods, but we also need the rest of that library.
-keep class javax.inject.** { *; }
And lastly let’s again quiet the internal library warnings:
Warning:library class dagger.internal.codegen.GraphAnalysisLoader extends or implements program class dagger.internal.Loader
Warning:library class dagger.internal.codegen.GraphAnalysisProcessor$1 extends or implements program class dagger.internal.BindingsGroup
With the same ignore rule:
-dontwarn dagger.internal.codegen.**
Let’s try to run it and see. No warnings! 🙂 But it crashes immediately 🙁 Get used to seeing this with ProGuard when adding new libraries. Can you guess what we forgot? All the other libraries! We have Event Bus, New Relic, Jumio and Saripaar. Event bus will need to keep its onEvent and onEventMainThread methods, so let’s add a rule for that.
-keepclassmembers, includedescriptorclasses class ** {
    public void onEvent*(**);
}
-keepclassmembers, includedescriptorclasses class ** {
    public void onEventMainThread*(**);
}
New Relic (3100 methods) may contribute a noticible bump towards the Dalvik limit, but I am inclined to leave it alone since it is our app monitoring framework. It has (and will need) its own exceptions and inner classes in order to correctly report on our app. Not to mention that it can help debug issues that we might introduce via ProGuard.
-keep class com.newrelic.** { *; }
-dontwarn com.newrelic.**
-keepattributes Exceptions, InnerClasses
Jumio (2421 methods) isn’t all that big and Saripaar (211) is almost negligible, so let’s just keep all of them.
-keep class com.jumio.** { *; }
-keep class com.mobsandgeeks.saripaar.** {*;}
-keep class commons.validator.routines.** {*;}
Try running again… and still a crash?! What went wrong now—haven’t we accounted for everything? After more research, I found that Dagger 1.2.2 has issues with obfuscation. Which is fine, since our main goal was to shrink. Let’s turn off that step and see what happens.
-dontobfuscate
Success! The app successfully builds and launches. Now for the real test, checking the method count to see how many we removed.
Processing app-dev-debug-0.1-debug.apk
Read in 44413 method IDs.
<root>: 44413
    : 3
    android: 10379
        support: 7886
    butterknife: 182
    com: 25103
        bignerdranch: 485
        facebook: 1283
        google: 7117
            android: 5969
                gms: 5969
            gson: 964
            maps: 46
        jumio: 2421
        mobileapptracker: 256
        mobsandgeeks: 211
            saripaar: 211
        newrelic: 3100
        myproject: 7882
        squareup: 2071
            okhttp: 1625
            picasso: 412
    dagger: 268
    de: 66
        greenrobot: 66
    io: 444
        branch: 444
    java: 1378
    javax: 134
    jumiomobile: 3047
    okio: 341
    org: 2474
        joda: 1995
        json: 59
    retrofit: 494
Overall method count: 44413
We started with 63,286 methods and now have 44,413. Thats almost 20,000 methods removed! Upon closer inspection, some of the greatest savings were from the biggest libraries. You may have noticed that we didn’t account for them, either. Thankfully, Google and Facebook provide their own ProGuard rules internally, saving us a lot of work.
Our own myproject and bignerdranch packages were trimmed up quite a bit, which is great. If we wanted or needed to remove more methods, we could attempt to shrink a bit more aggressively. Instead of using entire package rules like -keep class com.library.** { *; } we could dig deeper and understand exactly which parts our app needs.
Regardless of what you choose to do next, these are great results for a first pass. As you may have seen, it took only 10-20 seconds to use ProGuard on an app that wouldn’t finish building. Ideally, you would turn on ProGuard only for release builds, but you may have to enable it for debugging as you add more libraries.
Of course, we need to thoroughly test the app to make sure there are no problems with the shrinking process, but we have freed up a lot of space. We can now add more libraries to make our app even better. Just remember to add the appropriate ProGuard rules when you do!
Full dex-method-counts and build outputs, as well as the final set of ProGuard rules can be found in this gist.
The post I Like Big Apps and I Cannot Lie: Using ProGuard to Avoid the Dalvik Method Limit appeared first on Big Nerd Ranch.
]]>